Yamaha HTR-6130BL Owner's Manual
Yamaha HTR-6130BL - 500 Watt Home Theater Receiver Manual
 |
UPC - 961613072931
View all Yamaha HTR-6130BL manuals
Add to My Manuals
Save this manual to your list of manuals |
Yamaha HTR-6130BL manual content summary:
- Yamaha HTR-6130BL | Owner's Manual - Page 1
U HTR-6130 AV Receiver OWNER'S MANUAL - Yamaha HTR-6130BL | Owner's Manual - Page 2
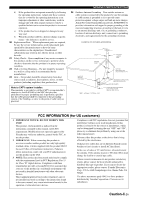
INSTRUCTIONS IMPORTANT SAFETY INSTRUCTIONS CAUTION RISK OF ELECTRIC SHOCK DO NOT OPEN CAUTION: TO REDUCE THE RISK OF ELECTRIC SHOCK, DO NOT REMOVE COVER (OR BACK). NO USER-SERVICEABLE PARTS INSIDE. REFER SERVICING TO QUALIFIED SERVICE and disconnect the antenna or cable system. This will prevent - Yamaha HTR-6130BL | Owner's Manual - Page 3
instructions contained in this manual, meets FCC requirements. Modifications not expressly approved by Yamaha may void your authority, granted by the FCC, to use the product. 2 IMPORTANT: When connecting this product to accessories and/or another product use only high quality shielded cables. Cable - Yamaha HTR-6130BL | Owner's Manual - Page 4
manual carefully. Keep it in a safe place for future reference. 2 Install this sound the user and cable Yamaha service personnel when any service Troubleshooting" section on common operating errors before concluding that this unit is faulty. 18 Before moving this unit, press ASTANDBY/ON to set digital - Yamaha HTR-6130BL | Owner's Manual - Page 5
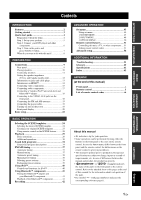
2 INPUT MENU 48 3 OPTION MENU 50 Remote control features 51 Controlling this unit, a TV, or other components.... 51 Setting remote control codes 53 Advanced setup 54 ADDITIONAL INFORMATION Troubleshooting 55 Glossary 60 Specifications 62 Index 63 APPENDIX (at the end of this manual) Front - Yamaha HTR-6130BL | Owner's Manual - Page 6
for various situations ◆ SCENE template customizing capability Decoders and DSP circuits ◆ Proprietary Yamaha technology for the creation of multi-channel surround sound ◆ Compressed Music Enhancer mode ◆ Dolby Digital decoder ◆ Dolby Pro Logic/Dolby Pro Logic II decoder ◆ DTS decoder ◆ Virtual - Yamaha HTR-6130BL | Owner's Manual - Page 7
with your local regulations. • If the remote control is without batteries for more than 2 minutes, or if exhausted batteries remain in the remote control, the contents of the memory may be cleared. When the memory is cleared, insert new batteries and set up the remote control code. English 3 En - Yamaha HTR-6130BL | Owner's Manual - Page 8
Front left speaker Front right speaker Subwoofer Surround right speaker Center speaker DVD player Surround left speaker Step 1: Set up your speakers ☞ P. 5 Step 2: Connect your DVD player and other components Preparation: Check the items Prepare the following items. ❏ Speakers ❏ Front speaker - Yamaha HTR-6130BL | Owner's Manual - Page 9
/CBL AUDIO DVR CD IN OUT L R R SUBWOOFER ANTENNA SPEAKERS SURROUND CENTER FRONT B R L R L AM GND FM 75 UNBAL. IN MD/ OUT (PLAY) CD-R (REC) OUTPUT SUB WOOFER R FRONT A L 1 Place your speakers and subwoofer in the room. 2 Connect speaker cables to each speaker. Quick start guide - Yamaha HTR-6130BL | Owner's Manual - Page 10
SUBWOOFER ANTENNA SPEAKERS SURROUND CENTER FRONT B R L R L AM GND FM 75 UNBAL. IN MD/ OUT (PLAY) CD-R (REC) OUTPUT SUB WOOFER R FRONT A L 3 Connect the video cable to the video input jack on your video monitor and the VIDEO MONITOR OUT jack on this unit. Video monitor AV receiver Make - Yamaha HTR-6130BL | Owner's Manual - Page 11
the volume. Check the type of the connected speakers. If the speakers are 6 ohm speakers, set "SP IMP." to "6ΩMIN" before using this unit (see page 12). 1 Turn on the video monitor and then set the input source selector of the video monitor to this unit. 2 Press ASTANDBY/ON on the front panel - Yamaha HTR-6130BL | Owner's Manual - Page 12
order to receive infrared signals from the remote control. ■ Adjusting the parameters of this unit • Optimizing the speaker parameters for your listening room (BASIC SETUP) ☞ P. 22 • Manually adjusting various parameters of this unit ☞ P. 43 • Setting the remote control ☞ P. 51 • Adjusting - Yamaha HTR-6130BL | Owner's Manual - Page 13
ANTENNA SPEAKERS SURROUND CENTER FRONT B R L R L AM GND FM 75 UNBAL. IN MD/ OUT (PLAY) CD-R (REC) OUTPUT SUB WOOFER R FRONT A L Connections 7 8 9 0 Name 1 DOCK terminal 2 COMPONENT VIDEO jacks 3 HDMI jacks 4 VIDEO jacks 5 ANTENNA terminals 6 SPEAKERS terminals 7 DIGITAL INPUT jacks - Yamaha HTR-6130BL | Owner's Manual - Page 14
Connections Placing speakers The speaker layout below shows the speaker setting we recommend. You can use it to enjoy CINEMA DSP and multi-channel audio sources. FL C FR 30˚ SL SR 60˚ SL 80˚ SR FR SW FL C SR SL Front left and right speakers (FL and FR) The front speakers are used for - Yamaha HTR-6130BL | Owner's Manual - Page 15
MULTI CH INPUT FRONT SURROUND CENTER L DVD DTV/CBL AUDIO DVR CD IN OUT L R R SUBWOOFER ANTENNA SPEAKERS SURROUND CENTER FRONT B R L R L AM GND FM 75 UNBAL. IN MD/ OUT (PLAY) CD-R (REC) OUTPUT SUB WOOFER R FRONT A L Subwoofer Right Left Front speakers (A) ■ Before connecting to - Yamaha HTR-6130BL | Owner's Manual - Page 16
Connections ■ Connecting to the FRONT A terminals 2 1 Red: positive (+) Black: negative (-) 3 Setting the speaker impedance (U.S.A. and Canada models only) Caution If you are to use 6 ohm speakers, set "SP IMP." to "6ΩMIN" as follows BEFORE using this unit. 1 Loosen the knob. 2 Insert the - Yamaha HTR-6130BL | Owner's Manual - Page 17
at the digital jacks are not output at the analog AUDIO OUT (REC) jacks. ■ Video jacks This unit has two types of video jacks. Connection depends on the availability of input jacks on your video monitor. VIDEO jacks For conventional composite video signals transmitted via composite video cables - Yamaha HTR-6130BL | Owner's Manual - Page 18
Information on HDMI™ Audio signals input at the HDMI jack are not output from any speaker terminals but output from the connected video monitor. To enjoy the sound from speakers connected to this unit, - make an analog or digital connection besides the HDMI connection (see page 16). - mute - Yamaha HTR-6130BL | Owner's Manual - Page 19
a DVD player ■ Connecting a cable TV/satellite tuner and a DVD recorder DOCK COMPONENT VIDEO DVD DTV/CBL DVR MONITOR OUT PR OUT DVD DTV/CBL HDMI DIGITAL INPUT PB OPTICAL Y CD 3 DTV/ CBL 2 COAXIAL DVD 1 DVD VIDEO DTV/CBL DVR IN OUT MONITOR OUT MULTI CH INPUT FRONT SURROUND CENTER - Yamaha HTR-6130BL | Owner's Manual - Page 20
to the COMPONENT VIDEO jacks Audio signals input at the HDMI jack are not output from any speaker terminals but output from the connected video monitor. To enjoy the sound from speakers connected to this unit, - make an analog or digital connection besides the HDMI connection (see page 15). - mute - Yamaha HTR-6130BL | Owner's Manual - Page 21
COAXIAL DVD 1 MULTI CH INPUT FRONT SURROUND CENTER L DVD DTV/CBL DVR IN L R R SUBWOOFER LR LR Notes • When you select the component connected to the MULTI CH INPUT jacks as the input source (see page 30), this unit automatically turns off the digital sound field processor, and you cannot - Yamaha HTR-6130BL | Owner's Manual - Page 22
SILENT CINEMA SPEAKERS A/B/OFF EDIT PRESET/TUNING BAND A/B/C/D/E TONE CONTROL 1 PROGRAM PRESET/TUNING SCENE 2 3 4 MEMORY TUNING AUTO/MAN'L STRAIGHT NIGHT INPUT AUDIO SELECT EFFECT VIDEO VIDEO AUX L AUDIO R PORTABLE DOCK COMPONENT VID DVD DTV/CBL DVR PR DIGITAL INPUT PB - Yamaha HTR-6130BL | Owner's Manual - Page 23
any polarity and you can connect either end of the wire to AM or GND terminal. Press ASTANDBY/ON (or E STANDBY) to set this unit to the standby mode. Note In the standby mode, this unit consumes a small amount of power in order to receive infrared signals from the remote control. English 19 En - Yamaha HTR-6130BL | Owner's Manual - Page 24
Lights up when this unit is reproducing PCM (Pulse Code Modulation) digital audio signals. A Headphones indicator Lights up when headphones are connected (see page 30). B SP A B indicators Light up according to the set of front speakers selected (see page 29). C NIGHT indicator Lights up when - Yamaha HTR-6130BL | Owner's Manual - Page 25
the remote control in the following types of conditions: - places of high humidity, such as near a bath - places of high temperature, such as near a heater or stove - places of extremely low temperatures - dusty places • To set the remote control codes for other components, see page 53. Connections - Yamaha HTR-6130BL | Owner's Manual - Page 26
all parameters manually adjusted in "SOUND MENU" (see page 45). • Initial settings are indicated in bold under each parameter. • Press 8RETURN on the remote control to return to the previous menu level. 1 Press 4AMP on the remote control. 2 Press HMENU. "BASIC SETUP" appears in the front panel - Yamaha HTR-6130BL | Owner's Manual - Page 27
display. CHECK:TestTone y • Check the speaker connections (see page 5) and adjust the "SPEAKERS" settings back in step 6, if necessary. • The indicator of the speaker currently outputting the test tone flashes in the front panel display. 9 Press 7l / h to select the desired setting. CHECK OK? ..YES - Yamaha HTR-6130BL | Owner's Manual - Page 28
various situations of using this unit. As the initial factory setting, the following SCENE templates are assigned to each SCENE button: to select the desired template. l INPUT h Front panel or AMP ENTER Select the desired SCENE template Remote control SCENE template library (Image) 1 - Yamaha HTR-6130BL | Owner's Manual - Page 29
TV Viewing 3 TV Sports Viewing Video games V-AUX Game Playing Note When iPod is connected to the Yamaha iPod universal dock or a Bluetooth component is connected to the Bluetooth adapter, this unit plays back the audio sources input at the DOCK terminal. y You can create your original SCENE - Yamaha HTR-6130BL | Owner's Manual - Page 30
Dock Listening Select this SCENE template when you play back music on your iPod stationed in a Yamaha iPod universal dock or Bluetooth component that is connected to the Bluetooth adapter. DOCK Music Enh. 5ch TV Viewing (SCENE 3 as the default setting) Select this SCENE template when you enjoy - Yamaha HTR-6130BL | Owner's Manual - Page 31
input source component • The active sound field programs or STRAIGHT mode • The night listening mode setting customizing display appears on the front panel display. 1 AMP 3 seconds Note When the SCENE you may need to set the input source of the SCENE template on the remote control. See page 28 - Yamaha HTR-6130BL | Owner's Manual - Page 32
both this unit and the input source component by using the remote control. You must set the appropriate remote control code for each input source in advance (see page 53). ■ Setting input source of the customized SCENE template on the remote control If you customize the input source of the selected - Yamaha HTR-6130BL | Owner's Manual - Page 33
, see page 32 for details. ■ Guide to contents When you want to... Adjust the tonal quality of the front speakers Edit parameters of sound field programs Enjoy the sources which have wide dynamic range at night Use headphones Select a decoder to play back sources with Set this unit to the standby - Yamaha HTR-6130BL | Owner's Manual - Page 34
analog audio cable plug to the PHONES jack on the front panel. ■ Selecting the front speaker set Press ISPEAKERS repeatedly to turn on or off the set of front speakers connected to the FRONT A or FRONT B speaker terminals. The active front speaker set changes as follows: FRONT A FRONT B VOLUME - Yamaha HTR-6130BL | Owner's Manual - Page 35
modes may vary in effectiveness depending on the input source and surround sound settings you use. ■ Adjusting the tonal quality Use this feature to adjust the balance of bass and treble for the front left and right speaker channels. Press JTONE CONTROL repeatedly to select "BASS" or "TREBLE" and - Yamaha HTR-6130BL | Owner's Manual - Page 36
remote control. "BASIC SETUP" appears in the front panel display. ;BASIC SETUP 2 Press 7k / n repeatedly to select "SIGNAL INFO" and then press 7ENTER. Display Adjusted speaker FRONT L Front left speaker FRONT R Front right speaker CENTER Center speaker SWFR Subwoofer SUR.L Surround left - Yamaha HTR-6130BL | Owner's Manual - Page 37
sound field program. y • To cancel the sleep timer, press OSLEEP on the remote control repeatedly until "SLEEP OFF" appears in the front panel display. • You can also cancel the sleep timer setting by pressing ASTANDBY/ON (or ESTANDBY) to set this unit to the standby mode. Playback ■ Playing - Yamaha HTR-6130BL | Owner's Manual - Page 38
of the selected sound field program appears in the front panel display. Notes • When you select an input source, this unit automatically selects the last sound field program used with the corresponding input source. • Sound field programs cannot be selected when the component connected to the MULTI - Yamaha HTR-6130BL | Owner's Manual - Page 39
signals to the surround speakers as well as the front speakers for a wraparound effect. OFF, ON Dimension DIMENSION Function: Gradually adjusts the sound field either towards the front or towards the rear. Control range: -3 (towards the rear) to +3 (towards the front), initial setting is STD - Yamaha HTR-6130BL | Owner's Manual - Page 40
Virtual CINEMA DSP allows you to enjoy the CINEMA DSP programs without surround speakers by creating virtual speakers. If you set "SUR. LR" to "NONE" (see page 47), Virtual CINEMA DSP is automatically activated whenever you select a sound field program (see page 34). Note Virtual CINEMA DSP will not - Yamaha HTR-6130BL | Owner's Manual - Page 41
is tuned into a station, the TUNED indicator lights up and the frequency of the received station is shown in the front panel display. Lights up A AM 1440 kHz No colon (:) If a colon (:) appears in the front panel display, manual tuning is not possible. Press BPRESET/TUNING to turn the colon (:) off - Yamaha HTR-6130BL | Owner's Manual - Page 42
manually. 1 Tune into a station automatically or manually. See page 37 for tuning instructions. 2 Press FMEMORY. The MEMORY indicator flashes in the front flashing. Check that the colon (:) appears in the front panel display preset station number where the first received station will be stored by - Yamaha HTR-6130BL | Owner's Manual - Page 43
y When performing this operation with the remote control, press 3TUNER to select "TUNER" as the input source. 1 Press DA/B/C/D/E (or 7A preset station number (1 to 8). The preset station group and number appear in the front panel display along with the station band and frequency. E1:FM 87.5 MHz y - Yamaha HTR-6130BL | Owner's Manual - Page 44
the Yamaha iPod universal dock, "iPod connected" and the DOCK indicator appears in the front panel display when "V-AUX" is selected as the input source. Controls and functions for iPod™ POWER POWER STANDBY POWER TV AV A B C MUTE CD MD/CD-R TUNER DVD DTV/CBL DVR TV CH V-AUX/DOCK D E AMP - Yamaha HTR-6130BL | Owner's Manual - Page 45
of 8 minutes is set for the pairing operation. You are recommended to read and fully understand all the instructions before starting. Note If the Bluetooth adapter is not connected to the DOCK terminal of this unit, "No BT adapter" appears in the front panel display. 4 Check that the Bluetooth - Yamaha HTR-6130BL | Owner's Manual - Page 46
of TONE CONTROL (see page 31) and VOLUME settings, speaker levels (see page 32) and the sound field programs (see page 34) do not affect recorded material. • The source connected to the MULTI CH INPUT jacks on this unit cannot be recorded. • Digital signals input at the DIGITAL INPUT jacks are - Yamaha HTR-6130BL | Owner's Manual - Page 47
or projectors. Parameter A)SPEAKER SET B)SP LEVEL C)SP DISTANCE D)CENTER GEQ E)LFE LEVEL F)D.RANGE G)AUDIO SET Features Selects the size of each speaker, the speakers for low-frequency signal output, the crossover frequency, and the location of the front speakers connected to the FRONT B terminals - Yamaha HTR-6130BL | Owner's Manual - Page 48
to check audio signal information (see page 32). Using set menu Use the remote control to access and adjust each parameter. y You can change the set menu parameters while this unit is reproducing sound. 1 Press 4AMP and then press HMENU on the remote control. "BASIC SETUP" appears in the front - Yamaha HTR-6130BL | Owner's Manual - Page 49
Set menu 1 SOUND MENU Use this menu to manually adjust any speaker settings or compensate for video signal processing delays when using LCD monitors or projectors. ■ Speaker settings A)SPEAKER SET Use this feature to manually adjust any speaker settings. FRONT B speaker setting FRONT B Use this - Yamaha HTR-6130BL | Owner's Manual - Page 50
■ Speaker level B)SP LEVEL Use this feature to manually adjust the output level of each speaker. Control range: -10 to +10 dB Control step: 1 dB Initial setting: 0 dB SP LEVEL FL FR C SL SR SWFR Adjusted speaker Front left speaker Front right speaker Center speaker Surround left speaker Surround - Yamaha HTR-6130BL | Owner's Manual - Page 51
) Control step: 0.10 m (0.5 ft) Initial setting: FRONT L/FRONT R/SWFR: 3.00 m (10.0 ft) CENTER: 2.60 m (8.5 ft) SUR. L/SUR. R: 2.40 m (8.0 ft) SP DISTANCE FRONT L FRONT R CENTER SUR. L SUR. R SWFR Adjusted speaker Front left speaker Front right speaker Center speaker Surround left speaker Surround - Yamaha HTR-6130BL | Owner's Manual - Page 52
to reassign the respective jacks and effectively connect more components. Once the input jacks are reassigned, you can select the corresponding component by using NINPUT l / h (or the input selector buttons (3) on the remote control). For DIGITAL INPUT COAXIAL jacks 1 IN (1) Choices: (1) CD, MD/CD - Yamaha HTR-6130BL | Owner's Manual - Page 53
V-AUX (DOCK), DVR, MULTI CH IN Control range: -6.0 to +6.0 dB Control step: 1.0 dB Initial setting: 0.0 dB ■ Decoder mode D)DECODER MODE Decoder select mode Use this feature to designate the default decoder mode for the input sources connected to the DIGITAL INPUT jacks when you turn on the power of - Yamaha HTR-6130BL | Owner's Manual - Page 54
- sound field program parameters - all set menu items - all speaker levels - SCENE template parameters Note When "MEM.GUARD" is set to "ON", you cannot select and adjust any other set menu items. ■ Audio select C)AUDIO SELECT Use this feature to designate the default audio input jack select setting - Yamaha HTR-6130BL | Owner's Manual - Page 55
source. TV MUTE Mutes the audio output. *2 These buttons control your TV only when 3DTV/CBL is pressed. For details, see the "Digital TV/Cable TV" column on page 52. y You can control more than one TV by setting the appropriate remote control code for any input source selector buttons other than - Yamaha HTR-6130BL | Owner's Manual - Page 56
6 7 8 MULTI CH IN AUDIO SEL 9 0 SLEEP 10 ENT [9] Remote control [1] AV POWER [2] TITLE [3] PRESET/CH k PRESET/CH n A/B/C/D/E l A/B/C/D/E h ENTER [4] RETURN [5] REC p w f e b a s [6] 1-9, 0, +10 [7] MENU [8] DISPLAY [9] ENT DVD player/recor VCR der Digital TV/ Cable TV LD player CD player - Yamaha HTR-6130BL | Owner's Manual - Page 57
by setting the appropriate remote control codes. For a complete list of available remote control codes, refer to "List of remote control codes" at the end of this manual. Remote control code default settings Input source Component category Manufacturer Default code CD CD Yamaha 5013 - Yamaha HTR-6130BL | Owner's Manual - Page 58
it matches that of your speakers. Choices: 8ΩMIN, 6ΩMIN • Select "8ΩMIN" to set the speaker impedance to 8 Ω . • Select "6ΩMIN" to set the speaker impedance to 6 Ω . SP IMP. Speaker Impedance level 8ΩMIN Front (A or B) Center Surround The impedance of each speaker must be 8 Ω or higher. 6ΩMIN - Yamaha HTR-6130BL | Owner's Manual - Page 59
play the source again. The sound is muted. Press FMUTE or IVOLUME +/- on the remote control to resume audio output. Incorrect cable connections. Connect the cables properly. If the problem persists, the cables may be defective. Incorrect settings in "SP LEVEL". Adjust the "SP LEVEL" settings - Yamaha HTR-6130BL | Owner's Manual - Page 60
digital signals. Audio input jack select is set to "ANALOG". Make an appropriate setting following the operating instructions for your component. Set Audio input jack select to "AUTO". A humming sound is Incorrect cable connections. heard. Connect the audio cables firmly. If the problem persists - Yamaha HTR-6130BL | Owner's Manual - Page 61
noisy. The characteristics of FM stereo broadcasts may cause this problem when the transmitter is too far away or the antenna input is poor. Check the antenna connections. Try using a high-quality directional FM antenna. Use the manual tuning method. There is distortion, and There is multi-path - Yamaha HTR-6130BL | Owner's Manual - Page 62
Troubleshooting ■ iPod Note In case of a transmission error without a status message appearing in the front panel display, check the connection to your iPod (see page 18). Status message Cause Remedy Connect error Unknown iPod iPod connected Disconnected There is a problem with the signal path - Yamaha HTR-6130BL | Owner's Manual - Page 63
than 30 degrees off-axis from the front panel. Reposition this unit. Replace all batteries. Set the remote control code correctly using "List of remote control codes" at the end of this manual. Try setting another code for the same manufacturer using "List of remote control codes" at the end of this - Yamaha HTR-6130BL | Owner's Manual - Page 64
Glossary Glossary ■ Audio information Dolby Digital Dolby Digital is a digital surround sound system that gives you completely independent multi-channel audio. With 3 front channels (front L/R and center), and 2 surround stereo channels, Dolby Digital provides 5 full-range audio channels. With an - Yamaha HTR-6130BL | Owner's Manual - Page 65
set for each sound field program so that accurate representations of all the sound field programs can be enjoyed on headphones. Virtual CINEMA DSP Yamaha has developed a Virtual CINEMA DSP algorithm that allows you to enjoy DSP surround effects even without any surround speakers component input jacks - Yamaha HTR-6130BL | Owner's Manual - Page 66
• Maximum Input Signal CD, etc. 1 kHz, 0.5%THD (EFFECT ON 2.0 V or more • Output Level/Output Impedance AUDIO OUT (REC 200 mV/1.2 kΩ SUBWOOFER OUTPUT (2ch Stereo and FRONT SP: SMALL 4 V/1.2 kΩ • Filter Characteristics (fc=40/60/80/90/100/110/120/160/200 Hz) H.P.F. (Front, Center, Surround 12 dB - Yamaha HTR-6130BL | Owner's Manual - Page 67
20 Front speakers 45 ■G G)AUDIO SET 48 Game 34 Game Playing 26 ■H Hall 34 HDMI 14 HDMI jack, HDMI cable plug 14 Headphone dynamic range 47 Headphone LFE 47 Headphones indicator 20 HP D.R 47 HP LFE 47 ■I Infrared window 21 INI.VOL 48 Initial volume 48 Initializing 54 Input assignment - Yamaha HTR-6130BL | Owner's Manual - Page 68
Setting input source of the customized SCENE template on the remote control 28 Setting remote control codes 53 Setting the speaker impedance 12 SIGNAL INFO 44 Signal information 44 SILENT CINEMA 36 SILENT CINEMA indicator 20 SLEEP indicator 20 Sleep timer 33 Sound field programs 34 Sound - Yamaha HTR-6130BL | Owner's Manual - Page 69
- Yamaha HTR-6130BL | Owner's Manual - Page 70
■ Front panel A BC D E FG H VOLUME STANDBY /ON PHONES SILENT CINEMA SPEAKERS A/B/OFF EDIT PRESET/TUNING BAND A/B/C/D/E TONE CONTROL 1 PROGRAM PRESET/TUNING SCENE 2 3 4 MEMORY TUNING AUTO/MAN'L STRAIGHT NIGHT INPUT AUDIO SELECT EFFECT VIDEO VIDEO AUX L AUDIO R PORTABLE I - Yamaha HTR-6130BL | Owner's Manual - Page 71
■ Remote control 1 2 3 4 5 6 7 POWER POWER STANDBY POWER TV AV A B C MUTE CD MD/CD-R TUNER DVD DTV/CBL DVR TV CH V-AUX/DOCK D E AMP TV INPUT TV MUTE TV VOL SCENE 1 2 3 4 BAND LEVEL TITLE MENU VOLUME ENTER 8 RETURN REC 9 DISPLAY 0 A B C l PROG h 1 2 ENHANCER SUR. DECODE - Yamaha HTR-6130BL | Owner's Manual - Page 72
List of remote control codes Blu-ray player Samsung 2137 CD player Yamaha 5000, 5013 CD Recorder Yamaha 5001 DVD Acoustic Solutions 2075 Denon 2030, 2102, 2103 Denver 2075, 2076 Diamond 2074 DK Digital 2094 Dual 2078 D-Vision 2096 DVX 2074 Elta 2096 Euroline 2096 Funai - Yamaha HTR-6130BL | Owner's Manual - Page 73
Akai 0059, 0065, 0127, 0129, 0130, 0200, 0204, 0208, 0209, 0213, 0217, 0218, 0255 Akiba 0209, 0218 Akura 0206, 0209, 0218 Alaron 0200 Alba 0200, 0207, 0208, 0209, 0217, 0218 ALBIRAL 0212 Allstar 0213 Amplivision 0207 Amstrad 0204, 0206, 0208, 0209, 0218 Amtron 0062 Anam 0208 - Yamaha HTR-6130BL | Owner's Manual - Page 74
, 0207, 0208, 0213, 0217 Sonolor 0211 Sontec 0213, 0217 Sony 0041, 0059, 0067, 0085, 0086, 0174, 0196, 0199, 0208, 0219, 0234 Sound & Vision 0209, 0218 Soundesign 0060, 0061, 0062 Soundwave 0213, 0217 SSS 0060, 0062 Standard 0207, 0208, 0209, 0213, 0218 Starlight 0217 Starlite - Yamaha HTR-6130BL | Owner's Manual - Page 75
0215 Wega 0205 Weltblick 0213, 0217 Weston 0215 White Westinghouse 0200, 0207, 0217 Yamaha 0000, 0001, 0002, 0003, 0004, 0005, 0060, 0061 Yamishi 0218 1046 Asha 1002, 1014 Asuka 1042, 1045, 1046, 1050 Audio Dynamics1000 Audiovox 1003 Baird 1042, 1043, 1047 Basic Line 1044, - Yamaha HTR-6130BL | Owner's Manual - Page 76
ELECTRONIQUE FRANCE S.A. RUE AMBROISE CROIZAT BP70 CROISSY-BEAUBOURG 77312 MARNE-LA-VALLEE CEDEX02, FRANCE YAMAHA ELECTRONICS (UK) LTD. YAMAHA HOUSE, 200 RICKMANSWORTH ROAD WATFORD, HERTS WD18 7GQ, ENGLAND YAMAHA SCANDINAVIA A.B. J A WETTERGRENS GATA 1, BOX 30053, 400 43 VÄSTRA FRÖLUNDA, SWEDEN - Yamaha HTR-6130BL | Owner's Manual - Page 77
those in the Owner's Manual. Les nombres et lettres dans un cercle correspondent à ceux du mode d'emploi. ■ Front panel/Face avant A BC D E UC HTR-6130 FG H VOLUME STANDBY /ON PHONES SILENT CINEMA SPEAKERS A/B/OFF EDIT PRESET/TUNING BAND A/B/C/D/E TONE CONTROL 1 PROGRAM PRESET/TUNING - Yamaha HTR-6130BL | Owner's Manual - Page 78
■ Remote control/Boîtier de télécommande 1 2 3 4 5 6 7 POWER POWER STANDBY POWER TV AV A B C MUTE CD MD/CD-R TUNER DVD DTV/CBL DVR TV CH V-AUX/DOCK D E AMP TV INPUT TV MUTE TV VOL SCENE 1 2 3 4 BAND LEVEL TITLE MENU VOLUME ENTER 8 RETURN REC 9 DISPLAY 0 A B C l PROG h 1 2
-
 1
1 -
 2
2 -
 3
3 -
 4
4 -
 5
5 -
 6
6 -
 7
7 -
8
-
9
-
10
-
11
-
12
-
13
-
14
-
15
-
16
-
17
-
18
-
19
-
20
-
21
-
22
-
23
-
24
-
25
-
26
-
27
-
28
-
29
-
30
-
31
-
32
-
33
-
34
-
35
-
36
-
37
-
38
-
39
-
40
-
41
-
42
-
43
-
44
-
45
-
46
-
47
-
48
-
49
-
50
-
51
-
52
-
53
-
54
-
55
-
56
-
57
-
58
-
59
-
60
-
61
-
62
-
63
-
64
-
65
-
66
-
67
-
68
-
69
-
70
-
71
-
72
-
73
-
74
-
75
-
76
-
77
-
78
 |
 |

HTR-6130
AV Receiver
OWNER’S MANUAL
U