Yamaha HTR 6230 Owner's Manual - Page 11
Quick start guide, Step 3: Connect your components - subwoofer no sound
 |
UPC - 027108933054
View all Yamaha HTR 6230 manuals
Add to My Manuals
Save this manual to your list of manuals |
Page 11 highlights
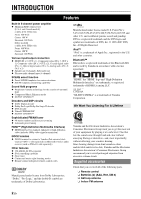
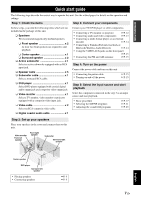
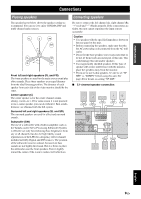
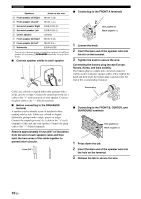
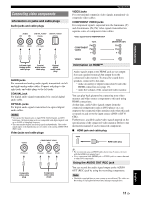
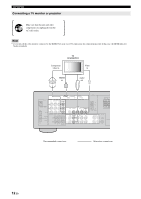
INTRODUCTION PREPARATION BASIC OPERATION Quick start guide The following steps describe the easiest way to operate this unit. See the related pages for details on the operation and settings. Step 1: Check the items Step 3: Connect your components In these steps, you need the following items which are not included in the package of this unit. ❏ Speakers We recommend magnetically shielded speakers. ❏ Front speaker x 2 At least two front speakers are required to start playback. ❏ Center speaker x 1 ❏ Surround speaker x 2 ❏ Active subwoofer x 1 Select an active subwoofer equipped with an RCA input jack. ❏ Speaker cable x 5 ❏ Subwoofer cable x 1 Select a monaural RCA cable. Connect your TV, DVD player or other components. • Connecting a TV monitor or projector ☞P. 12 • Connecting audio and video components ☞P. 13 • Connecting a multi-format player or an external decoder ☞P. 14 • Connecting a Yamaha iPod universal dock or Bluetooth Wireless Audio Receiver ☞P. 14 • Using the VIDEO AUX jacks on the front panel ☞P. 15 • Connecting the FM and AM antennas ☞P. 15 Step 4: Turn on the power Connect the power cable and turn on this unit. • Connecting the power cable • Turning on and off the power ☞P. 15 ☞P. 15 ❏ DVD player x 1 Select DVD player equipped with coaxial digital audio output jack and composite video output jack. ❏ Video monitor x 1 Select a TV monitor, video monitor or projector equipped with a composite video input jack. ❏ Video cable x 2 Select an RCA composite video cable. Step 5: Select the input source and start playback Select the component connected in the step 3 as an input source and start playback. • Basic procedure • Selecting the SCENE templates • Adjusting the sound field programs ☞P. 17 ☞P. 21 ☞P. 25 ❏ Digital coaxial audio cable x 1 Step 2: Set up your speakers Place your speakers in the room and connect them to this unit. Video monitor Front left speaker Front right speaker Subwoofer Surround right speaker ADVANCED OPERATION ADDITIONAL INFORMATION APPENDIX English Center speaker DVD player Surround left speaker • Placing speakers • Connecting speakers ☞P. 9 ☞P. 9 7 En
-
 1
1 -
2
-
3
-
4
-
5
-
 6
6 -
 7
7 -
 8
8 -
 9
9 -
 10
10 -
 11
11 -
 12
12 -
 13
13 -
 14
14 -
 15
15 -
 16
16 -
17
-
18
-
19
-
20
-
21
-
22
-
23
-
24
-
25
-
26
-
27
-
28
-
29
-
30
-
31
-
32
-
33
-
34
-
35
-
36
-
37
-
38
-
39
-
40
-
41
-
42
-
43
-
44
-
45
-
46
-
47
-
48
-
49
-
50
-
51
-
52
-
53
-
54
-
55
-
56
-
57
-
58
-
59
-
60
-
61
-
62
 |
 |