Yamaha HTR 6230 Owner's Manual - Page 27
Creating your original SCENE templates, Customizing the preset SCENE templates - audio connections
 |
UPC - 027108933054
View all Yamaha HTR 6230 manuals
Add to My Manuals
Save this manual to your list of manuals |
Page 27 highlights
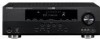
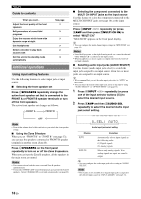
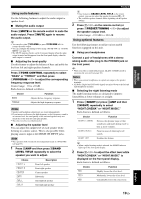
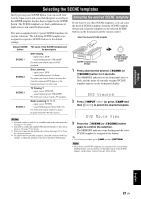
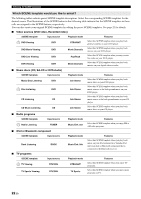
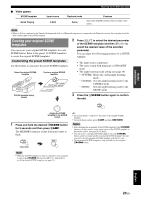
INTRODUCTION PREPARATION BASIC OPERATION ■ Video games SCENE template Game Playing Selecting the SCENE templates Input source V-AUX Playback mode Game Features Select this SCENE template when you play video games. Note • When an iPod is connected to the Yamaha iPod universal dock or a Bluetooth component is connected to the Bluetooth receiver, this unit plays back the audio sources input at the DOCK terminal. Creating your original SCENE templates You can create your original SCENE templates for each SCENE button. Refer to the preset 13 SCENE templates to create the original SCENE templates. 2 Press lk / n to select the desired parameter of the SCENE template and then ll / h to select the desired value of the selected parameter. You can adjust the following parameters for a SCENE template: Customizing the preset SCENE templates Use this feature to customize the preset SCENE templates. Select the desired SCENE template Create an original SCENE template • The input source component • The active sound field programs or STRAIGHT mode • The night listening mode setting (see page 19) - SYSTEM: Keeps the current night listening mode. - CINEMA: Sets the night listening mode to the CINEMA mode. - MUSIC: Sets the night listening mode to the MUSIC mode. SCENE : DVD Viewing INPUT : DVD SCENE : DVD Viewing SCENE template library (Image) 3 Press the iSCENE button again to confirm the edit. 1 Assign the SCENE template to the SCENE button 1 Press and hold the desired iSCENE button for 3 seconds and then press hAMP. The MEMORY indicator on the front panel starts to flash. 1 3 seconds AMP 1 y • An asterisk mark (*) appears by the name of the original SCENE template. • To cancel the procedure, press hAMP and then nRETURN. Notes • After changing the assignment of the SCENE template to the iSCENE buttons, you may need to set the input source of the SCENE template on the remote control. See page 24 for details. • You can create a customized SCENE template for each iSCENE button, and if you create another customized SCENE template, this unit overwrites the old customized SCENE template with the new one. • The customized SCENE template is only available for the assigned iSCENE button. Note • When the SCENE template you want to customize is not assigned to any of the iSCENE button, press ll / h repeatedly to recall the desired SCENE template (see page 21). ADVANCED OPERATION ADDITIONAL INFORMATION APPENDIX English 23 En
-
 1
1 -
2
-
3
-
4
-
5
-
6
-
7
-
8
-
9
-
10
-
11
-
12
-
13
-
14
-
15
-
16
-
17
-
18
-
19
-
20
-
21
-
 22
22 -
 23
23 -
 24
24 -
 25
25 -
 26
26 -
 27
27 -
 28
28 -
 29
29 -
 30
30 -
 31
31 -
 32
32 -
33
-
34
-
35
-
36
-
37
-
38
-
39
-
40
-
41
-
42
-
43
-
44
-
45
-
46
-
47
-
48
-
49
-
50
-
51
-
52
-
53
-
54
-
55
-
56
-
57
-
58
-
59
-
60
-
61
-
62
 |
 |