Yamaha Keyboard User Manual
Yamaha Keyboard Manual
 |
View all Yamaha Keyboard manuals
Add to My Manuals
Save this manual to your list of manuals |
Yamaha Keyboard manual content summary:
- Yamaha Keyboard | User Manual - Page 1
- Yamaha Keyboard | User Manual - Page 2
designed) are not covered by the manufacturer's warranty, and are therefore the owners responsibility. Please study this manual carefully and consult your dealer before requesting service. ENVIRONMENTAL ISSUES: Yamaha strives to produce products that are both user safe and environmentally friendly - Yamaha Keyboard | User Manual - Page 3
or modify them in any way. The instrument contains no user-serviceable parts. If it should appear to be malfunctioning, discontinue use immediately and have it inspected by qualified Yamaha service personnel. • Do not expose the instrument to rain, use it near water or in damp or wet conditions, or - Yamaha Keyboard | User Manual - Page 4
its various features. Contents PANEL CONTROLS AND TERMINALS 6 q Front Panel 6 q Rear Panel 8 SETTING UP 9 POWER REQUIREMENTS 9 q Using an AC Power Adaptor 9 q Using Batteries 9 TURNING ON THE POWER 9 ACCESSORY JACKS 10 MUSIC STAND 10 GETTING STARTED - PLAYING THE DEMO SONGS 11 PANEL - Yamaha Keyboard | User Manual - Page 5
/PSR-79 is a sophisticated yet easy-to-use keyboard with the following features and functions: Yamaha Education Suite page 26-27, 34-35, 37-39 The PortaTone features the new Yamaha Education Suite - a set of learning tools that utilize the latest technology to make studying and practicing music - Yamaha Keyboard | User Manual - Page 6
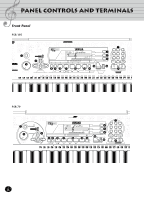
Panel Controls and Terminals Front Panel PSR-195 100 25 E GUITAR 35 SITAR 45 BRASS SECT 55 SYNTH BASS 61~70 HARMONY STYLE x 100 4 FOLK ROCK 9 PIANO BALLAD DANCE/DISCO 18 HIP HOP 22 16BT ROCK BLD 27 6/8 HVY ROCK O 26 DIST GUITAR 36 BANJO 46 ALTO SAX 56 SY STRINGS 71~80 SPLIT POPS 5 - Yamaha Keyboard | User Manual - Page 7
Panel Controls and Terminals ³ Power switch (STAND BY/ON) · MASTER VOLUME dial This determines the overall volume of the PortaTone. » OVERALL, DEMO START buttons (s, t, +, -) These are for selecting the various "overall" functions and setting their values. (See page 23.) They are also used to play - Yamaha Keyboard | User Manual - Page 8
ƽ DC IN 10-12V jack This is for connection to a PA-3B AC power adaptor. (See page 9.) ƾ PHONES/AUX OUT jack This is for connection to a set of stereo headphones or to an external amplifier/speaker system. (See page 10.) ƿ SUSTAIN jack (PSR-195 only) This is for connection to an optional FC4 or FC5 - Yamaha Keyboard | User Manual - Page 9
setting up your PortaTone for playing. Make sure to read this section carefully before using the instrument. Power Requirements Although the PSR-195/79 will run either from an optional AC adaptor or batteries, Yamaha recommends use are properly aligned, and replace the lid. PSR-195 BATTERIES 1.5V - Yamaha Keyboard | User Manual - Page 10
the PSR-195 lets you use an optional footswitch (Yamaha FC4 or FC5) to sustain the sound of the keyboard voice. This is used in the same way as a damper pedal on an acoustic piano - press and hold down the footswitch as you play the keyboard to sustain the sound. NOTE: Even though the PSR-79 does - Yamaha Keyboard | User Manual - Page 11
power. Press the STAND BY/ON button. Whenever the power is turned on, the Voice mode is automatically called up and set to play Voice 1 (GrandPno). STAND BY ON Set the Volume. Initially, turn the MASTER VOLUME control melody notes (in the music staves and the keyboard diagram) as they change - Yamaha Keyboard | User Manual - Page 12
STYLE) indicates that the mode is active in the background. In the first example, the Song mode is selected. In the second example, the Voice mode is selected, but the Song mode is active in the background. (This means that the song controls below the display are active and can be used to play - Yamaha Keyboard | User Manual - Page 13
the Song mode, calling up song #72, "Für Elise" - which can be played instantly by pressing the START/STOP (>/s) button. It also sets the Multi Pads to special piano phrases, and calls up style #81 ("2beat"). Using the Metronome Set the desired tempo with the Tempo function in the Overall menu - Yamaha Keyboard | User Manual - Page 14
set to various quarter-note based meters. NOTE: The time signature changes automatically when a style 7 8 9 0 Time signature Plays only "1" beats (all high clicks) 2/4 3/4 4/4 5/4 6/4 7/4 8/4 9/4 Plays no "1" beats (all low VOL TEMPO 116 Change the value. Use the OVERALL +/- buttons to increase - Yamaha Keyboard | User Manual - Page 15
SONG VOICE STYLE Select the desired voice number. Use the numeric keypad. The basic categories of voices and their numbers are shown at the left side of the panel. A complete list of the available voices is given on page 44. PSR-195 Voice list VOICE x 100 PIANO 1 GRAND PIANO 2 PIANO 3 HONKY-TONK - Yamaha Keyboard | User Manual - Page 16
the + key from the voice 100 returns to voice 1. Using the VOICE button Press the VOICE button to select the next voice number. (This functions exactly the same as the + button.) NOTE: Each voice is automatically called up with the most suitable octave range setting. Thus, playing middle C with - Yamaha Keyboard | User Manual - Page 17
a rich, layered sound. (On the PSR-79, Dual voices are at #91 - #93 and voices #94 - #99 are special Sustain voices.) Also included are special Percussion voices - #90 (with Echo) and #100 - that let you play various drum and percussion sounds from the keyboard. (Refer to the Percussion Voice chart - Yamaha Keyboard | User Manual - Page 18
selected style. It also determines the pitch of the songs and the Multi Pads. This allows you to easily match the pitch of the PortaTone to other instruments or singers, or play in a different key without changing your fingering. The Transpose settings can be adjusted over a range of ± 12 semitones - Yamaha Keyboard | User Manual - Page 19
and Playing Voices - The Voice Mode Tuning Tuning determines the fine pitch setting of both the main voice and the bass/chord accompaniment of the selected style. value 00 Tuning TUNING TEMPO 116 OVERALL Change the value. Use the OVERALL +/- buttons to increase or decrease the Tuning value - Yamaha Keyboard | User Manual - Page 20
the original melody and play it manually on the keyboard yourself. Selecting and Playing a Song Select the Song mode. Press the SONG button. Song name and number 001 StarWars 001 MEASURE Indicates Song mode is selected SONG VOICE STYLE Select the desired song number. Use the numeric keypad. The - Yamaha Keyboard | User Manual - Page 21
play along with the song using the currently selected voice, or even select a different voice for playing along. Simply call up the Voice mode while the song is playing song stops automatically. Changing the Tempo The tempo of song (and style) playback can be adjusted over a range of 40 - 240 bpm - Yamaha Keyboard | User Manual - Page 22
, the tempo of a song or style returns to the default setting when selecting a different song or style. (The set tempo remains, however, when switching styles during playback except when OTS is on.) When you turn on the power of the PortaTone, the tempo is automatically set to 116 bpm. About the - Yamaha Keyboard | User Manual - Page 23
Selecting and Playing Songs - The Song Mode Adjusting the Song Volume The playback volume of the song can be adjusted. This volume control affects only the song value 110 SongVol OVERALL SONG VOL 001 MEASURE Change the value. Use the OVERALL +/- buttons to increase or decrease the Song Volume - Yamaha Keyboard | User Manual - Page 24
is paused or stopped. This controls the Melody Guide function. (See page 26.) A/B Repeat This useful function is ideal for practicing and learning purposes. It allows you to specify any section or phrase of a song (between point A and point B) and repeat it - while you play or practice along with - Yamaha Keyboard | User Manual - Page 25
- tion. Press the button. This can be done either when the song is stopped or during play- back. oFF Repeat 001 MEASURE HINT: • You can also set the A/B Repeat function while the song is stopped. Simply use the r/f buttons to select the measures for the A and B points in the song, then start - Yamaha Keyboard | User Manual - Page 26
. During song playback, the PortaTone shows the notes of the melody in the music staves and the keyboard diagram in the display - indicating which notes you should play and when you should play them. The Melody Guide function even lets you practice at your own pace by automatically pausing playback - Yamaha Keyboard | User Manual - Page 27
GUIDE WAITING MINUS ONE OFF VC On 001 MEASURE Change the Voice directly. In the VC On condition, you can also directly make your own voice selections by using the +/- keys or the numeric keypad. The programmed voice of the song and the keyboard voice both change to the new selection. Settings - Yamaha Keyboard | User Manual - Page 28
function. Selecting and Playing a Style Select the Style mode. Press the STYLE button. Style name and number 001 8BtPop TEMPO 116 Indicates Style mode is selected SONG VOICE STYLE Select the desired style number. Use the numeric keypad. Available styles are listed at the center of the panel - Yamaha Keyboard | User Manual - Page 29
key on the keyboard. To use Sync-Start, first press the SYNC-START button (the handclap icon flashes to indicate Sync-Start stand-by), then press any key in the ACMP section of the keyboard (or any key Intro section and style by playing any key in the ACMP section of the keyboard. MP SYNCOFF START - Yamaha Keyboard | User Manual - Page 30
Start, letting you re-start the style by simply playing a chord or key in the ACMP section of the keyboard (or any key when accompaniment is off). Style Controls When the Style mode is active, the panel buttons below the display function as style controls. Pressing this button alternately enables - Yamaha Keyboard | User Manual - Page 31
single notes with your left hand, and notice how the bass and chord accompaniment change with each key you play. You can also play full chords to control the auto accompaniment. (Refer to page 33 for more information on how to use auto accompaniment.) HINT: The ACMP ON/OFF button can also be - Yamaha Keyboard | User Manual - Page 32
case the Fill-in will begin from the first beat of the next measure. • Fill-in patterns are not available when one of the Piano styles (#81 - #100) are selected. Adjusting the Accompaniment Volume The playback volume of the accompaniment can be adjusted. This volume control affects only the style - Yamaha Keyboard | User Manual - Page 33
and Playing Styles - The Style Mode Using Auto Accompaniment - Multi Fingering The auto accompaniment function automatically generates bass and chord accompaniment for you to play along with, by using Multi Fingering operation. You can change the chords of the accompaniment by playing keys in - Yamaha Keyboard | User Manual - Page 34
play the same notes in different octaves - without changing the basic nature of the chord itself. Inversion examples for the key of C E C C G G G E E C Beautiful sounding harmonies can be built in this manner. The use of intervals and chords is one of the most important elements in music - Yamaha Keyboard | User Manual - Page 35
to play them with the voicing or inversion that you prefer). Once you understand the basic principles of harmony and chords, it's very simple to use The chord type should be indicated to the right as well. Examples for the key of C are shown below. Major chord C Minor chord Cm Augmented chord - Yamaha Keyboard | User Manual - Page 36
Volume • Accompaniment On • Sync-Start On (set to standby when rhythm is stopped) Play the style. Since Sync-Start is automatically set to On when One Touch Setting is on, playing a key in the ACMP section of the keyboard starts the style. To turn One Touch Setting off, press the button again (so - Yamaha Keyboard | User Manual - Page 37
Playing Styles - The Style Mode Chord Guide The Chord Guide functions of the PortaTone provide powerful, easy-to-use tools for learning chords and chord relationships. Chord Guide features two different types of operation: Smart and Dictionary. Smart The Smart type allows you to set the basic key - Yamaha Keyboard | User Manual - Page 38
9 0 15 b=1 ACMP ON TEMPO 116 Play the style, and play single note chords (root notes) in the ACMP section. Start style playback in the desired way. (For specific instructions on starting styles, see page 29.) For example, when the key has been set to F major, pressing the following single notes - Yamaha Keyboard | User Manual - Page 39
it. With the Style mode active, select the Dictionary Chord Guide. Press the CHORD GUIDE button so that "Dict." appears briefly in the display. Dict. ACMP ON TEMPO 116 ROOT Specify the root of the chord. Press the key on the keyboard that corresponds to the desired chord root (as printed on - Yamaha Keyboard | User Manual - Page 40
- The Style Mode Multi Pads These convenient pads let you instantly trigger various musical and rhythmic phrases as you play the PortaTone. There are a total of 40 different sounds or phrases (20 banks, with two pad sounds for each bank). The phrases play back at the same speed as the Tempo setting - Yamaha Keyboard | User Manual - Page 41
yet powerful MIDI application example below, the Yamaha QY-70 Music Sequencer is used to record and play back performance data played on the PortaTone keyboard. Before actually recording to the sequencer, press the ACMP button once or twice to make sure that the current settings are sent. STAND BY - Yamaha Keyboard | User Manual - Page 42
the rear panel. When a set of headphones is plugged into this jack, no sound is output. When one of the PIANO styles is selected and started, the rhythm cannot be heard. This is normal; the accompaniment of the style can only be heard when accompaniment is set to ON and keys are played in the ACMP - Yamaha Keyboard | User Manual - Page 43
H Harmony voices 17 headphones 10 I interval 35 Intro 29 inversion 34 M Main A/B 32 Melody Guide 26 Metronome 13 MIDI 41 MIDI Implementation Chart .......... 48 MIDI, about 41 Minus One 26 mode indicator 12 Multi Fingering 33 Multi Pad List 46 Multi Pads 40 music stand 10 N numeric - Yamaha Keyboard | User Manual - Page 44
75 FN BA/FK GT 1 77 76 HARP/VIOLIN 1 78 77 HORN/TRP 1 79 78 SY B/BRS SEC 1 80 79 PIANO/FLUTE 1 81 80 PIANO 1 82 81 E PIANO 1 83 82 HARPSICHORD 1 84 83 CELESTA 1 85 84 FOLK GUITAR 1 86 85 BANJO 1 87 86 VIBRAPHONE 1 88 87 MARIMBA 1 89 88 STEEL DRUMS 1 90 *1 DRUM KIT 1 91 - Yamaha Keyboard | User Manual - Page 45
MIDI device; the corresponding bank select messages are: MSB = 00H, LSB = 00H. VOICE LIST Prg. Ch. # 0 3 4 5 6 7 8 11 12 16 17 19 20 21 22 23 24 25 26 27 28 29 30 31 32 33 34 36 38 40 42 46 49 51 56 57 59 60 61 Voice Name Piano Honky-tonk Piano Electric Piano 1 Electric Piano - Yamaha Keyboard | User Manual - Page 46
MULTI PAD LIST No. Name 1 Pianist1 2 Pianist2 3 Guitar Play 4 Brass 5 BrassHit 6 Funky 7 Techno1 8 Techno2 9 Arpeggio 10 Twinkle1 11 Twinkle2 12 Crystal 13 Bird 14 Africa 15 DrumKit 16 Tom_Flam 17 Drum_Seq 18 LatPerc 19 BongoSeq 20 Timbales LCD Pianist1 - Yamaha Keyboard | User Manual - Page 47
13-3/4" x 4-1/3") 921 x 317 x 108 mm (36-1/4" x 12-1/2" x 4-1/4") Weight PSR-195: 4.7kg (10 Ibs., 6 oz.) PSR-79: 3.7kg (8 Ibs., 3 oz.) Supplied accessories Music Stand, Owner's Manual, Song Book Optional accessories Headphones: AC power adaptor: Footswitch: Keyboard stand: HPE-150 PA-3B FC4, FC5 - Yamaha Keyboard | User Manual - Page 48
implementation chart [Portable Keyboard] Model: PSR-195/PSR-79 MIDI Implementation Chart Date: 27-JAN-1998 Version: 1.0 0~127 Velocity Note ON Note OFF O 9nH, v=1~127 X 9nH, v=0 After key's X Touch Ch's X Pitch Bender X Control Change 0, 32 1 6, 38 7 10 11 64 66 84 91 96 97 100 - Yamaha Keyboard | User Manual - Page 49
as indicated in the instructions contained in this manual, meets FCC requirements. Modifications not expressly approved by Yamaha may void your authority, granted by the FCC, to use the product. 2. IMPORTANT: When connecting this product to accessories and/ or another product use only high quality - Yamaha Keyboard | User Manual - Page 50
: the retailer selling the product, an authorized service center, or to Yamaha with an explanation of the problem. Please be prepared to provide proof purchase date (sales receipt, credit card copy, etc.) when requesting service and/or parts under warranty. 3. Shipping and/or insurance costs are the - Yamaha Keyboard | User Manual - Page 51
: 02-466-0021~5 MALAYSIA Yamaha Music Malaysia, Sdn., Bhd. 16-28, Jalan SS 2/72, Petaling Jaya, Selangor, Malaysia Tel: 3-717-8977 PHILIPPINES Yupangco Music Corporation 339 Gil J. Puyat Avenue, P.O. Box 885 MCPO, Makati, Metro Manila, Philippines Tel: 819-7551 SINGAPORE Yamaha Music Asia Pte., Ltd - Yamaha Keyboard | User Manual - Page 52
-
 1
1 -
 2
2 -
 3
3 -
 4
4 -
 5
5 -
 6
6 -
 7
7 -
8
-
9
-
10
-
11
-
12
-
13
-
14
-
15
-
16
-
17
-
18
-
19
-
20
-
21
-
22
-
23
-
24
-
25
-
26
-
27
-
28
-
29
-
30
-
31
-
32
-
33
-
34
-
35
-
36
-
37
-
38
-
39
-
40
-
41
-
42
-
43
-
44
-
45
-
46
-
47
-
48
-
49
-
50
-
51
-
52
 |
 |
