Yamaha MOX8 Owner's Manual - Page 43
Completing the Song by editing, the Mixing, Storing the created Song, Song Job List.
 |
UPC - 086792950907
View all Yamaha MOX8 manuals
Add to My Manuals
Save this manual to your list of manuals |
Page 43 highlights
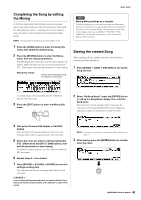
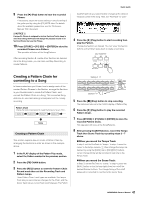
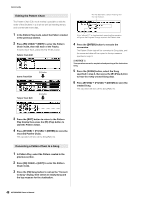
Quick Guide Completing the Song by editing the Mixing In this final step (other than storing your precious work, which we'll cover next), you can mix down your Tracks with the Song Mixing function - adjusting the volume balance and pan setting of all the parts and tweaking the effect levels. NOTE The explanations here also apply to the Pattern mode. 1 Press the [SONG] button to enter the Song Play mode, then select the desired Song. 2 Press the [MIXING] button to enter the Mixing mode, then set various parameters. The [MIXING] button lamp lights and the Mixing display will appear. Select the menu you wish to edit by pressing the [F1] - [F4] buttons, then edit the parameters in each display. Mixing Play display Indicates that the Mixing parameter is modified but not stored yet. HINT Storing Mixing settings as a template The Mixing settings you make can be stored as a Template- letting you create your own custom Mixing/Voice configurations for future use in recording Songs. This operation can be done on the display called up via [SONG] [STORE] [F2] TEMPLATE. For detailed instructions, see the "Reference Manual" PDF document. Storing the created Song After creating a Song, assign a name to the Song then execute the Store operation. 1 Press [SONG] [JOB] [F6] SONG to call up the Song Job List. For details about each parameter, see the "Reference Manual" PDF document. 3 Press the [EDIT] button to enter the Mixing Edit mode. 2 Select "04:Song Name," press the [ENTER] button to call up the Song Name display, then enter the Song name. Move the Cursor to the desired position then enter the character by holding the [SF6] CHAR button. Repeat this operation as often as necessary to create the name. 4 Call up the Common Edit display or Part Edit display. Use Part Edit to edit the parameters for each Part. Use Common Edit to edit the parameters for all of the Parts. 5 Select the menu you wish to edit by pressing the [F1] - [F6] buttons and [SF1] - [SF6] buttons, then edit the parameters in each display. For details on each parameter, see the "Reference Manual" PDF document. 6 Repeat steps 4 - 5 as desired. 7 Press [STORE] [F1] SEQ [ENTER] to store the settings as Song data. This operation will store all the Songs and Patterns at the same time. NOTICE If you are editing Mixing parameters and you select a different Song without storing the one being edited, all the edits you've made will be erased. NOTE For specific instructions on naming, see Basic Operation on page 21. 3 After naming, press the [ENTER] button to actually enter the name. 43 MOX6/MOX8 Owner's Manual
-
 1
1 -
2
-
3
-
4
-
5
-
6
-
7
-
8
-
9
-
10
-
11
-
12
-
13
-
14
-
15
-
16
-
17
-
18
-
19
-
20
-
21
-
22
-
23
-
24
-
25
-
26
-
27
-
28
-
29
-
30
-
31
-
32
-
33
-
34
-
35
-
36
-
37
-
 38
38 -
 39
39 -
 40
40 -
 41
41 -
 42
42 -
 43
43 -
 44
44 -
 45
45 -
 46
46 -
 47
47 -
 48
48 -
49
-
50
-
51
-
52
-
53
-
54
-
55
-
56
-
57
-
58
-
59
-
60
-
61
-
62
-
63
-
64
-
65
-
66
-
67
-
68
-
69
-
70
-
71
-
72
-
73
-
74
-
75
-
76
 |
 |
