Yamaha MOX8 Owner's Manual - Page 45
Creating a Pattern A by, using Arpeggio, Press the [PATTERN] button to enter Pattern Play - midi setup
 |
UPC - 086792950907
View all Yamaha MOX8 manuals
Add to My Manuals
Save this manual to your list of manuals |
Page 45 highlights
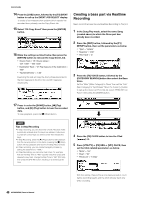
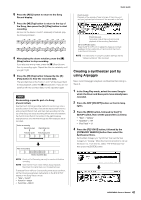
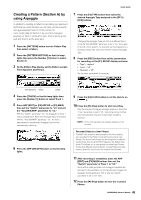
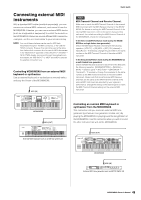
Creating a Pattern (Section A) by using Arpeggio In addition to creating a Pattern by recording your keyboard performance conventionally, you can also use the powerful Arpeggio playback features of this instrument. Here, create data for Section A by recording Arpeggio playback to Track 1 as the drum part, Track 2 as the guitar part and Track 3 as the bass part. 1 Press the [PATTERN] button to enter Pattern Play then select a Pattern. 2 Press the [PATTERN SECTION] so that its lamp lights then press the Number [1] button to select Section A. 3 On the Pattern Play display, set the Pattern Length, Time Signature and Tempo. Quick Guide 7 Press the [F2] TYPE button then select the desired Arpeggio Type assigned to the [SF1] - [SF6] buttons. Changing the Arpeggio Type will call up a different Voice since the "VoiceWithARP" parameter is set to "on." If you want to record a drum pattern, for example, set the Category to a drum/percussion-like name then find the desired Arpeggio Type. 8 Press the [REC] button then set the parameters for recording on the [F1] SETUP display as below. • "Type" = "replace" • "Loop" = "off" • "Quantize" = "off" Set the other parameters if necessary. Time Signature Tempo Length 4 Press the [TRACK] so that its lamp lights then press the Number [1] button to select Track 1. 5 Press ARP [EDIT] or [F3] ARP ED [F3] MAIN, then set the "Switch" parameter to "on" and set the "VoiceWithARP" parameter to "on." With the "Switch" parameter "on," the Arpeggio of Track 1 can be played back. When the Arpeggio Type is selected with the "VoiceWithARP" parameter "on," the Voice appropriate for the selected Arpeggio Type will be automatically called up. 6 Press the ARP [ON/OFF] button so that its lamp lights. 9 Press the [F5] CLICK button to set the click to on ( ). 10 Press the [F] (Play) button to start recording. Play the keyboard to trigger Arpeggio playback. Since the "Loop" parameter is set to "off," recording will be finished automatically when the end of the Pattern Length is reached. NOTE All the notes generated via Arpeggio playback will be recorded. Recorded Data as a User Phrase The MIDI note sequence data (except for the Voice setting, etc.) recorded in the Pattern mode will be stored as a User Phrase. The stored User Phrase can be assigned to a different Section/Track from the [F4] PATCH display in the Pattern Play mode. This allows you to use already recorded User Phrases for the other different Sections/Tracks. A single Pattern provides memory space for 256 of your own original User Phrases. 11 After recording is completed, press the ARP [EDIT] and [F3] MAIN buttons then set the "Switch" parameter of Track 1 to "off." Since all the notes generated via Arpeggio playback are recorded in this example, it is not necessary to trigger the Arpeggio during playback. This is why the "Switch" parameter is set to "off" here. 12 Press the [F] (Play) button to hear the recorded Phrase. 45 MOX6/MOX8 Owner's Manual
-
 1
1 -
2
-
3
-
4
-
5
-
6
-
7
-
8
-
9
-
10
-
11
-
12
-
13
-
14
-
15
-
16
-
17
-
18
-
19
-
20
-
21
-
22
-
23
-
24
-
25
-
26
-
27
-
28
-
29
-
30
-
31
-
32
-
33
-
34
-
35
-
36
-
37
-
38
-
39
-
 40
40 -
 41
41 -
 42
42 -
 43
43 -
 44
44 -
 45
45 -
 46
46 -
 47
47 -
 48
48 -
 49
49 -
 50
50 -
51
-
52
-
53
-
54
-
55
-
56
-
57
-
58
-
59
-
60
-
61
-
62
-
63
-
64
-
65
-
66
-
67
-
68
-
69
-
70
-
71
-
72
-
73
-
74
-
75
-
76
 |
 |
