Yamaha MOX8 Owner's Manual - Page 47
Creating a Pattern Chain for, converting to a Song
 |
UPC - 086792950907
View all Yamaha MOX8 manuals
Add to My Manuals
Save this manual to your list of manuals |
Page 47 highlights
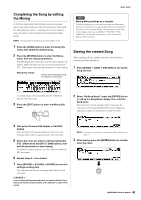
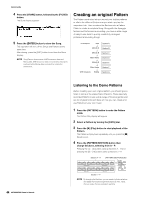
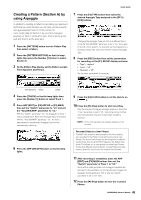
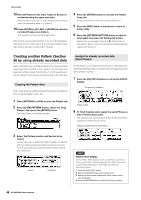
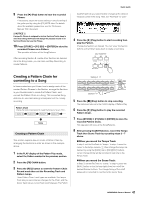
9 Press the [F] (Play) button to hear the recorded Phrase. If necessary, adjust the octave setting or velocity setting of the guitar part by using the [F2] NOTE Jobs. For details about the available parameters, see the "Reference Manual" PDF document. NOTICE If a specific Phrase is assigned to various Sections/Tracks, keep in mind that editing the Phrase will change the playback sound of all Sections/Tracks that use this Phrase. 10 Press [STORE] [F1] SEQ [ENTER] to store the recorded Phrases as a Pattern. This operation will store all the Song/Patterns. After recording Section B, create other Sections as desired. As in the Song mode, you can also use Step Recording to create Patterns. Quick Guide ("patt") Track lets you record Section changes at the desired measure points in the Song. Here, set "RecTrack" to "patt." 4 Press the [F] (Play) button to start recording then play the Pattern. Change the Sections as desired. You can "play" the Section buttons as the Pattern plays back to create a new Song. Creating a Pattern Chain for converting to a Song In these instructions you'll learn how to assign each of the created Pattern Phrases to the Section, arrange the Sections in your favorite order to create the Pattern Chain, and convert the Pattern Chain to a Song. This converted Song data can be used as backing accompaniment for melody recording. Pattern Chain Change the Sections as desired to create the Song you have in mind... Section A Section B Section F Section H ....... Song Creating a Pattern Chain This section explains how to create a Pattern Chain by arranging the Sections in order as shown in the example above. 1 In the PLAY display of the Pattern Play mode, select the Pattern created in the previous section. 2 Press the [F6] CHAIN button. 3 Press the [REC] button to enter the Pattern Chain Record mode then set the Recording Track and Pattern tempo. Three Pattern Chain Track types are available. The Tempo Track lets you record tempo changes for the Chain, and the Scene Track lets you record Track on/off changes. The Pattern Section A - H Section I - P 5 Press the [J] (Stop) button to stop recording. The instrument returns to the CHAIN display of Pattern Play. 6 Press the [F] (Play) button to play the recorded Pattern Chain. 7 Press [STORE] [F1] SEQ [ENTER] to store the recorded Pattern Chain. This operation will store all the Song/Patterns. 8 After pressing the [EXIT] button, record the Tempo Track then Scene Track by repeating steps 3 - 7 above. *When you record the Tempo Track: In step 3, set the RecTrack to "tempo." In step 4, move the cursor to the tempo column ( ) then change the tempo as desired by using the [DATA] dial or [INC]/[DEC] buttons. Tempo change timing will be recorded in real time to the Tempo Track. *When you record the Scene Track: In Step 3, set the RecTrack to "scene." In step 4, press the [MUTE] button so that its lamp lights then turn on/off the desired Number buttons. The change timing of the on/off status will be recorded in real time to the Scene Track. 47 MOX6/MOX8 Owner's Manual
-
 1
1 -
2
-
3
-
4
-
5
-
6
-
7
-
8
-
9
-
10
-
11
-
12
-
13
-
14
-
15
-
16
-
17
-
18
-
19
-
20
-
21
-
22
-
23
-
24
-
25
-
26
-
27
-
28
-
29
-
30
-
31
-
32
-
33
-
34
-
35
-
36
-
37
-
38
-
39
-
40
-
41
-
 42
42 -
 43
43 -
 44
44 -
 45
45 -
 46
46 -
 47
47 -
 48
48 -
 49
49 -
 50
50 -
 51
51 -
 52
52 -
53
-
54
-
55
-
56
-
57
-
58
-
59
-
60
-
61
-
62
-
63
-
64
-
65
-
66
-
67
-
68
-
69
-
70
-
71
-
72
-
73
-
74
-
75
-
76
 |
 |
