Yamaha MOX8 Owner's Manual - Page 51
Precautions when using the USB [TO HOST], terminal, MIDI channels and MIDI ports, Audio channels - keyboard case
 |
UPC - 086792950907
View all Yamaha MOX8 manuals
Add to My Manuals
Save this manual to your list of manuals |
Page 51 highlights
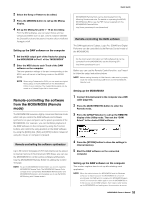
3 Make sure that the USB [TO HOST] terminal of this instrument is enabled. Press the [UTILITY] button to call up the Utility mode, then press the [F6] MIDI button followed by the [SF4] OTHER button to call up the OTHER display. Set the "MIDI IN/OUT" parameter to "USB." 4 Set the input and output settings for audio data and MIDI data as desired to suit your personal preferences. These settings can be set in the [F5] USB I/O display and [F6] MIDI display of the Utility mode. Setting the parameters related to the Audio data and MIDI data by using the Quick Setup lets you instantly reconfigure the MOX6/MOX8 for different computer/sequencer related applications by calling up specially programmed presets. In this case, press the [QUICK SETUP] button and then set the "SETUP." After making the settings, press the [ENTER] button to apply them to the MOX6/MOX8. NOTE For details on the parameters set by the Quick Setup function, see the "Reference Manual" PDF document. 5 Press the [STORE] button to store the settings to internal memory. Precautions when using the USB [TO HOST] terminal When connecting the computer to the USB [TO HOST] terminal, make sure to observe the following points. Failing to do so risks freezing the computer and corrupting or losing the data. If the computer or the instrument freezes, restart the application software or the computer OS, or turn the power to the instrument off then on again. NOTICE • Use an AB type USB cable • Before connecting the computer to the USB [TO HOST] terminal, exit from any power-saving mode of the computer (such as suspend, sleep, standby). • Before turning on the power to the instrument, connect the computer to the USB [TO HOST] terminal. • Execute the following before turning the power to the instrument on/off or plugging/unplugging the USB cable to/ from the USB [TO HOST] terminal. • Quit any open application software on the computer. • Make sure that data is not being transmitted from the instrument. (Data is transmitted only by playing notes on the keyboard or playing back a song.) • While the computer is connected to the instrument, you should wait for six seconds or more between these operations: (1) when turning the power of the instrument off then on again, or (2) when alternately connecting/ disconnecting the USB cable. MIDI channels and MIDI ports MIDI data is assigned to one of sixteen channels, and this synthesizer is capable of simultaneously playing sixteen separate Parts, via the sixteen MIDI channels. However, the sixteen-channel limit can be overcome by using separate MIDI Quick Guide "ports," each supporting sixteen channels. While a single MIDI cable is equipped to handle data over up to sixteen channels simultaneously, a USB connection is capable of handling far more-thanks to the use of MIDI ports. Each MIDI port can handle sixteen channels, and the USB connection allows up to eight ports, letting you use up to 128 channels (8 ports x 16 channels) on your computer. When connecting this instrument to a computer using a USB cable, the MIDI ports are defined as follows: Port 1 The tone generator block in this instrument can recognize and use only this port. When playing the MOX6/MOX8 as a tone generator from the external MIDI instrument or computer, you should set the MIDI Port to 1 on the connected MIDI device or computer. Port 2 This port is used to control the DAW software on the computer from the MOX6/MOX8 by using the Remote Control feature. Port 3 This port is used as the MIDI Thru Port. The MIDI data received over Port 3 via the USB [TO HOST] terminal will be re-transmitted to an external MIDI device via the MIDI [OUT] terminal. The MIDI data received over Port 3 via the MIDI [IN] terminal will be re-transmitted to an external device (computer, etc.) via the USB [TO HOST] terminal. Port 4 This port is used only for data communication of the MOX6/ MOX8 Editor. No other software or device can use this port. Port 5 This port is used only for data communication of the MOX6/ MOX8 Remote Editor. No other software or device can use this port. When using a USB connection, make sure to match the MIDI transmit port and the MIDI receive port as well as the MIDI transmit channel and the MIDI receive channel. Make sure to set the MIDI port of the external device connected to this instrument according to the above information. Audio channels The audio signals of the MOX6/MOX8 can be output to the USB [TO HOST] terminal and the OUTPUT [L/MONO]/[R] jacks. When connecting to a computer, use the USB [TO HOST] terminal. In this case, up to four audio channels (USB 1 - USB 4) are available. The output-to-channel assignments are made in the [F5] USB I/O display of the Utility mode. The audio signals of the MOX6/MOX8 can be input from the USB [TO HOST] terminal and the A/D INPUT [L]/[R] jacks. Up to two channels of audio can be input to the USB [TO HOST] terminal. Set the output level by using the [DAW LEVEL] slider on the MOX6/MOX8. The signals are output to the OUTPUT [L/ MONO]/[R] jack. Also, up to two audio channels can be input to the A/D INPUT [L]/[R] jacks. The signal is sent to the A/D input part of the MOX6/MOX8. For more details, see the "Reference Manual" PDF document. 51 MOX6/MOX8 Owner's Manual
-
 1
1 -
2
-
3
-
4
-
5
-
6
-
7
-
8
-
9
-
10
-
11
-
12
-
13
-
14
-
15
-
16
-
17
-
18
-
19
-
20
-
21
-
22
-
23
-
24
-
25
-
26
-
27
-
28
-
29
-
30
-
31
-
32
-
33
-
34
-
35
-
36
-
37
-
38
-
39
-
40
-
41
-
42
-
43
-
44
-
45
-
 46
46 -
 47
47 -
 48
48 -
 49
49 -
 50
50 -
 51
51 -
 52
52 -
 53
53 -
 54
54 -
 55
55 -
 56
56 -
57
-
58
-
59
-
60
-
61
-
62
-
63
-
64
-
65
-
66
-
67
-
68
-
69
-
70
-
71
-
72
-
73
-
74
-
75
-
76
 |
 |