Yamaha MSP7Studio Owners Manual
Yamaha MSP7Studio Manual
 |
View all Yamaha MSP7Studio manuals
Add to My Manuals
Save this manual to your list of manuals |
Yamaha MSP7Studio manual content summary:
- Yamaha MSP7Studio | Owners Manual - Page 1
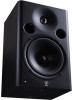
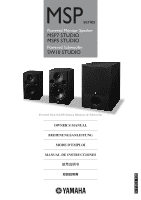
MSPseries Powered Monitor Speaker MSP7 STUDIO MSP5 STUDIO Powered Subwoofer SW10 STUDIO Powered Near-field Reference Monitors & Subwoofer OWNER'S MANUAL BEDIENUNGSANLEITUNG MODE D'EMPLOI MANUAL DE INSTRUCCIONES EN DE FR ES ZH JA - Yamaha MSP7Studio | Owners Manual - Page 2
INSTRUCTIONS 1 Read these instructions. 2 Keep these instructions. 3 Heed all warnings. 4 Follow all instructions Refer all servicing to qualified service personnel. Servicing is required when the apparatus has been damaged in any way, such as power 's Manual in a safe place for future reference. - Yamaha MSP7Studio | Owners Manual - Page 3
manual carefully before using powered monitor speaker or powered subwoofer. Keep the manual in a safe place for future reference. Vielen Dank dass Sie sich für einen aktiven Monitorlautsprecher oder Subwoofer von YAMAHA und Funktionen 21 MSP7 STUDIO, MSP5 STUDIO 22 SW10 STUDIO 65 Technische Daten - Yamaha MSP7Studio | Owners Manual - Page 4
attached to the MSP5 STUDIO and MSP7 STUDIO to prevent slippage when it is to be used on a slippery surface. Air blowing out of the bass reflex ports is normal, and often occurs when the speaker is handling program material with heavy bass content. Yamaha cannot be held responsible for damage caused - Yamaha MSP7Studio | Owners Manual - Page 5
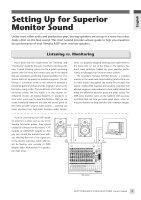
want problems hidden by poor monitor performance to sabotage your sound on other systems. The legendary Yamaha NS10M became a standard monitor in the music and sound industry (and is still in use in many studios throughout the world) for precisely that reason: it offered flat response and excellent - Yamaha MSP7Studio | Owners Manual - Page 6
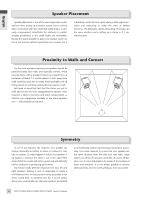
when setting up a monitor system, but it is all too often overlooked with the result that performance is seriously compromised. Admittedly the obstacles to perfect speaker positioning in the small studio are formidable. Having the space available to place your speaker system so that it can - Yamaha MSP7Studio | Owners Manual - Page 7
. ● Since no subwoofer is being used in this setup, if your speakers have a LOW CUT switch, set it to "FLAT" (the MSP7 STUDIO has a LOW CUT switch). ● For accurate monitoring set the LOW TRIM switch to "0". If you want to reduce the low-frequency level a bit set the switch to "-1.5". ● For accurate - Yamaha MSP7Studio | Owners Manual - Page 8
about 80 Hz. The HIGH CUT frequency can be adjusted later to achieve the smoothest integration with the MSP7 STUDIO or MSP5 STUDIO speakers. ● If you are using the MSP7 STUDIO, set the LOW CUT switch to "80". ● úFor accurate monitoring set the MSP7 STUDIO/MSP5 STUDIO LOW TRIM switch to "0". If you - Yamaha MSP7Studio | Owners Manual - Page 9
re connecting your MSP-series speakers to a mixing console that features built-in surround handling capability - such as the Yamaha DM2000, DM1000, or 02R96 - each speaker will be and bass management facilities. C L R SUBWOOFER LS RS MSP7 STUDIO/MSP5 STUDIO/SW10 STUDIO Owner's Manual 9 - Yamaha MSP7Studio | Owners Manual - Page 10
to a HPF frequency of about 100 Hz*. The HIGH CUT frequency can be adjusted later to achieve the smoothest integration with the MSP7 STUDIO or MSP5 STUDIO speakers. * Set . This is definitely not the case for serious monitoring. The response of your ears changes so drastically according to level - Yamaha MSP7Studio | Owners Manual - Page 11
. 2 AC IN Connector Connect the supplied power cable here. First connect the power cord to the speaker, then insert the power cord plug into the AC outlet. 3 LOW TRIM switch Adjusts the level of low-frequency range. MSP7 STUDIO: With the "+1.5" setting, low frequencies around 45 Hz are boosted by - Yamaha MSP7Studio | Owners Manual - Page 12
may improve low-range response, depending on the type and location of the entire speaker system. Try both settings and select the one that produces the best low-end sound. 4 HIGH CUT control Use the HIGH CUT control to set the cutoff frequency of the signal output from the SW10 STUDIO from 40 Hz to - Yamaha MSP7Studio | Owners Manual - Page 13
Overall Frequency Response Maximum Output Level Demensions (W x H x D) Weight Magnetic Shielding SPEAKER SECTION LF Components HF Enclosure Type Material AMPLIFIER SECTION Output Power * S/N, IHF-A filter Input Sensitivity XLR-3-31 PHONE Input Connectors, Impedance MSP7 STUDIO Biamp - Yamaha MSP7Studio | Owners Manual - Page 14
English Deutsch Français Español Dimensions MSP7 STUDIO 218 (8-9/16") 330 (13") 20* 160* 2-M8 For mounting bracket MSP5 STUDIO 179 (7-1/16") 35 120 235 (9-1/4") *Non-skid pad positions. Unit: mm (inch) 279 (11") SW10 STUDIO 20* 110* 2-M5 For mounting bracket 328 (12-15/16") 476 (18 - Yamaha MSP7Studio | Owners Manual - Page 15
Español Français Deutsch Performance graph RESPONSE (dB) RESPONSE (dB) RESPONSE (dB) MSP7 STUDIO +10 0 -10 -20 -30 -40 20 50 100 500 1k 5k 10k 20k 40k FREQUENCY (Hz) MSP5 STUDIO +10 0 -10 -20 -30 -40 20 50 100 500 1k 5k 10k 20k 40k FREQUENCY (Hz) SW10 STUDIO +10 0 -10 -20 -30 -40 20 - Yamaha MSP7Studio | Owners Manual - Page 16
Pro Audio Division Nakazawa-cho 10-1, Naka-ku, Hamamatsu, Japan 430-8650 Tel: +81-53-460-2441 PA29 C.S.G., Pro Audio Division © 2006-2011 Yamaha Corporation 109 MW-02B0 Printed in China Yamaha Pro Audio global web site http://www.yamahaproaudio.com/ Yamaha Manual Library http://www.yamaha.co.jp
-
 1
1 -
 2
2 -
 3
3 -
 4
4 -
 5
5 -
 6
6 -
 7
7 -
8
-
9
-
10
-
11
-
12
-
13
-
14
-
15
-
16
 |
 |

EN
DE
FR
ES
ZH
JA
Powered Near-field Reference Monitors & Subwoofer
OWNER’S MANUAL
BEDIENUNGSANLEITUNG
MODE D’EMPLOI
MANUAL DE INSTRUCCIONES
取扱説明書
MSP
series
Powered Monitor Speaker
MSP7 STUDIO
MSP5 STUDIO
Powered Subwoofer
SW10 STUDIO