Yamaha MT1X Owner's Manual
Yamaha MT1X Manual
 |
View all Yamaha MT1X manuals
Add to My Manuals
Save this manual to your list of manuals |
Yamaha MT1X manual content summary:
- Yamaha MT1X | Owner's Manual - Page 1
YAMAHA® AUTHORIZED PRODUCT MANUAL - Yamaha MT1X | Owner's Manual - Page 2
YAMAHA MULTITRACK CASSETTE RECORDER OPERATING MANUAL - Yamaha MT1X | Owner's Manual - Page 3
of trouble-free operation, we urge you to thoroughly read this operating manual. After reading, keep it in a handy place for reference. CONTENTS BEFORE OPERATION 2 PLEASE NOTE THE FOLLOWING PRECAUTIONS 2 THE DIFFERENCE BETWEEN TRACKS AND CHANNELS 3 WHAT IS A MULTITRACK CASSETTE RECORDER 3 THE - Yamaha MT1X | Owner's Manual - Page 4
recorded without dbx. *dbx and the dbx mark are trademarks of dbx incorporated. *The dbx system has been manufactured under license of dbx Incorporated. • USING THE AC ADAPTOR Please use the AC adaptor supplied parts or circuits inside. • CONNECTING OTHER EQUIPMENT Make sure the power instructions, - Yamaha MT1X | Owner's Manual - Page 5
between the MT1X multitrack cassette recorder and a conventional stereo cassette deck is shown below. CONVENTIONAL STEREO CASSETTE DECK MT1X MULTITRACK CASSETTE RECORDER The diagram shows how a conventional stereo cassette deck records and plays back music. The four tracks on a cassette tape - Yamaha MT1X | Owner's Manual - Page 6
recorder, meter/ monitor, and connector sections. Familiarize yourself with them in order to take full advantage of the MT1X's is not being used, or when you don't want to playback material already recorded on the track. Although sliding the input fader to the "O" position will stop the signal, - Yamaha MT1X | Owner's Manual - Page 7
of the microphone or instrument as outlined in its instruction booklet. SOUND CHARACTERISTICS OF THE EQUALIZER AND VARIOUS MUSICAL with the Hi control to help preserve the high frequency response when the track is re-recorded. PAN (PAN POT) CONTROLS After volume level and equalizing, the input - Yamaha MT1X | Owner's Manual - Page 8
AUX CONTROLS The MT1X is equipped with an AUX SEND jack and two (left and right mixed through the stereo mix buss. The output level of the ST OUT jack (the recording level at mixdown) and the recording level during ping-ponging are also adjusted with this control. Set the control input faders at - Yamaha MT1X | Owner's Manual - Page 9
for synchronized operation with MIDI products like synthesizers and rhythm machines. Synchro operation is explained in the section on Sync jack or in the Sync-Recording section on page 33. Power Indicator This indicator lights when the power switch on the rear panel is turned on. 7 - Yamaha MT1X | Owner's Manual - Page 10
track is not in the TAPE position, the sound will not be heard on the stereo buss. REW SWlTCH (REWIND) Use this switch to rewind the tape. Pressing it when the MT1X momentarily stop playback or recording in progress. Press it again to restart. dbx SWITCH Ordinary cassette tapes don't have sufficient - Yamaha MT1X | Owner's Manual - Page 11
: Set the switch in this position to display the level of each track. Starting from the far left, each meter corresponds to tracks 1-4. During playback, the playback level is displayed; during recording, the recording level is displayed. Setting the switch to this position during overdubbing enables - Yamaha MT1X | Owner's Manual - Page 12
of all the instruments can be monitored. MONITOR Position: This position is for monitoring the signal of each track. You can freely monitor while mixing the sound of each track during recording or playback. Using the MONITOR LEVEL Controls and the MONITOR PAN Controls , set the desired level and - Yamaha MT1X | Owner's Manual - Page 13
to the MONITOR position, these level controls are used for each track to achieve a level balance for easy monitoring. Use these controls of an special electric guitar preamp to increase the input level will assure recordings of better sound quality. REAR PANEL PHONES JACK Plug a set of headphones - Yamaha MT1X | Owner's Manual - Page 14
. ST OUT JACKS The mixed signals of each channel (and each track) are output in stereo signal through these jacks. Since these jacks output the final mix, a stereo cassette deck can be connected. These jacks can also be used as follows. The MT1X can be used as a sub-mixer, with the output sent - Yamaha MT1X | Owner's Manual - Page 15
CONNECTION EXAMPLES BASIC CONNECTION LAYOUT FOR MULTITRACK RECORDING 13 - Yamaha MT1X | Owner's Manual - Page 16
be erased or sonically altered to some degree. Recording over a tape with the tabs broken out • Playing tapes recorded on other cassette recorders When playing Normal-position tapes, or tapes encoded with Dolby B noise reduction the MT1X, the following steps are advised: 1) Playing Normal-position - Yamaha MT1X | Owner's Manual - Page 17
cover. 15 Slide it on, and tighten the battery pack mounting screw with a coin or screwdriver. The battery pack is now firmly attached. NOTES: When using the battery pack as a power supply, remove the AC adaptor. The battery pack can only supply power to the MT1X when it is properly attached. The - Yamaha MT1X | Owner's Manual - Page 18
MULTITRACK RECORDING PROCESS Multitrack recording is usually used to record a rhythm section, with overdubbing and ping-ponging operations assisting in mixing the parts stereo positioning of each track with its MONITOR LEVEL and MONITOR PAN controls. In addition, powered monitor speakers can be - Yamaha MT1X | Owner's Manual - Page 19
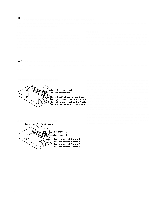
has four input jacks, enabling the setting up of the four microphones for recording, as shown in the diagram. Through the MT1X's mixing section, the sounds recorded by these microphones are mixed down onto track 1. YAMAHA's REV7 Digital Reverberator can be used for reverb effects. It also features - Yamaha MT1X | Owner's Manual - Page 20
the MT1X "ON". The POWER indicator will light. 3. Setting up the recorder section Press the RESET switch to return the counter to "000". Turn "ON" the ZERO STOP switch. Turn "ON" the dbx switch. Set the RECORD SELECT switch 1 to the "L" position. This is to record the Left stereo signal onto track - Yamaha MT1X | Owner's Manual - Page 21
4. Setting the monitor and meter sections Set the PHONES SELECT switch to the "STEREO" position. Set the PHONES volume to around "7". Make sure the METER SELECT switch is in the "4 TRK" position. 5. Adjusting the input level Set all of the input switches to the MIC/LINE position. Set the MASTER - Yamaha MT1X | Owner's Manual - Page 22
playing, be sure to "count" out loud to help you get the timing right on the other tracks during overdubbing later on. When the music sequence is over, press the STOP switch to stop the recording. Then, press the REW switch, and the tape will rewind to a point just before the beginning - Yamaha MT1X | Owner's Manual - Page 23
switch is set to "4 TRK". Press the PLAY switch, and check the sound recorded on track 1 by headphones, and by looking at the level meter. At this point, if the track is recorded properly and there doesn't seem to be any problems, press the REW switch and reset all the knobs and controls to their - Yamaha MT1X | Owner's Manual - Page 24
to play many different instrumental parts on a single recording. If you're multitalented, multitrack overdubbing can clone you into your own group. Now, we're going to record a bass guitar on track 2 to synch with, or match, with the drum part already recorded on track 1. There are two ways to - Yamaha MT1X | Owner's Manual - Page 25
to "2", the REC indicator will flash to show that the bass guitar con- nected to input jack 2 will be recorded on track 2. Press the pause switch to start the recording. The REC indicator will light up completely. Connect the monitor headphones. Until the mixdown process, only use headphones and - Yamaha MT1X | Owner's Manual - Page 26
the musical segment is over, stop and rewind the tape. - Bass Guitar Recording completed - Track 1 Track 2 Track 3 Track 4 8. Post recording check Just press the play switch to check to see that the track was recorded properly. Set all switches and controls back to their normal positions. 24 - Yamaha MT1X | Owner's Manual - Page 27
just before the input jack. PING-PONG < PING-PONG RECORDING > After the rhythm section has been recorded on tracks 1 - 3, only track 4 remains as an empty, spare track. Since there are three more parts to be recorded, more tracks will be needed. The ping-pong technique (sometimes called bouncing - Yamaha MT1X | Owner's Manual - Page 28
REC indicator will light. 2. Setting the monitor and meter sections Set the PHONES SELECT switch to the "MONITOR" position to monitor the sound recorded onto track 4. Turn the MONITOR LEVEL 4 control to about "7". Turn the PHONES volume control to about "7". Make sure the METER SELECT switch is set - Yamaha MT1X | Owner's Manual - Page 29
lead solo into an empty section of the vocal track. However, this sort of operation requires a blank section of tape on a track. NOTE: The RECORD SELECT switches of the MT1X can be operated by the optional FS-1 Foot Switch. The RECORD SELECT switch for the track to be redone must be set, and then it - Yamaha MT1X | Owner's Manual - Page 30
- Signal Path during Punch-in/Punch-out Operation - Before and after the punch-in, the sound from tracks 1-4 plus the new sounds to be recorded can be monitored. However, during the punch-in, only the sound from tracks 1, 2, and 4 plus the new sound being recorded can be monitored. 28 - Yamaha MT1X | Owner's Manual - Page 31
Set the PHONES SELECT switch to "MIX". (If it's not set to this position, you won't be able to monitor the new recording sound and the playback sound of tracks 1 - 4 during punch-in/punch-out operation.) Turn the MONITOR LEVEL control to about "7". Turn the PHONES volume to about "7". Set the METER - Yamaha MT1X | Owner's Manual - Page 32
-1, press on the foot switch. In both cases, the REC indicator will light. "Punch-out" when you have finished redoing the passage by sliding the RECORD SELECT switch to the "OFF" position. When using the FS-1, press on the foot switch again. In both cases, the REC indicator will begin flashing - Yamaha MT1X | Owner's Manual - Page 33
the mixdown. Often called "trackdown" or "remix", mixdown is when all the four recorded tracks are mixed to achieve a certain sound' balance in level, effects, and stereo positioning, and then recorded onto one side of a cassette tape in mono or stereo. This tape is the final "master". In this next - Yamaha MT1X | Owner's Manual - Page 34
switch to start the tape, and adjust the level balance of each track. Push the MASTER fader up to "7': and then set the level balance recording level. Rewind the tape. 4. Recording Press the PLAY switch of the MT1X at the same time you start recording with the stereo tape deck. After the recording - Yamaha MT1X | Owner's Manual - Page 35
. Connect as shown below for mixdown. Start the tape, mixdown the sound from tracks 2-4 and the RX15's drum sounds input through the AUX Left and Right jacks, and record it with a stereo tape deck. After putting the MT1X into the REC PAUSE mode, turn the SYNC switch "ON". In this condition - Yamaha MT1X | Owner's Manual - Page 36
or head cleaning fluid (available in most all audio stores) to clean the heads, capstan, and pinchroller. Keeping the heads clean is essential for good recordings. For demagnetization, use a quality head demagnetizer, and follow the instructions carefully. It's important to keep all parts clean! 34 - Yamaha MT1X | Owner's Manual - Page 37
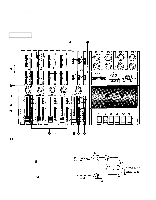
BLOCK DIAGRAM NOTE: When the REC button is engaged, the panel switches can be used to individually order recording on only those channels with RECORD SELECT not switched "OFF". 35 - Yamaha MT1X | Owner's Manual - Page 38
distortion Channel separation Erasure ratio : multitrack cassette recorder : standard cassette; CrO2 tape only (EQ: 70 ) : better than 70dB General Power supply Power consumption Dimensions (W x H x D) Weight Supplied accessories : supplied AC adaptor (DC 15V), PA11 battery pack ("C" x 10) : 14w - Yamaha MT1X | Owner's Manual - Page 39
INTRODUCTION TO THE ACCESSORIES 37 - Yamaha MT1X | Owner's Manual - Page 40
SERVICE The MTlX is supported by Yamaha's worldwide network of factory trained and qualified dealer service personnel. In the event of a problem, contact your nearest Yamaha dealer. - Yamaha MT1X | Owner's Manual - Page 41
SINCE 1887 NIPPON GAKKI CO., LTD. HAMAMATSU, JAPAN - Yamaha MT1X | Owner's Manual - Page 42
YAMAHA® MT1X OM Yamaha Corporation of America 6600 Orangethorpe Avenue, P.O. Box 6600, Buena Park, CA 90622-6600 5/15/98 28791 MT1X OM Recyclable Recycled
-
 1
1 -
 2
2 -
 3
3 -
 4
4 -
 5
5 -
 6
6 -
 7
7 -
8
-
9
-
10
-
11
-
12
-
13
-
14
-
15
-
16
-
17
-
18
-
19
-
20
-
21
-
22
-
23
-
24
-
25
-
26
-
27
-
28
-
29
-
30
-
31
-
32
-
33
-
34
-
35
-
36
-
37
-
38
-
39
-
40
-
41
-
42
 |
 |

YAMAHA
®
AUTHORIZED
PRODUCT MANUAL