Yamaha NS-10MT Owner's Manual
Yamaha NS-10MT Manual
 |
View all Yamaha NS-10MT manuals
Add to My Manuals
Save this manual to your list of manuals |
Yamaha NS-10MT manual content summary:
- Yamaha NS-10MT | Owner's Manual - Page 1
Natural Sound Bass-Reflex Type 2-Way Speaker System Thank you for selecting the Yamaha NS-10MT speaker system. PRECAUTIONS CONNECTION TO YOUR AMPLIFIER Read these precautions carefully before operating your speaker. ● When using an amplifier with a rated output power higher than the nominal input - Yamaha NS-10MT | Owner's Manual - Page 2
with your hands or to exert excessive force with tools. SPECIFICATIONS Type 2 way bass-reflex speaker system Magnetic-shielding type Speaker Unit 18 cm cone woofer x 1 3 cm dome tweeter x 1 Nominal Impedance 6 ohms Frequency Response ...........43 Hz - 30 kHz (-10 dB) Nominal Input Power 60W
-
 1
1 -
 2
2
 |
 |

Thank you for selecting the Yamaha NS-10MT speaker system.
NS-10MT
Natural Sound
Bass-Reflex Type
2-Way Speaker System
PRECAUTIONS
Read these precautions carefully before operating
your speaker.
●
When using an amplifier with a rated output power
higher than the nominal input power of the speaker,
care should be taken never to exceed the speaker’s
maximum input.
●
Anytime you note distortion, reduce the volume con-
trol on your amplifier to a lower setting.
Never allow
your amplifier to be driven into “clipping”.
●
Do not place the speaker where it will be exposed to
direct sunlight or excessive humidity to prevent it
from being damaged.
●
Do not attempt to clean the speaker with chemical
solvents as this might damage the finish. To clean,
wipe with a dry, soft cloth.
●
Placing the speaker on the same shelf or rack as
the turntable can result in feedback.
●
Do not place the speaker where it is liable to be
knocked over or struck by falling objects. Stable
placement will also ensure better sound perfor-
mance.
●
Secure placing is the owner’s responsibility.
YAMAHA shall not be liable to any accident
caused by an improper placing of the speaker.
Note
Do not let the bare speaker wires touch each other
as this could damage the speaker and/or the
amplifier.
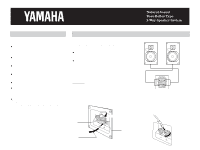
* Banana Plug connections are also possible. First
tighten the terminal knobs, and then insert the
Banana Plug connector into the corresponding ter-
minal hole.
BEFORE MAKING CONNECTIONS, MAKE SURE
THAT THE AMPLIFIER IS SWITCHED OFF.
■
CONNECTIONS
●
Connect the screw-type input terminals at the rear
of the speaker to the speaker output terminals of
your amplifier with the provided speaker cables.
●
One side of the speaker cable is marked by a white
line. Connect the
(+) terminals on both the amplifier
and the speakers using this white-marked side.
Connect the (–) terminals on both components
using the unmarked side of the cable. If connected
with reversed polarity, the sound will be unnatural
and lack bass.
Procedures:
Loosen the terminal knob.
Insert the bare wire end properly into the terminal
hole. [Remove approx. 10 mm (3/8”) insulation
from the speaker cable.]
Tighten the knob.
Test the security of the connection by tugging
lightly on the cable at the terminal.
Black(–)
Loosen
Tighten
Red (+)
White line
CONNECTION TO YOUR AMPLIFIER
R
L
Left
Right
Amplifier