Yamaha P-520 P-520 OWNERS MANUAL
Yamaha P-520 Manual
 |
View all Yamaha P-520 manuals
Add to My Manuals
Save this manual to your list of manuals |
Yamaha P-520 manual content summary:
- Yamaha P-520 | P-520 OWNERS MANUAL - Page 1
YAMAHA P-520 direct drive turntable. CONTENTS CAUTION . NAMES OF THE PARTS AND THEIR FUNCTIONS . . • . . . ASSEMBLING THE TURNTABLE AND RECORDS TROUBLESHOOTING MOUNTING THE DUST COVER SPECIFICATIONS 1/2 3 .... 4 5 .... 6 .... 6 7 7 8 8 8 9 10 11 11 \ r) OWNER'S MANUAL IMPORTANT - Yamaha P-520 | P-520 OWNERS MANUAL - Page 2
normally or exhibits a marked change in performance; or E. The appliance has been dropped, or the cabinet damag- ed. 1 6 Servicing - The user should not attempt to service the appliance beyond those means described in the operating instructions. All other servicing should be referred to qualified - Yamaha P-520 | P-520 OWNERS MANUAL - Page 3
you to the presence of important operating and maintenance (servicing) instructions in the literature accom- panying the appliance. CAUTION: REAR THIS BEFORE OPERATING YOUR P-520 The P-520 is a sophisticated semi-automatic belt drive turntable. To ensure proper operation for the best possible - Yamaha P-520 | P-520 OWNERS MANUAL - Page 4
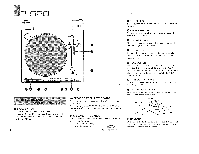
rotation speed. Refer to the section on adjusting the platter speed on page 8. Speed control knob • STROBOSCOPE The P-520 features a stroboscope for accurate indication of turntable speed. O REPEAT SWITCH Depress the repeat switch when you want to repeat the same side of the record. () CUEING - Yamaha P-520 | P-520 OWNERS MANUAL - Page 5
securely positioned. 2. Place the rubber mat on top of the turntable platter. P-520 Be sure to unplug the power cord from AC power outlet until assembly WEIGHT 1. To mount the main weight rotate the Balance adjustment knob in the direction indicated by the arrow. 2. The grooves inside the main weight and the - Yamaha P-520 | P-520 OWNERS MANUAL - Page 6
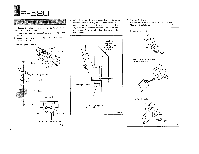
P-520 IV:MATING THE CARTRIDGE Cartridges with weights ranging from 2.5 to 9 grams may be used with this turntable. 1. Properly connect White (+L) -Finger hook -Headshell Cartridge Cartridge Nuts White (+L.) Red (+R) YAMAHA Cartridge Align the stylus point in the center. 2. Push the cartridge - Yamaha P-520 | P-520 OWNERS MANUAL - Page 7
520 ikOiLiSTING TONEARM EALANCE Proceed with the balance adjustment after mounting and installing the main weight assembly. Disconnect the power supply to prevent turntable is too heavy (rotate the Balance adjustment knob in the direction of the arrow) x 4111111111 Arm lifter Tonearm is balanced - Yamaha P-520 | P-520 OWNERS MANUAL - Page 8
P-520 ADJUSTING CARTRIDGE STYLUS_ 'TRACK/NG FORCE Be careful not to move the of the indicator groove on the tonearm (See Fig. 7-la)) Rotate the Balance adjustment knob slowly in the direction shown in Fig. 7(b), and note that the indicator ring turns with it. Turn the Balance adjustment knob until - Yamaha P-520 | P-520 OWNERS MANUAL - Page 9
voltage and does not mean that something is wrong with the turntable. Adjusting platter speed Cabinet 1. Connect the output cords from the outlet on the audio amplifier. Connections to your amplifier PHONO terminals P-520 THE CLIUNG SWITCH n normal operation the cueing switch is set in the - Yamaha P-520 | P-520 OWNERS MANUAL - Page 10
P-520 PLAYING RECORDS After you have assembled the turntable, made the necessary adjustments and connected the turntable to the audio amplifier, you are ready to start playing records. Proceed as follows. Please check the connecting cords for the turntable, amp and speakers. • F'ower cord -*AC - Yamaha P-520 | P-520 OWNERS MANUAL - Page 11
P -52D Before assuming that your turntable is faulty, check the following troubleshooting list which details the corrective action you can take yourself without having to call a service engineer. If you have any doubts or queries, get in touch with your nearest YAMAHA dealer. Fault Platter does not - Yamaha P-520 | P-520 OWNERS MANUAL - Page 12
P-520 M0UNTIN0 THE DUST . 13 SPECIFICATIONS • TURNTABLE MOTOR SECTION Drive System FG Servo direct drive Motor 8 Poles coreless DC Hall motor Turntable Platter 30cm (12") subject to change without notice. SINCE 1887 YAMAHA NIPPON GAKKI CO., LTD. HAMAMATSU, JAPAN Printed in Japan S42
-
 1
1 -
 2
2 -
 3
3 -
 4
4 -
 5
5 -
 6
6 -
 7
7 -
8
-
9
-
10
-
11
-
12
 |
 |

YAMA
520
Natural
Sound
Direct
Drive
Turntable
Unique
Yamaha
Optimum
Mciss,
Minimum
Resonance
Straight
Tonearm
Fully
Automatic
Operation,
Stable
FG
Servo
Direct
Drive
System
Slim
Design,
Light
-Touch
(Ion
trols,
Convenient
Front
,
Pnnel
Operation
ai
°
Thank
you
for
purchasing
the
YAMAHA
P-520
direct
drive
turntable.
CONTENTS
CAUTION
.
•
.
1/2
NAMES
OF
THE
PARTS
AND
THEIR
FUNCTIONS
.
.
.
.
3
ASSEMBLING
THE
TURNTABLE
AND
TONEARM
. . .
.
....
4
MOUNTING
THE
CARTRIDGE
5
MOUNTING
THE
HEADSHELL
. . . . . . . . . . . . . . . . .
. . . .
6
ADJUSTING
TONEARM
BALANCE
. . . . .
. . . .
. .
....
.
. . . .
6
ADJUSTING
CARTRIDGE
STYLUS
TRACKING
FORCE
ADJUSTING
THE
ANTI
-SKATING
7
STYLUS
HEIGHT
ADJUSTMENT
7
ADJUSTING
PLATTER
SPEED
8
CONNECTIONS
TO
YOUR
AMPLIFIER
8
USING
THE
CUEING
SWITCH
8
PLAYING
RECORDS
9
TROUBLESHOOTING
10
MOUNTING
THE
DUST
COVER
11
SPECIFICATIONS
11
P-.110unt
Ileudshell
Supplied,
Speed
Control
\
r
)
OWNER'S
MANUAL
IMPORTANT!
Please
record
the
serial
number
of
your
unit
in
the
space
below:
Model
:
P-520
Serial
No.
:
The
serial
number
is
located
on
the
rear
of
the
cabinet.
Retain
this
Owner's
Manual
in
a
safe
place
for
future
reference.
WARNING
To
prevent
fire
or
shock
hazard,
do
not
expose
this
appliance
to
rain
or
moisture.