Yamaha PR7 Reference Manual
Yamaha PR7 Manual
 |
View all Yamaha PR7 manuals
Add to My Manuals
Save this manual to your list of manuals |
Yamaha PR7 manual content summary:
- Yamaha PR7 | Reference Manual - Page 1
RECORDER Reference Manual Using the Reference Manual The PPOCKETRAK PR7 Reference Manual (this book) enables you to use a terminology the page link. Using the functional tree table The functional tree table for the PR7 is illustrated on page 3. Use this diagram if you want to refer to a description of - Yamaha PR7 | Reference Manual - Page 2
between the markers 18 Overdubbing (Layered Recordings 20 Overdubbing mode screen 20 Overdubbing 20 Contents Functions Useful for Musical Instrument Practice 24 Using the tuner 24 Using the metronome 25 Adjusting the playback speed 26 Handling Audio Files 27 Folder structure 27 About - Yamaha PR7 | Reference Manual - Page 3
be edited as many times as you like during recording and/or playback. • Peak limiter ➔ page 14 The limiter automatically adjusts excessive input levels for distortion-free recording. • Tuner and metronome ➔ page 24 Tuner and metronome support practicing musical instruments or choir. • Presets for - Yamaha PR7 | Reference Manual - Page 4
the power off 6 4 (standby). To stop playback or recording, press this button. While the LCD screen displays recording, such as the tuner or metronome. Using the tuner ➔ page 24 Using the metronome ➔ page 25 Adjusting the playback speed ➔ page 26 B [+]/[-] buttons Adjust the PR7's audio volume - Yamaha PR7 | Reference Manual - Page 5
battery here. 2 microSD card slot Insert a commercially-available microSD/ microSDHC card here. 3 Threaded socket for a tripod Use this socket to attach the PR7 to a tripod. The thread size is 1/4 inch (6.35mm). 4 Speaker You can listen to a recording on the spot. 4 1 1 2 3 2 5 Reference Manual - Yamaha PR7 | Reference Manual - Page 6
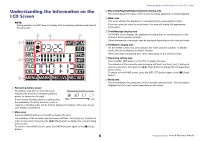
2 Menu area Press the [MENU] button on the PR7 to display this area. The indicator of the currently- Recording/Playback/Repeat playback display area This area indicates the status of the current recording, playback, or repeat playback. 4 Meter area This area indicates the playback or recording Manual - Yamaha PR7 | Reference Manual - Page 7
that you cannot recharge an NiMH battery using the PR7. • The microSD card slot supports both microSD and microSDHC card formats. If you plan microSD cards, please visit the following Yamaha Pro Audio website: http://www.yamahaproaudio.com/pr7/ Preparing the PR7 Turning the power on or off Turning - Yamaha PR7 | Reference Manual - Page 8
. 3. After you complete the settings, press the [■] (Stop) button. The PR7 displays the HOME screen. NOTE You can also set the calendar by using the Option 4 kbps File recording start time Recording format (sound quality) (If the file format is not supported for recording on the PR7, "- - - - Yamaha PR7 | Reference Manual - Page 9
/stopping/playing back/setting the recording and playback levels 1. Press the [●] (Record) button. The PR7 enters recording standby mode. 1, 5 6, 9 2, 4 7 2. To set the recording level, press the [REC LEVEL] button. If you already set the recording level or if the ALC HI or ALC LO (Auto Level - Yamaha PR7 | Reference Manual - Page 10
recorded separately) as the save destination for recorded audio files. The default setting is card into the card slot on the unit. Preparing the PR7 ➔ page 7 Formatting (Initializing) a microSD card ➔ PR7 displays the HOME screen. 2. Press the [+] or [-] button to select the SD icon in the record - Yamaha PR7 | Reference Manual - Page 11
MUSIC folder is selected, the PR7 will record automatically to the R0 folder. If the R0 folder is not available for recording for some reason, the PR7 will check other folders in sequence (R1, R2,...etc.) to find and record into the available folder. 11 (Continued on the next page) Reference Manual - Yamaha PR7 | Reference Manual - Page 12
following formats are supported: • PCM (File extension: wav) as 44) Bit rate (bit): 24, 16 • MP3 (File extension: recording space (for continuous recording) in one file is 2GB. If the recording file size reaches 2GB, the PR7 will automatically continue recording very important to record audio with a sound - Yamaha PR7 | Reference Manual - Page 13
are playing. Adjusting the playback speed ➔ page 26 Fast forward and fast reverse While the PR7 is playing or while playback is paused, press and hold File date kbps File recording start time Recording format (sound quality) (If the file format is not supported for recording on the PR7, "- - - -" - Yamaha PR7 | Reference Manual - Page 14
an excessive level of audio is input. This option is suitable for recording performances of musical instruments. • ALC HI ... The PR7 will slightly lower higher volume levels of sound, and slightly raise lower volume levels of sound. The microphone sensitivity is set slightly higher for this option - Yamaha PR7 | Reference Manual - Page 15
) for the input device setting. NOTE Yamaha recommends that you use a microphone with recording Conference or speech Field recording Recording closer to the musical instrument/ close miking After the setting process is complete, the PR7 button. The PR7 displays the HOME screen. 15 Reference Manual - Yamaha PR7 | Reference Manual - Page 16
seem amazing, as if the irretrievable past had been recovered. However, how it works is quite simple. The PR7 is actually recording continually into a three-second memory buffer. Once recording is started, data in the PRC buffer is added to the beginning of the file. On the screen, it looks like the - Yamaha PR7 | Reference Manual - Page 17
recording a long live performance, you can place a marker at the beginning of each song so that you will be able to quickly locate the songs for playback computer ➔ page 33 2. While the PR7 is in Marker mode, press the [+] also add a marker to the current playback position while the unit is stopped. - Yamaha PR7 | Reference Manual - Page 18
PR7 is stopped in Marker mode, use the [] button to locate a marker you want to delete. Markers Repeat playback playback. Follow the steps below to set up Repeat playback: 1. Press the [MARK] button. 2. Press the [ ] (Playback) button to play the song. During playback playback is paused. - Yamaha PR7 | Reference Manual - Page 19
high quality. You can slow down the playback speed without changing the pitch enabling you to master fast phrases by playing them back slowly and repeatedly. Take advantage of the Repeat playback function, as well as playback speed adjustment (which is explained on page 26). 19 Reference Manual - Yamaha PR7 | Reference Manual - Page 20
playback sound will not be recorded again.) Original audio files that you wish to use for overdubbing must be in an audio format supported by the PR7 (except MP3: 64kbps/32kbps). Supported the PR7 will automatically create a new file to one of the folders inside the REC folder. 20 Reference Manual - Yamaha PR7 | Reference Manual - Page 21
that if you stop playback of the original data in the middle of overdubbing, the new file created will end at the point at which you stopped playback. 4. After adjusting the recording level, press the [REC LEVEL] button again. The PR7 displays the Overdubbing Standby screen. 21 Reference Manual - Yamaha PR7 | Reference Manual - Page 22
record any portions of a song other than the part you want to record recording, the original data will be recorded PR7 creates a new audio file with only the necessary part overdubbed. NOTE After overdubbing is complete and playback of the original file is over, the PR7 will continue normal recording - Yamaha PR7 | Reference Manual - Page 23
point. Listening to the overdubbed data The overdubbed file will be created as a new recording in the same folder as the original file. If you select a file in the MUSIC folder as the original file, the PR7 will automatically create a new file to one of the folders inside the REC folder. After - Yamaha PR7 | Reference Manual - Page 24
tuned, the screen will indicate the following meter segments. 3. Press the [+] or [-] button to select "TUN", then press the [ ] (Play) button. The PR7 displays the tuner screen. 6. After tuning is complete, press the [■] (Stop) button. The PR7 displays the HOME screen. 24 Reference Manual - Yamaha PR7 | Reference Manual - Page 25
you are setting the beat. The metronome will stop. 8. After the settings are complete, press the [■] (Stop) button. The PR7 displays the HOME screen. NOTE The volume level of the metronome is affected by the playback level of the PR7. Adjusting the recording level ➔ page 9 25 Reference Manual - Yamaha PR7 | Reference Manual - Page 26
button. The PR7 displays the playback speed screen. Playback speed (%) 3. Press the [+] or [-] button to set the playback speed. You can set the playback speed as files recorded at sampling rates of 96kHz/88.2kHz, you can set the playback speed in the range of 50% to 150%. 26 Reference Manual - Yamaha PR7 | Reference Manual - Page 27
Stores audio files that were recorded on the unit. • MUSIC folder Stores files that were copied from a computer. PCM, MP3, and WMA files are supported for playback. This folder is used for playback only. You cannot copy or divide files in this folder. • MANUAL folder.......... Stores the Reference - Yamaha PR7 | Reference Manual - Page 28
", then press the [ ] (Play) button. The PR7 displays the copy destination and asks for confirmation of the copy [ ] (Play) button. If you select "no", the PR7 will return to the screen displayed in step 4. NOTE • To The PR7 enters File mode. 6. To finish the copy operation, press the [■] (Stop - Yamaha PR7 | Reference Manual - Page 29
for each song from a long audio file recorded at a live performance. 1. Select an audio "FILE", then press the [ ] (Play) button. The PR7 enters File mode. 5. Press the [+] or [-] button to ] (Play) button. If you select "no", the PR7 will return to the screen displayed in step 5 without processing - Yamaha PR7 | Reference Manual - Page 30
] (Play) button. All files in the folder 5. Press the [] button to select "y" (Yes), then press the [ ] (Play) button. If you select "no", the PR7 will return to the screen displayed in step 4 without processing the file. 6. To finish the delete operation, press the [■] (Stop) button. The - Yamaha PR7 | Reference Manual - Page 31
"FILE", then press the [ ] (Play) button. 6. Press the [] button to select "y" (Yes), then press [ ] (Play) button. If you select "no", the PR7 will return to the screen displayed in step 5 without processing the file. 7. To finish the move operation, press the [■] (Stop) button. The - Yamaha PR7 | Reference Manual - Page 32
application software, or turn the power to the PR7 off and on. NOTICE • Be sure to use the USB cable supplied with the unit. The unit does not support a USB3.0 cable. • When you disconnect the USB cable, be sure to follow the instructions and requirements of your computer operating system. • Before - Yamaha PR7 | Reference Manual - Page 33
PR7 for playback or overdubbing (➔ page 20). 1. Connect the PR7 to the computer. 2. Once the PR7 recorded on the PR7) to a computer. In this way, you can edit the recordings using music production software or send a copy to your band members. 1. Connect the PR7 to the computer. 2. Once the PR7 "PR7" - Yamaha PR7 | Reference Manual - Page 34
download and install such software on an Internet-connected computers, you will be able to edit audio data that was recorded on the PR7. For more information on downloading software, refer to the Yamaha Pro Audio website. http://www.yamahaproaudio.com/pr7/ 34 Handling Audio Files Reference Manual - Yamaha PR7 | Reference Manual - Page 35
Accessing the system setting menu Follow the steps below to access the system setting menu. 1. Power off the PR7. Press and hold down 2. While pressing and holding down the [REC SET] button, press and hold the steps described in the "Setting the calendar" section on page 7. 35 Reference Manual - Yamaha PR7 | Reference Manual - Page 36
you want to initialize PR7 settings due to technical or card. NOTE We recommend that you format a microSD card on the PR7 if you use the card for the first time. 1. While the the settings, select "No" in the confirmation screen. The PR7 returns to the previous screen. Press the [■] (Stop) button - Yamaha PR7 | Reference Manual - Page 37
), then press the [ ] (Play) button. Other Functions Switching the REC LED on or off You can program the PR7 so that the REC LED illumination will be on or off. If you set the LED illumination off, the battery life will Press the [■] (Stop) button to return to the HOME screen. 37 Reference Manual - Yamaha PR7 | Reference Manual - Page 38
Yamaha Pro Audio website for the latest information on the firmware. http://www.yamahaproaudio.com/pr7 ). Slow in recording into a microSD card REC Error Select a lower-quality recording format (page the format that is supported for recording (page 11). File is Recording level setting disabled error ALC On Set - Yamaha PR7 | Reference Manual - Page 39
Supported Operating System Supported media Recording format and available recording time (guideline) (with built-in 2GB memory) Recording format Playback format Sampling frequency Bit rate (playback) Jacks Operating temperature Power supply Battery life for recording Battery life for playback - Yamaha PR7 | Reference Manual - Page 40
High-pass filter 14 M MANUAL folder 27 Markers 17 Metronome 25 microSD card 7 Moving a file 31 MUSIC folder 27 O Overdubbing 20, 22 P Pitch indication (tuner 38 Playback level 9 Playback level (overdubbing 20 Playback speed 26 PRC (Pre-recording 16 Pre-recording 16 Preset 15 Punch in - Yamaha PR7 | Reference Manual - Page 41
Yamaha Pro Audio Global Web Site http://www.yamahaproaudio.com/ Yamaha Manual Library http://www.yamaha.co.jp/manual/ C.S.G., Pro Audio Division © 2013 Yamaha Corporation 303IP-A0
-
 1
1 -
 2
2 -
 3
3 -
 4
4 -
 5
5 -
 6
6 -
 7
7 -
8
-
9
-
10
-
11
-
12
-
13
-
14
-
15
-
16
-
17
-
18
-
19
-
20
-
21
-
22
-
23
-
24
-
25
-
26
-
27
-
28
-
29
-
30
-
31
-
32
-
33
-
34
-
35
-
36
-
37
-
38
-
39
-
40
-
41
 |
 |

RECORDER
EN
Using the Reference Manual
The PPOCKETRAK PR7 Reference Manual (this book) enables you to use a
terminology search function and a link function.
Searching for terminology
To search for terminology, use the search function built into the software
application that displays this book.
If you are using Adobe Reader to display this book, type in a term in the search
bar field, then press the <Enter> key on the computer keyboard.
The application will search for the term inside the book.
Viewing the previous or next page
If you are using Adobe Reader to display this book, you can go back to the
previous view, forward to the next view, or jump back and forth to a pre-link
page. This feature is convenient if you want to return to a page after you jump
to a different page via the page link.
Using the functional tree table
The functional tree table for the PR7 is illustrated on
page 3
.
Use this diagram if you want to refer to a description of the screen or the
various functions of the PR7.
Reference Manual