Yamaha PSR-225GM Owner's Manual - Page 31
M.Volume, Change the parameter setting or value., Set other parameters as needed.
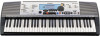 |
View all Yamaha PSR-225GM manuals
Add to My Manuals
Save this manual to your list of manuals |
Page 31 highlights
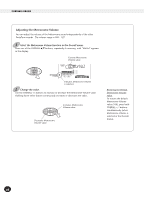
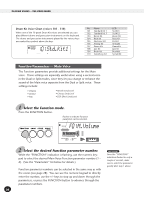
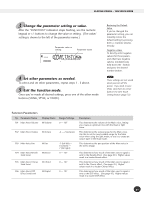
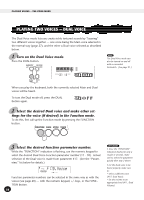
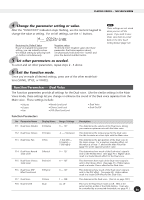
PLAYING VOICES - THE VOICE MODE 3 Change the parameter setting or value. After the "FUNCTION" indication stops flashing, use the numeric keypad or +/- buttons to change the value or setting. (The value/ setting is shown to the left of the parameter name.) Parameter value or setting Parameter name STYLE 100M.Volume FUNCTION 4 Set other parameters as needed. To select and set other parameters, repeat steps 1 - 3 above. 5 Exit the Function mode. Once you've made all desired settings, press one of the other mode buttons (SONG, STYLE, or VOICE). Restoring the Default Value If you've changed the parameter setting, you can instantly restore the default setting by pressing both +/- buttons simultaneously. Negative values To directly enter negative values (for those parameters that have negative values), simultaneously hold down the - button and press the desired number button. These settings are not saved when you turn off the power. If you wish to save them, save them to a User bank in the One Touch Setting feature (page 72). Function Parameters No. Parameter Name F01 Main Voice Volume Display Name M.Volume Range/Settings 0 - 127 F02 Main Voice Octave M.Octave -2 - 2 (octaves) F03 Main Voice Pan M.Pan F04 Main Voice Reverb Send Level M.RevLvl F05 Main Voice Chorus M.ChoLvl Send Level F06 Main Voice DSP Effect Send Level M.DspLvl -7 (full left) - 0 (center) - 7 (full right) 0 - 127 0 - 127 0 - 127 Description This determines the volume of the Main voice, letting you create an optimum mix with the Dual or Split voice. This determines the octave range for the Main voice. Use this to set the most suitable range for the Main voice when using the Split mode, or use it to create an octave layer in the Dual mode. This determines the pan position of the Main voice in the stereo image. This determines how much of the Main voice's signal is sent to the Reverb effect. (See page 40.) Higher values result in a louder Reverb effect. This determines how much of the Main voice's signal is sent to the Chorus effect. (See page 41.) Higher values result in a louder Chorus effect. This determines how much of the Main voice's signal is sent to the DSP effect. (See page 42.) Higher values result in a louder DSP effect. 31
-
 1
1 -
2
-
3
-
4
-
5
-
6
-
7
-
8
-
9
-
10
-
11
-
12
-
13
-
14
-
15
-
16
-
17
-
18
-
19
-
20
-
21
-
22
-
23
-
24
-
25
-
 26
26 -
 27
27 -
 28
28 -
 29
29 -
 30
30 -
 31
31 -
 32
32 -
 33
33 -
 34
34 -
 35
35 -
 36
36 -
37
-
38
-
39
-
40
-
41
-
42
-
43
-
44
-
45
-
46
-
47
-
48
-
49
-
50
-
51
-
52
-
53
-
54
-
55
-
56
-
57
-
58
-
59
-
60
-
61
-
62
-
63
-
64
-
65
-
66
-
67
-
68
-
69
-
70
-
71
-
72
-
73
-
74
-
75
-
76
-
77
-
78
-
79
-
80
-
81
-
82
-
83
-
84
-
85
-
86
-
87
-
88
-
89
-
90
-
91
-
92
-
93
-
94
-
95
-
96
-
97
-
98
-
99
-
100
-
101
-
102
-
103
-
104
-
105
-
106
-
107
-
108
-
109
-
110
-
111
-
112
-
113
-
114
-
115
-
116
-
117
-
118
-
119
-
120
-
121
 |
 |
