Yamaha PSR-225GM Owner's Manual - Page 82
Start recording., Recor, ding to the Chor, When recording the Chord track
 |
View all Yamaha PSR-225GM manuals
Add to My Manuals
Save this manual to your list of manuals |
Page 82 highlights
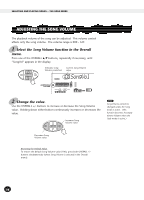
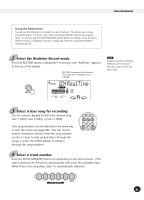
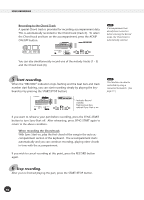
SONG RECORDING Recording to the Chord Track A special Chord track is provided for recording accompaniment data. This is automatically recorded to the Chord track (track 6). To select the Chord track and turn on the accompaniment, press the ACMP ON/OFF button. RECORD ACMP ON If accompaniment has already been turned on before entering the Record mode, the Chord track is automatically selected. 001 116 MEASURE TEMPO 1 CHORD You can also simultaneously record one of the melody tracks (1 - 5) and the Chord track (6). 5 Start recording. When the "RECORD" indication stops flashing and the beat bars and track number start flashing, you can start recording simply by playing the key- 00 board (or by pressing the START/STOP button). SONG RECORD ACMP ON 001 116 MEASURE TEMPO 1 CHORD Indicates Record standby. Flashing beat bars indicate Sync-Start is on. If you want to rehearse your part before recording, press the SYNC-START button to turn Sync-Start off. After rehearsing, press SYNC-START again to return to the above condition. When recording the Chord track With Sync-Start on, play the first chord of the song in the auto accompaniment section of the keyboard. The accompaniment starts automatically and you can continue recording, playing other chords in time with the accompaniment. If you wish to cancel recording at this point, press the RECORD button again. This function can also be controlled by using a connected footswitch. (See page 91.) 6 Stop recording. After you've finished playing the part, press the START/STOP button. 82
-
 1
1 -
2
-
3
-
4
-
5
-
6
-
7
-
8
-
9
-
10
-
11
-
12
-
13
-
14
-
15
-
16
-
17
-
18
-
19
-
20
-
21
-
22
-
23
-
24
-
25
-
26
-
27
-
28
-
29
-
30
-
31
-
32
-
33
-
34
-
35
-
36
-
37
-
38
-
39
-
40
-
41
-
42
-
43
-
44
-
45
-
46
-
47
-
48
-
49
-
50
-
51
-
52
-
53
-
54
-
55
-
56
-
57
-
58
-
59
-
60
-
61
-
62
-
63
-
64
-
65
-
66
-
67
-
68
-
69
-
70
-
71
-
72
-
73
-
74
-
75
-
76
-
 77
77 -
 78
78 -
 79
79 -
 80
80 -
 81
81 -
 82
82 -
 83
83 -
 84
84 -
 85
85 -
 86
86 -
 87
87 -
88
-
89
-
90
-
91
-
92
-
93
-
94
-
95
-
96
-
97
-
98
-
99
-
100
-
101
-
102
-
103
-
104
-
105
-
106
-
107
-
108
-
109
-
110
-
111
-
112
-
113
-
114
-
115
-
116
-
117
-
118
-
119
-
120
-
121
 |
 |