Yamaha PSR-225GM Owner's Manual - Page 89
Entering Velocity Curves, • Velocity Curve Chart
 |
View all Yamaha PSR-225GM manuals
Add to My Manuals
Save this manual to your list of manuals |
Page 89 highlights
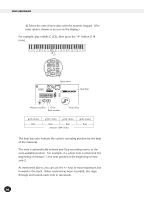
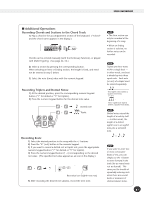
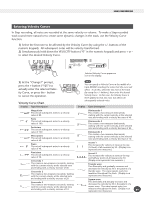
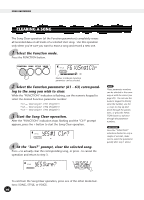
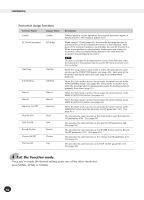
SONG RECORDING Entering Velocity Curves In Step recording, all notes are recorded at the same velocity or volume. To make a Step-recorded track sound more natural or to create some dynamic changes in the track, use the Velocity Curve function. 1) Select the first note to be affected by the Velocity Curve (by using the +/- buttons of the numeric keypad). All subsequent notes will be velocity-transformed. 2) Simultaneously hold down the VELOCITY button ("0" in the numeric keypad) and press + or to select the desired Velocity Curve. 001-201 MEASURE 1 Selected Velocity Curve appears as icon in the display. 3) At the "Change?" prompt, press the + button ("YES") to actually enter the selected Velocity Curve, or press the - button to cancel the operation. Velocity Curve Chart Display Type/Description Mezzoforte This sets all subsequent notes to a velocity value of 80. Forte This sets all subsequent notes to a velocity value of 100. Fortissimo This sets all subsequent notes to a velocity value of 120. Mezzopiano This sets all subsequent notes to a velocity value of 60. Piano This sets all subsequent notes to a velocity value of 40. Pianissimo This sets all subsequent notes to a velocity value of 20. Crescendo 1 This creates a two-measure crescendo, starting with the current velocity at the selected note and ending with a velocity increase of 40. Crescendo 2 This creates a two-measure crescendo, starting with the current velocity at the selected note and ending with a velocity increase of 20. Crescendo 3 This creates a two-measure crescendo, starting with the current velocity at the selected note and ending with a velocity increase of 10. You can specify a Velocity Curve in the middle of a track BEFORE recording the notes that the curve will affect. To do this, select the last note of the track (by using the +/- buttons), then enter the desired Velocity Curve. In this case, the Velocity Curve is NOT applied to that last note, but affects all subsequently entered notes. Display Type/Description Diminuendo 1 This creates a two-measure diminuendo, starting with the current velocity at the selected note and ending with a velocity decrease of 40. Diminuendo 2 This creates a two-measure diminuendo, starting with the current velocity at the selected note and ending with a velocity decrease of 20. Diminuendo 3 This creates a two-measure diminuendo, starting with the current velocity at the selected note and ending with a velocity decrease of 10. Accent 1 This increases the velocity of notes at the top (1st beat) of all measures by 30. (Display icon represents two measures.) Accent 2 This increases the velocity of notes at the top and halfway points of all measures by 30. (Display icon represents two measures.) Triangle wave This alternately and gradually increases and decreases the velocity by 30 in the pattern of a triangle wave. The wave repeats every two measures throughout the track. (Display icon represents two measures.) Square wave This alternately and abruptly increases and decreases the velocity by 30 in the pattern of a square wave. The wave repeats every two measures throughout the track. (Display icon represents two measures.) 89
-
 1
1 -
2
-
3
-
4
-
5
-
6
-
7
-
8
-
9
-
10
-
11
-
12
-
13
-
14
-
15
-
16
-
17
-
18
-
19
-
20
-
21
-
22
-
23
-
24
-
25
-
26
-
27
-
28
-
29
-
30
-
31
-
32
-
33
-
34
-
35
-
36
-
37
-
38
-
39
-
40
-
41
-
42
-
43
-
44
-
45
-
46
-
47
-
48
-
49
-
50
-
51
-
52
-
53
-
54
-
55
-
56
-
57
-
58
-
59
-
60
-
61
-
62
-
63
-
64
-
65
-
66
-
67
-
68
-
69
-
70
-
71
-
72
-
73
-
74
-
75
-
76
-
77
-
78
-
79
-
80
-
81
-
82
-
83
-
 84
84 -
 85
85 -
 86
86 -
 87
87 -
 88
88 -
 89
89 -
 90
90 -
 91
91 -
 92
92 -
 93
93 -
 94
94 -
95
-
96
-
97
-
98
-
99
-
100
-
101
-
102
-
103
-
104
-
105
-
106
-
107
-
108
-
109
-
110
-
111
-
112
-
113
-
114
-
115
-
116
-
117
-
118
-
119
-
120
-
121
 |
 |
