Yamaha PSR-630 Owner's Manual - Page 69
Format, NO/YES, Execute?
 |
View all Yamaha PSR-630 manuals
Add to My Manuals
Save this manual to your list of manuals |
Page 69 highlights
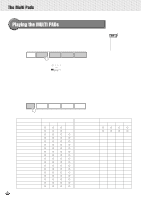
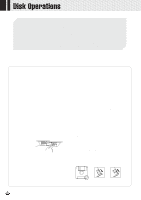
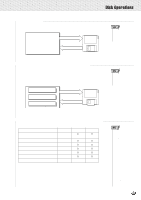
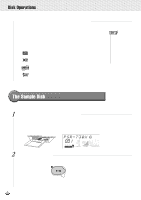
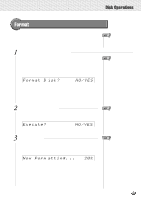
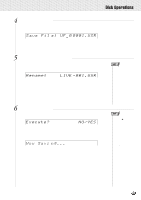
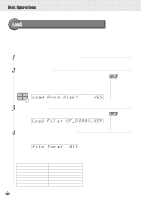
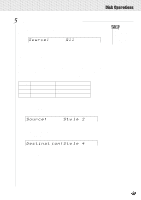
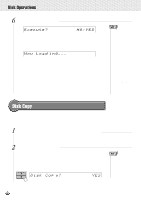
,,QQ,,QQ,,QQ,,QQ,,QQ,,QQ,,QQ,,QQ,,QQ,,QQ,,QQ,,QQDisk,,QQOper,,QQation,,QQs ,,QQ Format Setting up commercially available floppy disks (3.5 inch, 2HD/2DD type) for use with the PSR-730/630 is called formatting Follow the steps below to format a disk. • After formatting, the capacity of a 2HD disk will be 1 Mbyte, and of a 2DD disk will be 720 Kbyte. 1 Insert the Disk into the Disk Drive Insert a commercially available 3.5 inch floppy disk (unformatted) into the disk drive, with the shutter on the disk towards the drive, and with the label side facing upward. The "DISK" menu will be automatically selected, and the Sub Menu item "Format Disk? NO/YES" will appear on the top line of the display. Format D isk? NO/YES 2 Press the [+] (YES) Button When the [+] button is pressed, "Execute? NO/YES" will appear on the display. Execute? isk? NO/YES 3 Start Formatting Press the [+] (YES) button and disk formatting will begin. Once started, formatting cannot be canceled. During formatting, the display will read "Now Formatting... xx%." Now Form atting. .. 20% When formatting is finished, the display will return to the one which was selected before inserting the disk. If you don't want to format, press the [-] (NO) button before the step 3 or simply eject the disk. The display will return to the one which was selected before inserting the disk. • If you insert an unformatted disk with the write protect tab in the ON position into the drive, "Format Disk? NO/YES" will appear, but when you try to format it, "Disk Write Protected!!" will be displayed. Eject the disk, move the protect tab to the OFF position, and reinsert it in the drive. • The "DISK" menu won't be selected automatically when you insert the formatted disk. If you want to format the formatted disk to record from scratch, first insert the disk you want to format, then press the Menu button, next press the Sub Menu button to show the "Format Disk? YES" on the display. • If data is already saved on the disk, be careful not to format it. If you format the disk, all the previously recorded data will be deleted. • While formatting is in progress (while "Now Formatting" is displayed) , never eject the disk or turn off the power to the PSR730/630. • If a disk that cannot be read by the PSR-730/630 is inserted into the disk drive, it will be treated the same as an unformatted floppy disk. Take care not to erase important data by accidentally formatting a disk. • If you want to reformat a disk that already has been formatted for the PSR-730/630, insert the disk in the drive, select the "Format Disk? YES" item from the sub menu of the "DISK" menu, then proceed as for a normal format. • If you insert the formatted disk and you press the [-] (NO) button or eject the disk in the step 2, the display will return to the "Format Disk?". 67
-
 1
1 -
2
-
3
-
4
-
5
-
6
-
7
-
8
-
9
-
10
-
11
-
12
-
13
-
14
-
15
-
16
-
17
-
18
-
19
-
20
-
21
-
22
-
23
-
24
-
25
-
26
-
27
-
28
-
29
-
30
-
31
-
32
-
33
-
34
-
35
-
36
-
37
-
38
-
39
-
40
-
41
-
42
-
43
-
44
-
45
-
46
-
47
-
48
-
49
-
50
-
51
-
52
-
53
-
54
-
55
-
56
-
57
-
58
-
59
-
60
-
61
-
62
-
63
-
 64
64 -
 65
65 -
 66
66 -
 67
67 -
 68
68 -
 69
69 -
 70
70 -
 71
71 -
 72
72 -
 73
73 -
 74
74 -
75
-
76
-
77
-
78
-
79
-
80
-
81
-
82
-
83
-
84
-
85
-
86
-
87
-
88
-
89
-
90
-
91
-
92
-
93
-
94
-
95
-
96
-
97
-
98
-
99
-
100
-
101
-
102
-
103
-
104
-
105
-
106
-
107
-
108
-
109
-
110
-
111
-
112
-
113
-
114
-
115
-
116
-
117
-
118
-
119
-
120
-
121
-
122
-
123
-
124
-
125
-
126
-
127
-
128
-
129
-
130
-
131
-
132
-
133
-
134
-
135
-
136
-
137
-
138
-
139
-
140
-
141
-
142
-
143
-
144
-
145
-
146
-
147
-
148
-
149
-
150
-
151
-
152
-
153
-
154
-
155
-
156
-
157
-
158
-
159
-
160
-
161
-
162
-
163
-
164
-
165
-
166
-
167
-
168
-
169
-
170
-
171
-
172
-
173
-
174
-
175
-
176
-
177
-
178
 |
 |