Yamaha PSR-630 Owner's Manual - Page 72
Load, After saving User Style 101-104, User Pad bank 37-40, and Registration
 |
View all Yamaha PSR-630 manuals
Add to My Manuals
Save this manual to your list of manuals |
Page 72 highlights
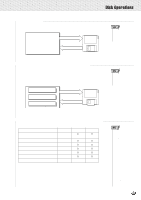
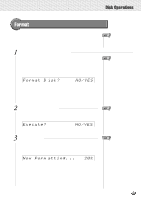
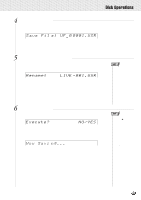
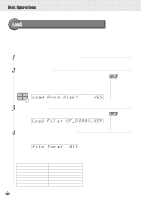
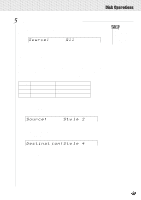
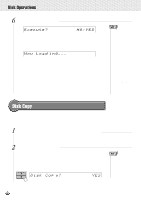
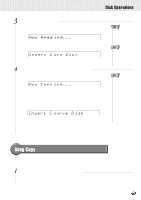
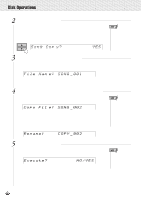
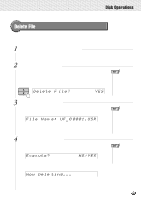
,,QQ,,QQDisk,,QQOpe,,QQration,,QQs ,,QQ,,QQ,,QQ,,QQ,,QQ,,QQ,,QQ,,QQ,,QQ,,QQ,,QQ Load After saving User Style (101-104), User Pad (bank 37-40), and Registration Memory (bank 01-32) data onto a floppy disk, you can reload them into the PSR-730/ 630. You can also load style data from the included Sample Disk or commercially available Yamaha Style File disks. 1 Insert the Floppy Disk into the Disk Drive. Insert the floppy disk that has the data you want to load into the floppy disk drive. 2 Select a Load Function Use the MENU [v] and [w] buttons to select the Disk function so that the triangular indicator in the display appears next to "DISK" to the left of the display. Use the SUB MENU [v] and [w] buttons so that "Load To Disk? YES" appears on the display. SUB MENU Load Fro m Disk? YES • If the DISK menu is selected when there is no floppy disk inserted into the disk drive, "- - -" will be displayed at the top of the display, and disk operations won't be possible. 3 Select the File to Load Press the [+] (YES) button, and "Load File....." file select screen will appear on the display. Load Fil e: UF-0 0001.USR Use the [-] and [+] buttons or the Data Dial to select the file to load. 4 Select the File Type (Data Type) to Load Press the SUB MENU [w] button and the sub menu "File Type:...." will be displayed. File Typ e: All Use the [-] and [+] buttons or the Data Dial to select the file type (data type) to load. The file types that you can load at this point will depend on the types of files that were originally saved to this file. File types that were saved All Style Pad Regist Style+Reg. Pad+Regist Style+Pad File types that can be loaded All, Style, Pad, Regist Style Pad Regist Style, Regist, Style+Reg. Pad, Regist, Pad+Regist Style, Pad , Style+Pad • If the disk contains no file, the display shows "File Not Found!!" indicating that the Load function is not possible. 70
-
 1
1 -
2
-
3
-
4
-
5
-
6
-
7
-
8
-
9
-
10
-
11
-
12
-
13
-
14
-
15
-
16
-
17
-
18
-
19
-
20
-
21
-
22
-
23
-
24
-
25
-
26
-
27
-
28
-
29
-
30
-
31
-
32
-
33
-
34
-
35
-
36
-
37
-
38
-
39
-
40
-
41
-
42
-
43
-
44
-
45
-
46
-
47
-
48
-
49
-
50
-
51
-
52
-
53
-
54
-
55
-
56
-
57
-
58
-
59
-
60
-
61
-
62
-
63
-
64
-
65
-
66
-
 67
67 -
 68
68 -
 69
69 -
 70
70 -
 71
71 -
 72
72 -
 73
73 -
 74
74 -
 75
75 -
 76
76 -
 77
77 -
78
-
79
-
80
-
81
-
82
-
83
-
84
-
85
-
86
-
87
-
88
-
89
-
90
-
91
-
92
-
93
-
94
-
95
-
96
-
97
-
98
-
99
-
100
-
101
-
102
-
103
-
104
-
105
-
106
-
107
-
108
-
109
-
110
-
111
-
112
-
113
-
114
-
115
-
116
-
117
-
118
-
119
-
120
-
121
-
122
-
123
-
124
-
125
-
126
-
127
-
128
-
129
-
130
-
131
-
132
-
133
-
134
-
135
-
136
-
137
-
138
-
139
-
140
-
141
-
142
-
143
-
144
-
145
-
146
-
147
-
148
-
149
-
150
-
151
-
152
-
153
-
154
-
155
-
156
-
157
-
158
-
159
-
160
-
161
-
162
-
163
-
164
-
165
-
166
-
167
-
168
-
169
-
170
-
171
-
172
-
173
-
174
-
175
-
176
-
177
-
178
 |
 |