Yamaha PSR-9000 Owner's Manual - Page 141
Video Monitor Settings, Talk Setting
 |
View all Yamaha PSR-9000 manuals
Add to My Manuals
Save this manual to your list of manuals |
Page 141 highlights
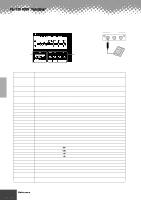
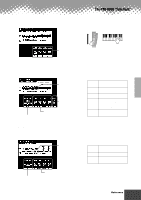
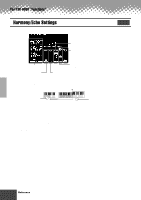
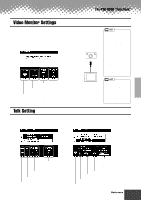
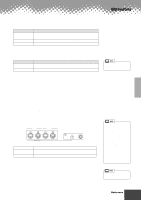
The PSR-9000 "Functions" Video Monitor Settings The functions on this page let you set the display characteristics for the lyrics and chords (page 67) that are output to a television or video monitor connected to the [VIDEO OUT] jack (page 12). You can set the size and color of the displayed characters, as well as the color of the display background. The explanations here apply to step #3 of the Basic Procedure on page 134. VIDEO OUT NTSC/PAL You can set the background to one of four colors. Television The characters displayed on the video screen can be set to any of a variety of colors. Set this to "SMALL" if the contents of the LCD do not fit in the monitor screen. Set this to correspond to the standard (NTSC or PAL) used by your video equipment. The default setting is "PAL." If the standard used by your television or video monitor is not PAL (for example, NTSC is generally used in North America), change the setting to "NTSC." This setting is retained in memory as part of the System Backup parameters. (See pages 50 and 178) Talk Setting This function page includes a number of parameters which affect the microphone sound when the [TALK] button is on. The explanations here apply to step #3 of the Basic Procedure on page 134. • Occasionally some flashing parallel lines may appear in the television or video monitor. This does not indicate that the television or video monitor is malfunctioning; you may be able to remedy the situation by adjusting the Character Color or Background Color parameters. For optimum results, also try adjusting the color settings on the TV monitor itself. • Avoid looking at the television or video monitor for prolonged periods of time since doing so could damage your eyesight. Take frequent breaks and/or focus your eyes on distant objects to avoid eyestrain. • Keep in mind that even after adjusting all settings as recommended here, the TV monitor you are using may not display the LCD contents as expected (e.g., the LCD contents may not fit on the screen, the characters may not be completely clear, or the colors may be wrong). This determines the amount of attenuation to be applied to the overall sound (not including the microphone input). These set the reverb and chorus depth of the microphone sound. This sets the stereo pan position of the microphone sound. This determines the volume or level of your voice from the microphone. This is the same parameter as the Vocal Harmony type described on page 69. When the [TALK] button is turned on, the current type setting is recalled. This turns Vocal Harmony ON or OFF. This selects the type of DSP effect to be applied to the microphone sound. This sets the depth of the DSP effect applied to the microphone sound. This turns the DSP effect applied to the microphone sound ON or OFF. q q q q q q q q q q q q q q q q q q q q q q q q q q q q q q q q q q q q q q q q q q q Reference 141 139
-
 1
1 -
2
-
3
-
4
-
5
-
6
-
7
-
8
-
9
-
10
-
11
-
12
-
13
-
14
-
15
-
16
-
17
-
18
-
19
-
20
-
21
-
22
-
23
-
24
-
25
-
26
-
27
-
28
-
29
-
30
-
31
-
32
-
33
-
34
-
35
-
36
-
37
-
38
-
39
-
40
-
41
-
42
-
43
-
44
-
45
-
46
-
47
-
48
-
49
-
50
-
51
-
52
-
53
-
54
-
55
-
56
-
57
-
58
-
59
-
60
-
61
-
62
-
63
-
64
-
65
-
66
-
67
-
68
-
69
-
70
-
71
-
72
-
73
-
74
-
75
-
76
-
77
-
78
-
79
-
80
-
81
-
82
-
83
-
84
-
85
-
86
-
87
-
88
-
89
-
90
-
91
-
92
-
93
-
94
-
95
-
96
-
97
-
98
-
99
-
100
-
101
-
102
-
103
-
104
-
105
-
106
-
107
-
108
-
109
-
110
-
111
-
112
-
113
-
114
-
115
-
116
-
117
-
118
-
119
-
120
-
121
-
122
-
123
-
124
-
125
-
126
-
127
-
128
-
129
-
130
-
131
-
132
-
133
-
134
-
135
-
 136
136 -
 137
137 -
 138
138 -
 139
139 -
 140
140 -
 141
141 -
 142
142 -
 143
143 -
 144
144 -
 145
145 -
 146
146 -
147
-
148
-
149
-
150
-
151
-
152
-
153
-
154
-
155
-
156
-
157
-
158
-
159
-
160
-
161
-
162
-
163
-
164
-
165
-
166
-
167
-
168
-
169
-
170
-
171
-
172
-
173
-
174
-
175
-
176
-
177
-
178
-
179
-
180
-
181
-
182
-
183
-
184
-
185
-
186
-
187
-
188
-
189
-
190
-
191
-
192
-
193
-
194
-
195
-
196
-
197
-
198
-
199
-
200
-
201
-
202
-
203
-
204
-
205
-
206
-
207
-
208
-
209
-
210
-
211
-
212
-
213
-
214
 |
 |
