Yamaha PSR-9000 Owner's Manual - Page 22
Accompaniment s
 |
View all Yamaha PSR-9000 manuals
Add to My Manuals
Save this manual to your list of manuals |
Page 22 highlights
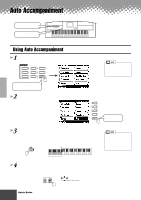
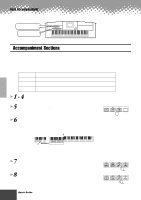
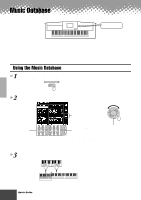
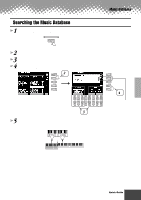
Auto Accompaniment Style related buttons Auto Accompaniment section buttons Accompaniment Sections There are various types of Auto Accompaniment sections that allow you to vary the arrangement of the accompaniment to match the song you are playing. They are: Intro, Main, Fill-in & Break and Ending. By switching among them as you play, you can easily produce the dynamic elements of a professional-sounding arrangement in your performance. INTRO MAIN VARIATION FILL IN & BREAK ENDING This is used for the beginning of the song. When the intro finishes playing, accompaniment shifts to the main section. This is used for playing the main part of the song. It plays an accompaniment pattern of several measures, and repeats indefinitely until another section's button is pressed. This lets you add dynamic variations and breaks in the rhythm of the accompaniment, to make your performance sound even more professional. This is used for the ending of the song. When the ending is finished, the auto accompaniment stops automatically. 1 - 4 Use the same operations as in "Using Auto Accompaniment." 5 Press any of the [INTRO] buttons. INTRO 6 As soon as you play a chord with your left hand, the auto accompaniment starts. For this example, play a C major chord (as shown below). Split Point TAP TAP TEMPO Auto Accompaniment section When the playback of the intro is finished, it automatically leads into main section. 7 Press any of the accompaniment section buttons as desired. (See the Accompaniment Structure Diagram on the next page.) 8 Press any of the [ENDING] buttons. This switches to the ending section. When the ending is finished, the auto accompaniment automatically stops. FILL IN & BREAK ENDING/rit. FADEIN/OUT 22 Quick Guide q q q q q q q q q q q q q q q q q q q q q q q q q q q q q q q q q q q q q q q q q q 20
-
 1
1 -
2
-
3
-
4
-
5
-
6
-
7
-
8
-
9
-
10
-
11
-
12
-
13
-
14
-
15
-
16
-
 17
17 -
 18
18 -
 19
19 -
 20
20 -
 21
21 -
 22
22 -
 23
23 -
 24
24 -
 25
25 -
 26
26 -
 27
27 -
28
-
29
-
30
-
31
-
32
-
33
-
34
-
35
-
36
-
37
-
38
-
39
-
40
-
41
-
42
-
43
-
44
-
45
-
46
-
47
-
48
-
49
-
50
-
51
-
52
-
53
-
54
-
55
-
56
-
57
-
58
-
59
-
60
-
61
-
62
-
63
-
64
-
65
-
66
-
67
-
68
-
69
-
70
-
71
-
72
-
73
-
74
-
75
-
76
-
77
-
78
-
79
-
80
-
81
-
82
-
83
-
84
-
85
-
86
-
87
-
88
-
89
-
90
-
91
-
92
-
93
-
94
-
95
-
96
-
97
-
98
-
99
-
100
-
101
-
102
-
103
-
104
-
105
-
106
-
107
-
108
-
109
-
110
-
111
-
112
-
113
-
114
-
115
-
116
-
117
-
118
-
119
-
120
-
121
-
122
-
123
-
124
-
125
-
126
-
127
-
128
-
129
-
130
-
131
-
132
-
133
-
134
-
135
-
136
-
137
-
138
-
139
-
140
-
141
-
142
-
143
-
144
-
145
-
146
-
147
-
148
-
149
-
150
-
151
-
152
-
153
-
154
-
155
-
156
-
157
-
158
-
159
-
160
-
161
-
162
-
163
-
164
-
165
-
166
-
167
-
168
-
169
-
170
-
171
-
172
-
173
-
174
-
175
-
176
-
177
-
178
-
179
-
180
-
181
-
182
-
183
-
184
-
185
-
186
-
187
-
188
-
189
-
190
-
191
-
192
-
193
-
194
-
195
-
196
-
197
-
198
-
199
-
200
-
201
-
202
-
203
-
204
-
205
-
206
-
207
-
208
-
209
-
210
-
211
-
212
-
213
-
214
 |
 |
