Yamaha PSR-9000 Owner's Manual - Page 74
Recording a Sample
 |
View all Yamaha PSR-9000 manuals
Add to My Manuals
Save this manual to your list of manuals |
Page 74 highlights
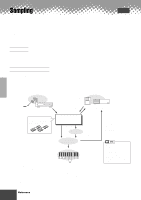
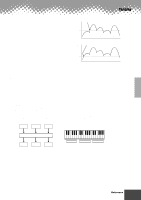
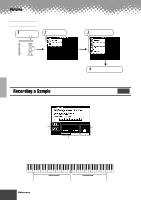
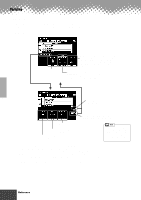
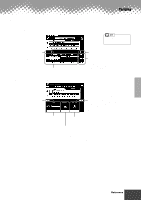
Sampling Basic Procedure 1 Press the [SOUND CREATOR] button. DIGITAL STUDIO SOUND CREATOR SAMPLING CUSTOM VOICE DIGITAL RECORDING SONG STYLE MULTI PAD MIXING CONSOLE EFFECTS FILTER/EQ TUNING PART 2 Select "SAMPLING." 3 Select the desired menu. 4 Follow the on-screen instructions. Refer to "Quick Guide" on page 40 for details. The operations for each function corresponding to step #4 are covered in the following explanations. Recording a Sample Refer to page 40 for instructions on recording a sample. The following display will be shown in step #9 on page 40. Quick Guide on page 40 You can set the START/END KEY by pressing the desired key while holding either of the LCD buttons. Set this parameter to ON if you want the sample to play back at the same pitch over the entire key range of the PSR-9000. Set the key range to which the new sample will be assigned. When FIXED PITCH above is set to OFF, the new recorded sample will be assigned to C3. Notice that the pitch and speed of the sample "follows" the keyboard: Playing keys lower than the original results in a lower pitch and slower speed; playing higher keys results in higher pitch and faster speed. C3 START KEY Pitch/speed of sample goes down. Original key Pitch/speed of sample goes up. END KEY 74 Reference q q q q q q q q q q q q q q q q q q q q q q q q q q q q q q q q q q q q q q q q q q q 72
-
 1
1 -
2
-
3
-
4
-
5
-
6
-
7
-
8
-
9
-
10
-
11
-
12
-
13
-
14
-
15
-
16
-
17
-
18
-
19
-
20
-
21
-
22
-
23
-
24
-
25
-
26
-
27
-
28
-
29
-
30
-
31
-
32
-
33
-
34
-
35
-
36
-
37
-
38
-
39
-
40
-
41
-
42
-
43
-
44
-
45
-
46
-
47
-
48
-
49
-
50
-
51
-
52
-
53
-
54
-
55
-
56
-
57
-
58
-
59
-
60
-
61
-
62
-
63
-
64
-
65
-
66
-
67
-
68
-
 69
69 -
 70
70 -
 71
71 -
 72
72 -
 73
73 -
 74
74 -
 75
75 -
 76
76 -
 77
77 -
 78
78 -
 79
79 -
80
-
81
-
82
-
83
-
84
-
85
-
86
-
87
-
88
-
89
-
90
-
91
-
92
-
93
-
94
-
95
-
96
-
97
-
98
-
99
-
100
-
101
-
102
-
103
-
104
-
105
-
106
-
107
-
108
-
109
-
110
-
111
-
112
-
113
-
114
-
115
-
116
-
117
-
118
-
119
-
120
-
121
-
122
-
123
-
124
-
125
-
126
-
127
-
128
-
129
-
130
-
131
-
132
-
133
-
134
-
135
-
136
-
137
-
138
-
139
-
140
-
141
-
142
-
143
-
144
-
145
-
146
-
147
-
148
-
149
-
150
-
151
-
152
-
153
-
154
-
155
-
156
-
157
-
158
-
159
-
160
-
161
-
162
-
163
-
164
-
165
-
166
-
167
-
168
-
169
-
170
-
171
-
172
-
173
-
174
-
175
-
176
-
177
-
178
-
179
-
180
-
181
-
182
-
183
-
184
-
185
-
186
-
187
-
188
-
189
-
190
-
191
-
192
-
193
-
194
-
195
-
196
-
197
-
198
-
199
-
200
-
201
-
202
-
203
-
204
-
205
-
206
-
207
-
208
-
209
-
210
-
211
-
212
-
213
-
214
 |
 |
