Yamaha PSR-9000 Owner's Manual - Page 77
Loop Point
 |
View all Yamaha PSR-9000 manuals
Add to My Manuals
Save this manual to your list of manuals |
Page 77 highlights
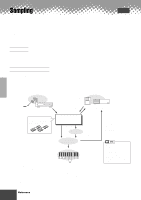
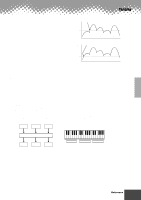
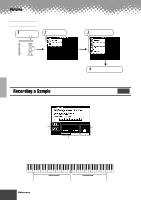
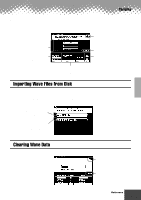
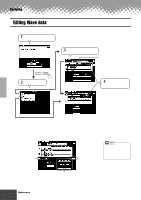
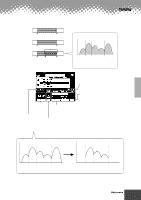
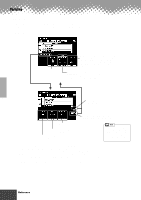
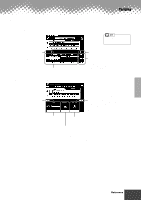
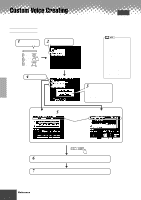
Sampling q Loop Point This display determines how your sampled waves play back. Your sampled waves can be played back in three different ways as follows: WAVE START END Example WAVE START WAVE START LOOP START END LOOP END A B C D E Start point Loop Start point Loop End point B, C, D, C, D, C, D .... Press this to actually edit the selected wave. The LEVEL indicators the right of each address show the signal level at the current address - the longer the bar, the higher the signal level. This makes it easier to locate zero-level points for noise-free trimming and looping. See above. When the ONE SHOT or REVERSE is selected, select either the Start or End address of the wave. When the LOOP is selected, select the Start, Press this to automatically Loop Start or Loop End address of the wave. remove all data prior to the specified Start point and after the End or Loop End point of your sample. See the illustration below. When this is turned ON, the LOOP ADDRESS LCD buttons will automatically only select points in the wave corresponding to, or adjacent to, zero level points. Sample A B C D E Extract Start point Loop Start point Loop End point Sample B C D Start point Loop Start point Loop End point q q q q q q q q q q q q q q q q q q q q q q q q q q q q q q q q q q q q q q q q q q q Reference 77 75
-
 1
1 -
2
-
3
-
4
-
5
-
6
-
7
-
8
-
9
-
10
-
11
-
12
-
13
-
14
-
15
-
16
-
17
-
18
-
19
-
20
-
21
-
22
-
23
-
24
-
25
-
26
-
27
-
28
-
29
-
30
-
31
-
32
-
33
-
34
-
35
-
36
-
37
-
38
-
39
-
40
-
41
-
42
-
43
-
44
-
45
-
46
-
47
-
48
-
49
-
50
-
51
-
52
-
53
-
54
-
55
-
56
-
57
-
58
-
59
-
60
-
61
-
62
-
63
-
64
-
65
-
66
-
67
-
68
-
69
-
70
-
71
-
 72
72 -
 73
73 -
 74
74 -
 75
75 -
 76
76 -
 77
77 -
 78
78 -
 79
79 -
 80
80 -
 81
81 -
 82
82 -
83
-
84
-
85
-
86
-
87
-
88
-
89
-
90
-
91
-
92
-
93
-
94
-
95
-
96
-
97
-
98
-
99
-
100
-
101
-
102
-
103
-
104
-
105
-
106
-
107
-
108
-
109
-
110
-
111
-
112
-
113
-
114
-
115
-
116
-
117
-
118
-
119
-
120
-
121
-
122
-
123
-
124
-
125
-
126
-
127
-
128
-
129
-
130
-
131
-
132
-
133
-
134
-
135
-
136
-
137
-
138
-
139
-
140
-
141
-
142
-
143
-
144
-
145
-
146
-
147
-
148
-
149
-
150
-
151
-
152
-
153
-
154
-
155
-
156
-
157
-
158
-
159
-
160
-
161
-
162
-
163
-
164
-
165
-
166
-
167
-
168
-
169
-
170
-
171
-
172
-
173
-
174
-
175
-
176
-
177
-
178
-
179
-
180
-
181
-
182
-
183
-
184
-
185
-
186
-
187
-
188
-
189
-
190
-
191
-
192
-
193
-
194
-
195
-
196
-
197
-
198
-
199
-
200
-
201
-
202
-
203
-
204
-
205
-
206
-
207
-
208
-
209
-
210
-
211
-
212
-
213
-
214
 |
 |
