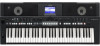
Yamaha PSR-S650 Owner's Manual
Yamaha PSR-S650 Manual
 |
View all Yamaha PSR-S650 manuals
Add to My Manuals
Save this manual to your list of manuals |
Yamaha PSR-S650 manual content summary:
- Yamaha PSR-S650 | Owner's Manual - Page 1
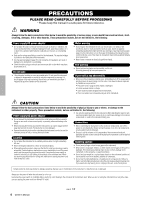
DIGITAL WORKSTATION Owner's Manual Before using the instrument, be sure to read "PRECAUTIONS" on pages 4-5. EN - Yamaha PSR-S650 | Owner's Manual - Page 2
or; a cart, rack, or stand that is recommended by Yamaha. If a cart, etc., is used, please observe all safety markings and instructions that accompany the accessory product. SPECIFICATIONS SUBJECT TO CHANGE: The information contained in this manual is believed to be correct at the time of printing - Yamaha PSR-S650 | Owner's Manual - Page 3
Yamaha Corporation of America Address : 6600 Orangethorpe Ave., Buena Park, Calif. 90620 Telephone : 714-522-9011 Type of Equipment : Digital Keyboard Model Name : PSR-S650 interference that may cause undesired operation. See user manual instructions if interference to radio reception is suspected. - Yamaha PSR-S650 | Owner's Manual - Page 4
outlet. Then have the device inspected by Yamaha service personnel. • The power cord or plug becomes frayed or damaged. • It emits unusual smells or smoke. • Some object has been dropped into the instrument. • There is a sudden loss of sound during use of the instrument. CAUTION Always follow the - Yamaha PSR-S650 | Owner's Manual - Page 5
trademarks of their respective companies. Supplied Accessories • Owner's Manual (this book) • Data List • AC power adaptor * May not be included depending on your particular area. Please check with your Yamaha dealer. • My Yamaha Product User Registration * The PRODUCT ID on the sheet will - Yamaha PSR-S650 | Owner's Manual - Page 6
want more detailed information about PSR-S650 features, refer to the Reference Manual. To check which manual, Owner's or Reference, contains descriptions of the desired function, refer to the Panel Button Chart on page 65. MIDI Reference (Only in English) Contains both the MIDI Data Format and the - Yamaha PSR-S650 | Owner's Manual - Page 7
the Reference Manual. • Style Creator • Song Edit • Style related functions: Style Volume, Track Mute • Song related functions: Song Volume, Track Mute, Right-Part, Left-part • MIDI related functions: PC Mode, Local, External Clock, Keyboard Out, Style Out, Song Out, Initial Setup Owner's Manual 7 - Yamaha PSR-S650 | Owner's Manual - Page 8
Pressing the [REGIST/PART[MIXER]] button at right will alternate the function of the white eight buttons: Registration Memory buttons, Song track setting buttons and Style track setting buttons. !6 Display and related controls....... pages 13-14 8 Owner's Manual - Yamaha PSR-S650 | Owner's Manual - Page 9
q-@4 call up the related displays, all of which are listed in the Panel Button Chart on page 65. !6 !7 keyboard performance. @3 UPPER OCTAVE buttons page 20 Shifts the pitch of the keyboard in octave steps. @4 PITCH BEND wheel page 20 Bends the pitch of the keyboard played sound Owner's Manual 9 - Yamaha PSR-S650 | Owner's Manual - Page 10
Use the specified adaptor (page 70). The use instrument features refer to the Reference Manual. NOTE • The data and settings are always backed up, and are main- tained even when the power is turned off. For information on the backup parameters, see page 53. Connecting a Footswitch 10 Owner's Manual - Yamaha PSR-S650 | Owner's Manual - Page 11
not using the instrument for a long time, make sure to unplug the AC power adaptor from the wall AC outlet. NOTICE • Never attempt to turn the power off when a "Writing.." message is shown in the display. Doing so can damage the data on the flash memory and result in a loss of data. Owner's Manual - Yamaha PSR-S650 | Owner's Manual - Page 12
currently selected language 3 Select a display language. Using dial to select English or Japanese. The language selection will be stored in the internal flash memory so that it is retained even when the power is turned off. 4 Press the [EXIT] button to return to the Main display. 12 Owner's Manual - Yamaha PSR-S650 | Owner's Manual - Page 13
The Main display, called up when the power is turned on, shows all of the current basic settings: Song, Style, Voice. It also includes a range of indicators that show the on/off status of a range of functions. such a case, return to the Main display by pressing the [EXIT] button. Owner's Manual 13 - Yamaha PSR-S650 | Owner's Manual - Page 14
, Style, Song or MDB Use the dial or the [-/NO]/[+/YES] buttons to select an item as desired. Press and hold either button to continuously increment or decrement the value in the corresponding direction. Decrease Increase Press briefly to decrement. Press briefly to increment. 14 Owner's Manual - Yamaha PSR-S650 | Owner's Manual - Page 15
button(s) as many times as necessary until the required function appears, then use the dial or the [-/NO] and [+/YES] buttons to adjust the longer than a second. The buttons are as follows: • [FUNCTION] button Scale • [DEMO] button Demo Group • [ACMP of Functions are available. Owner's Manual 15 - Yamaha PSR-S650 | Owner's Manual - Page 16
and displayed in sequence. The Voice selected here becomes the Main Voice. 3 Play the keyboard. Try selecting and playing a variety of Voices. Press the [EXIT] button to return to the Main display. 16 Owner's Manual NOTE • The main Voice parameters such as Volume can be set in the Function display - Yamaha PSR-S650 | Owner's Manual - Page 17
Voice when you play the keyboard. The second voice is known as the "Dual Voice." NOTE • The Dual Voice parameters such as Voice Volume can be set in the Function display. For details, refer to the Reference Manual. The button lights when Dual is ON. Two Voices will sound at the same time. Press - Yamaha PSR-S650 | Owner's Manual - Page 18
Mixture Kit 023 Indian Kit 024 Chinese Kit 025 Chinese Mixture Kit 3 Play each key and enjoy the Drum Kit. Example: 003 Standard Kit 1 NOTE • See the Drum Kit List in the separate Data List. Brush TaBprush OJpinegnle BeBllsell Tree 18 Owner's Manual - Yamaha PSR-S650 | Owner's Manual - Page 19
a thick sound that is similar to many of the same voices being played in unison. A suitable Reverb type and Chorus type are automatically selected when you select a Style or Song. NOTE • You can specify the Reverb type and Chorus type. For details, refer to the Reference Manual. Owner's Manual 19 - Yamaha PSR-S650 | Owner's Manual - Page 20
value is shown in the display between -1 and +1. The setting can be reset to the initial default value "0" by pressing the [-] and [+] buttons simultaneously. NOTE • When a Drum Kit is selected, each percussion Voice assigned to the keyboard is shifted in location but not pitch. 20 Owner's Manual - Yamaha PSR-S650 | Owner's Manual - Page 21
and [>] buttons as many times as necessary to call up "Tuning." Tuning 3 Use the dial to set the tuning value between 415.3-466.2Hz as desired. The range is 415.3-466.2, equivalent to -1semitone - +1semitone. NOTE • Press the [EXIT] button to return to the Main display. Value Owner's Manual 21 - Yamaha PSR-S650 | Owner's Manual - Page 22
time of Bach and Beethoven, and even now it is often used when performing period music on the harpsichord. Use these tunings when playing Arabic music. NOTE • "(Edited)" will appear in the display if you have created your original scale using the "Scale Tune" function (page 23). 22 Owner's Manual - Yamaha PSR-S650 | Owner's Manual - Page 23
C to F, the tuning values for keys C-B are shifted to F-E. 3 Use the dial to tune the note, then press the [EXECUTE] button. The tuning range is between -64 - +63. The setting can be reset to the initial default value by pressing the [-/NO] and [+/YES] buttons simultaneously. Owner's Manual 23 - Yamaha PSR-S650 | Owner's Manual - Page 24
you want to apply this setting to the Left Voice or Style playback as well as the Main/Dual Voices, follow the instructions below. 1 Press and hold the [FUNCTION] button for longer than a second to call up the Scale select display. 2 Use the CATEGORY [>] button as many times as necessary to select - Yamaha PSR-S650 | Owner's Manual - Page 25
however, you can change it to the keyboard performance by following the instructions below. 1 Press and hold the [FUNCTION] button for longer than a second to call up the Scale select display. 2 Use the CATEGORY [>] button as many times as necessary to select "External Scale Tune." Owner's Manual 25 - Yamaha PSR-S650 | Owner's Manual - Page 26
function off. You can see the on/off status for Touch Response in the Main display. NOTE • Touch Sensitivity, or how the sound volume responds to the playing strength, can be set in the Function display. For details, refer to the Reference Manual. Appears when Touch Response is on 26 Owner's Manual - Yamaha PSR-S650 | Owner's Manual - Page 27
1. Voices - Playing the Keyboard - Using the Metronome Playing the Metronome The metronome provides a click sound, giving you an accurate tempo guide when you practice, or letting you hear and check how a specific tempo sounds. Press the [METRONOME] button to start the metronome. To stop the - Yamaha PSR-S650 | Owner's Manual - Page 28
. 5 Use the TEMPO [+] and [-] buttons to set the tempo. Or press any of the TEMPO buttons once to call up the Tempo setting in the display, then use the dial to set the value. NOTE • Other metronome settings such as Volume or Bell sound can be set in the Function display. 28 Owner's Manual - Yamaha PSR-S650 | Owner's Manual - Page 29
the Style list in the separate Data List. NOTE • The [EXPANSION/USER] button is used for calling up your original Styles created with the Style Creator, or Styles loaded/installed from a USB flash memory (pages 59 and 61.) For details about the Style Creator, refer to the Reference Manual. 3 Turn - Yamaha PSR-S650 | Owner's Manual - Page 30
/STOP] button to begin the rhythm of the selected Style. The bass and chords will begin playing as soon as you play a key in the Auto Accompaniment range of the keyboard. 6 Press one of the MAIN VARIATION [A]-[D] buttons as desired. The selected Main Variation button flashes. 30 Owner's Manual - Yamaha PSR-S650 | Owner's Manual - Page 31
, refer to the Reference Manual. This switches to the Ending section. When the Ending is finished, the Style playback stops automatically. You can have the Ending gradually slow down (ritardando) by pressing the same ENDING/rit. button again while the Ending is playing back. Owner's Manual 31 - Yamaha PSR-S650 | Owner's Manual - Page 32
Styles - Playing Rhythm and Accompaniment - Playing Auto Accompaniment Chords For users who are unfamiliar with chords, this handy chart features common chords for your quick reference. Chords recognized by this instrument are described in the Reference Manual range of the keyboard using only one, - Yamaha PSR-S650 | Owner's Manual - Page 33
" on page 54. If this button is lit, press the button to turn off. The Style files must be saved either in the USB flash memory's root directory or a first-level/second-level/third-level folder in the root directory. The directory can be moved using the CATEGORY [] buttons. Owner's Manual 33 - Yamaha PSR-S650 | Owner's Manual - Page 34
feature automatically selects four ideally matched Voices for the Style you've selected. Select the desired Style (See page 29), then press one of the ONE TOUCH SETTING [1]-[4] buttons to call up the appropriate panel settings. As soon as you play a chord with your left hand, the selected Style - Yamaha PSR-S650 | Owner's Manual - Page 35
Some buttons in the Style Control section become Song related buttons, and other buttons are disabled. • The [ACMP] button cannot be turned on. • Styles cannot be played. 2 Select the desired Song. Use the dial to call up the Songs in order within the category selected in step 1. Owner's Manual 35 - Yamaha PSR-S650 | Owner's Manual - Page 36
3. Using Songs PRESET Built-in Songs 001 Guitar Voice demo (Original) 002 Dance Voice demo (Original) 003 Drums Voice demo (Original) 004 Amazing Grace (Traditional) 005 Annie Laurie (Traditional) 006 Latin (Original) 007 Arabic (Original) 008 Bhangra (Original) 009 Wu Lin Hun (Original) USER - Yamaha PSR-S650 | Owner's Manual - Page 37
button for longer than a second to call up the "Demo Group" selection display, and use the dial to select a repeat playback group from the table below. Press the [DEMO] button to start sequential playback of the Songs in the selected group. Demo Preset User Download USB Demo Song All Preset songs - Yamaha PSR-S650 | Owner's Manual - Page 38
. For details, refer to the Reference Manual. NOTE • No lyrics and chords downloaded from the Internet or commercially available Song files, including XF format files (page 6), are compatible with the lyrics display features as long as they are standard MIDI file format files containing lyric data - Yamaha PSR-S650 | Owner's Manual - Page 39
the end point-for repeat playback. The AB Repeat function is also very convenient for practicing when used along with the score display features of the instrument. A B 1 Play the Song (page 35) and press the [ ] press the [ ] button before start- ing playback of the Song. Owner's Manual 39 - Yamaha PSR-S650 | Owner's Manual - Page 40
is useful when you want to record data to data, the previous data will be erased by the new data. Recording track Performance parts are as follows: Tracks [9]-[16] will be set for Style playback and the Record Ready mode is enabled automatically. NOTE • You can manually select the recorded user - Yamaha PSR-S650 | Owner's Manual - Page 41
Song. Multi-track Recording Procedure 1 Press the [USER] button, then use the dial to select the desired User Song number (001-005) for recording. 2 Press the [EXIT] button to return to the Main display, then assign the Part (Style, Main, Dual and Left) to each recording track. Owner's Manual 41 - Yamaha PSR-S650 | Owner's Manual - Page 42
highlighted, indicating that the Style Part will be assigned to Tracks 9-16 for recording. NOTICE • If you assign the Part to a Track containing data, the Recording operation will erase the previous data. NOTE • The [ACMP of "When the [ACMP] button is turned on:" described above. 42 Owner's Manual - Yamaha PSR-S650 | Owner's Manual - Page 43
keyboard any unnecessary Song data by using Song clear (page saved as a MIDI file to the User Song selected in step refer to page 58. NOTE • The Style number, Style volume and Time signature are recorded only at the top of the Song. These cannot be recorded at the middle of the Song. Owner's Manual - Yamaha PSR-S650 | Owner's Manual - Page 44
following way. 1 Press the [FILE MENU] button. 2 Press the category []buttons until "User Delete" appears. 3 Rotate the dial to select a Song. 4 Press the [EXECUTE] button. A confirmation message will appear in the display. 5 Press the [+/YES] button to clear the Song. 44 Owner's Manual - Yamaha PSR-S650 | Owner's Manual - Page 45
second. Hold for longer than a second. A confirmation message will appear on the display. Press [-/NO] to cancel the Track Clear operation. 4 Press the [+/YES] button to clear the track. The clear-in-progress message will appear briefly on the display while the track is being cleared. Owner's Manual - Yamaha PSR-S650 | Owner's Manual - Page 46
and used in the same way as the internal Music Databases. File load instructions are provided on page 59. 3 Play the chords with your left hand and the melody with your right. The Style will start playing when you play a left-hand chord to the left of the split point (page 30). Refer to page - Yamaha PSR-S650 | Owner's Manual - Page 47
Style. Tracks [1]-[16] can be set for Song playback, and [9]-[16] for Style. 1 Select the Style or Song. 2 Press and hold the [REGIST/PART [MIXER]] button for longer than a second parameter by using the CATEGORY [] buttons and change the parameter value with the dial. Owner's Manual 47 - Yamaha PSR-S650 | Owner's Manual - Page 48
Song cannot be saved. NOTE • For details, refer to the "Style Creator" chapter or "Song Edit" chapter in the Reference Manual. 4 (Only in the SONG EDIT display) Change the file name as necessary, then press the [EXECUTE] button again. For instructions on naming, refer to step 4 on page 57. 5 Press - Yamaha PSR-S650 | Owner's Manual - Page 49
ON/OFF, DSP ON/OFF, DSP Type, Pitch Bend Range, Upper Octave • Transpose • Scale Scale, Scale Tune, Base Note, Part Select * Style number, Auto Accompaniment ON/OFF, Sections, Style Volume and Chord Fingering in the Style settings cannot be memorized and called up in the Song mode. Owner's Manual 49 - Yamaha PSR-S650 | Owner's Manual - Page 50
been memorized. NOTICE • If you press the lighted button that already contains data, the previous data will be replaced with the new one. • Do not turn off the power during this shown below, the REGIST display appears. The dial can also be used to change values. Bank number 50 Owner's Manual - Yamaha PSR-S650 | Owner's Manual - Page 51
Fingering type is set to "FullKeyboard." Disabling Recall of Specific Items (Freeze) Registration Memory lets you recall all the button for longer than a second to call up the Freeze Group Setting display. Use the dial to select the desired item from Style, Voice, Tempo, Transpose Owner's Manual 51 - Yamaha PSR-S650 | Owner's Manual - Page 52
be used to second To cancel the Clear operation, press the [-/NO] button at this message. 4 Press the [+/YES] button to clear the Registration Memory pressed in Step 3. The clear-in- progress message will appear briefly on the display while the Registration Memory is being cleared. 52 Owner's Manual - Yamaha PSR-S650 | Owner's Manual - Page 53
Style Creator function, or Styles loaded or transferred from the external device) • User Music Database (loaded or transferred from the external device) NOTE • You can save the Backup data to your computer, by using the Musicsoft Downloader (MSD) software. For details, refer to the Reference Manual - Yamaha PSR-S650 | Owner's Manual - Page 54
support all commercially available USB devices. Yamaha cannot guarantee operation of USB devices that you purchase. Before purchasing a USB device for use with this instrument, please visit the following web page: http://download.yamaha.com/ NOTE • Other USB devices such as a computer keyboard - Yamaha PSR-S650 | Owner's Manual - Page 55
(information or confirmation dialog) sometimes appears in the display to facilitate operation. Refer to the "Messages" section on page 67 for an explanation of each message. NOTE • No sound will be produced if you play the keyboard while the FILE CONTROL display is showing. Also, in this state only - Yamaha PSR-S650 | Owner's Manual - Page 56
before it can be used by this instrument. NOTICE • If you format a USB flash memory that already contains data, all of the data will be erased. Be careful not to erase important data when using the format function. 1 this operation. Doing so could result in damage to the data. 56 Owner's Manual - Yamaha PSR-S650 | Owner's Manual - Page 57
exists in USB flash memory, use the dial or the [-/NO result in damage to the data. NOTE • If an existing USER FILE folder in the USB flash memory. NOTE • Perform the Load operation (page 59) if you want to recall the Registration Memory file on the USB flash memory to the instrument. Owner's Manual - Yamaha PSR-S650 | Owner's Manual - Page 58
(extension: mid), or one of the User Styles as a Style File-formatted file (extension: sty). What is SMF (Standard MIDI File)? The SMF (Standard MIDI File) format is one of the most common and widely compatible sequence formats used for storing sequence data. There are two variations: Format 0 and - Yamaha PSR-S650 | Owner's Manual - Page 59
EXPANSION/USER] button in the STYLE section then confirm the loaded file name is added on the display. NOTE • When loading a Song or Style, you should set whether the DSP Effect is used for the keyboard performance, or for Song/Style . Doing so may corrupt the data on the device. Owner's Manual 59 - Yamaha PSR-S650 | Owner's Manual - Page 60
9. Using USB Flash Memory Deleting Data from USB Flash Memory This procedure deletes Registration files, Song files and Style files in the USB flash memory. The files to be deleted must be located inside the "USER FILES" this operation. Doing so could result in damage to the data. 60 Owner's Manual - Yamaha PSR-S650 | Owner's Manual - Page 61
as User Songs using Expansion Voices and Styles. 3 Use the dial to select the Expansion Pack you want to install. You can confirm the information of the selected file by pressing the [START/STOP] button. After confirming, press the [EXIT] button to return to the display of step 2. Owner's Manual - Yamaha PSR-S650 | Owner's Manual - Page 62
User Song, Style and Registration Memory using the previous Expansion Contents will produce the unexpected sound. 1 Press the [FILE MENU] button. 2 Use the CATEGORY [] buttons to select "Expansion Pack restored to the initial factory defaults when the power is turned on. 62 Owner's Manual - Yamaha PSR-S650 | Owner's Manual - Page 63
computer will automatically be set to enable MIDI communication with the instrument. Using Yamaha Standard USB-MIDI driver When data communication is unstable or some problem occurs even though you've executed the above instructions, download the Yamaha Standard USBMIDI driver from the following - Yamaha PSR-S650 | Owner's Manual - Page 64
AppAepndpixendix Troubleshooting Problem Power suddenly and unexpectedly turns off. When the instrument is turned on or off, a popping sound is temporarily produced. When using a mobile phone, noise is produced. There is no sound even when the keyboard is played or when a song or style is being - Yamaha PSR-S650 | Owner's Manual - Page 65
second MAIN Display called up via the Button w MASTER VOLUME control - e [DEMO] button r [SONG MODE] button DEMO display * FUNCTION - DEMO - Demo Group - SONG buttons [PRESET] t [USER] [SCORE] [LYRICS] y [USB] button u [REC] button i STYLE buttons [POP & ROCK]-[EXPANSION/USER] STYLE - Yamaha PSR-S650 | Owner's Manual - Page 66
PC - PC Mode FUNCTION - MIDI - Local FUNCTION - MIDI - External Clock FUNCTION - MIDI - Keyboard Out FUNCTION - MIDI - Style Out FUNCTION - MIDI - Song Out FUNCTION - MIDI - Initial Setup FUNCTION - 28 22 34 16 17 17 17 17 19 - 26 - 19 19 - 20 20 Reference Manual 66 Owner's Manual - Yamaha PSR-S650 | Owner's Manual - Page 67
Style cannot be used because the source Style was not loaded properly. Displayed when the internal memory becomes full during recording. Indicates that loading data cannot be executed since the file data is too large. Internal memory capacity may not be large enough to save the Song. Owner's Manual - Yamaha PSR-S650 | Owner's Manual - Page 68
. Disconnect the device from the USB TO DEVICE terminal, then turn on the power of the instrument. Displayed when too much MIDI data was received at one time and failed to proceed. NOTE • Not all the messages are listed in the table: the messages necessary to be explained only. 68 Owner's Manual - Yamaha PSR-S650 | Owner's Manual - Page 69
Styles Custom Other Features Mega Voices Live! Voices Cool! Voices Sweet! Voices Voice Wave Voice Set Reverb Chorus DSP Master EQ Harmony Dual Split Panel Sustain Number of Preset Styles Fingering Style Control SFF GE User Styles Style Creator + External Files 4 for Each Style Owner's Manual 69 - Yamaha PSR-S650 | Owner's Manual - Page 70
User Songs Song Edit Number of Songs Tracks Data Capacity Recording Function Function Compatible Data Format Registration Demo Overall Controls Expansion Pack by Yamaha 25 W (When using PA-300 power adaptor) Yes • Owner's Manual • Data List • Music Rest • My Yamaha Product User Registration - Yamaha PSR-S650 | Owner's Manual - Page 71
DC IN 10 Delete (File Menu 60 Delete (User Song 44 Demo Song 37 Dial 14 Display 13-15 Drum Kit 18 DSP 19 DUAL 17 Dual Voice 17 E Effect 19 Ending 31 ENDING/rit 31 EXECUTE 15 EXIT 13 Expansion Pack 61 Expansion Styles 61 Expansion Voices 61 External Clock 7 External Scale Tune 25 - Yamaha PSR-S650 | Owner's Manual - Page 72
MIDI File 58 Song 35 SONG category 35 Song Clear 44 SONG CONTROL 36 Song Edit 7 SONG MODE 35 Song Out 7 Song Volume 7 Specifications 69 Split Point 17, 30 STANDBY/ON 11 START/STOP 30 Style 29 STYLE category 29 STYLE CONTROL 30-31 72 Owner's Manual Style Creator 7 Style File - Yamaha PSR-S650 | Owner's Manual - Page 73
or operation or failure to follow instructions according to the Owner's Manual for this product; any shipment of the product (claims must be presented to the carrier); repair or attempted repair by anyone other than Yamaha or an authorized Yamaha Service Center; (b) any unit which has been altered - Yamaha PSR-S650 | Owner's Manual - Page 74
. 5F Ambience Corporate Tower Ambience Mall Complex Ambience Island, NH-8, Gurgaon-122001, Haryana, India Tel: 0124-466-5551 INDONESIA PT. Yamaha Musik Indonesia (Distributor) PT. Nusantik Gedung Yamaha Music Center, Jalan Jend. Gatot Subroto Kav. 4, Jakarta 12930, Indonesia Tel: 021-520-2577 KOREA - Yamaha PSR-S650 | Owner's Manual - Page 75
Yamaha Global Home http://www.yamaha.com/ Yamaha Manual Library http://www.yamaha.co.jp/manual/ U.R.G., Digital Musical Instruments Division © 2011 Yamaha Corporation ***POTY*.*-01A0 Printed in China WW73170
-
 1
1 -
 2
2 -
 3
3 -
 4
4 -
 5
5 -
 6
6 -
 7
7 -
8
-
9
-
10
-
11
-
12
-
13
-
14
-
15
-
16
-
17
-
18
-
19
-
20
-
21
-
22
-
23
-
24
-
25
-
26
-
27
-
28
-
29
-
30
-
31
-
32
-
33
-
34
-
35
-
36
-
37
-
38
-
39
-
40
-
41
-
42
-
43
-
44
-
45
-
46
-
47
-
48
-
49
-
50
-
51
-
52
-
53
-
54
-
55
-
56
-
57
-
58
-
59
-
60
-
61
-
62
-
63
-
64
-
65
-
66
-
67
-
68
-
69
-
70
-
71
-
72
-
73
-
74
-
75
 |
 |
Owner’s Manual
DIGITAL WORKSTATION
EN
Before using the instrument, be sure to read “PRECAUTIONS” on pages 4-5.