Yamaha PSR-S650 Reference Manual
Yamaha PSR-S650 Manual
 |
View all Yamaha PSR-S650 manuals
Add to My Manuals
Save this manual to your list of manuals |
Yamaha PSR-S650 manual content summary:
- Yamaha PSR-S650 | Reference Manual - Page 1
DIGITAL WORKSTATION Reference Manual Explains advanced features of the PSR-S650. After reading the Owner's Manual and you want more detailed information about PSR-S650 features, refer to the Reference Manual. EN - Yamaha PSR-S650 | Reference Manual - Page 2
with a computer 48 PC Mode 48 MIDI Settings 49 Initial Setup 50 Transferring Data Between the Computer and Instrument 51 Installing Musicsoft Downloader 51 Transferring Data by using the Musicsoft Downloader 51 Index 53 Using the PDF manual • To quickly jump to items and topics of interest - Yamaha PSR-S650 | Reference Manual - Page 3
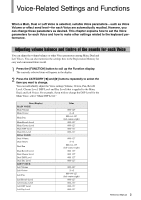
the keyboard performance. Adjusting volume balance and timbre of the sounds for center-right) 000-127 000-127 000-127 000-127 000-127 -2-+2 000-64-127 (left-center-right) 000-127 000-127 000-127 000-127 000-127 -2-+2 000-64-127 (left-center-right) 000-127 000-127 000-127 000-127 Reference Manual - Yamaha PSR-S650 | Reference Manual - Page 4
Voice, using specific velocity values to play the desired sounds. Because of the complex nature of these Voices and the precise velocities need to play the sounds, they're not intended for playing from the keyboard. They are, however, very useful and convenient when creating MIDI data-especially - Yamaha PSR-S650 | Reference Manual - Page 5
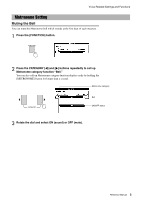
Functions Metronome Setting Muting the Bell You can mute the Metronome bell which sounds at the first beat of each measure. 1 Press the [FUNCTION] button ] button for longer than a second. Metronome category Bell ON/OFF status 3 Rotate the dial and select ON (sound) or OFF (mute). Reference Manual 5 - Yamaha PSR-S650 | Reference Manual - Page 6
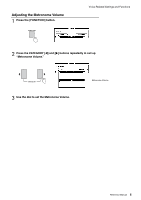
Adjusting the Metronome Volume 1 Press the [FUNCTION] button. Voice-Related Settings and Functions 2 Press the CATEGORY [] buttons repeatedly to call up "Metronome Volume." 3 Use the dial to set the Metronome Volume. Metronome Volume Reference Manual 6 - Yamaha PSR-S650 | Reference Manual - Page 7
3 Use the dial to select a Touch Sensitivity setting between 1 and 3. 1 (Soft) 2 (Medium) 3 (Hard) Produces high volume with moderate playing strength. Standard touch response. Requires moderately strong playing for higher volume. NOTE • The initial default setting is 2. Reference Manual 7 - Yamaha PSR-S650 | Reference Manual - Page 8
EQ) settings which are provided to give you the best possible sound when listening through different reproduction systems: the instrument's built-in using a mixer. Setting 5 is more suitable for small external speakers, and compared to 4, emphasizes the low and high frequencies. Reference Manual - Yamaha PSR-S650 | Reference Manual - Page 9
feature List in the separate Data List for information about the available Harmony types. Try playing the keyboard with the Harmony function. The effect and operation of each Harmony type is different-for details, refer to the section "How to play Each Harmony Type" in chapter 1 in the Owner's Manual - Yamaha PSR-S650 | Reference Manual - Page 10
Reverb type will be displayed. Reverb type Selected Reverb type 3 Use the dial to select a Reverb type. Refer to the Effect Type List in the separate Data List for information about the available Reverb types. Try playing the keyboard with the Reverb function. Adjusting the Reverb Level You can - Yamaha PSR-S650 | Reference Manual - Page 11
Chorus type will be displayed. Chorus type Selected Chorus type 3 Use the dial to select a Chorus type. Refer to the Effect Type List in the separate Data List for information about the available Chorus types. Try playing the keyboard with the Chorus function. Adjusting the Chorus Level You can - Yamaha PSR-S650 | Reference Manual - Page 12
during Song playback. DSP type Hold for longer than a second Selected DSP type 3 Use the dial to select a DSP type. Refer to the Effect Type List in the separate Data List for information about the available DSP types. Try playing the keyboard with the DSP function. Adjusting the DSP Level You - Yamaha PSR-S650 | Reference Manual - Page 13
is applied to the Dual Voice or Left Voice as well as the Main Voice. If you want to create a custom sound using a favorite Voice, determine the Voices, effects and Voice parameters first, then memorize the settings to the Registration Memory without changing the Style or Song. Reference Manual 13 - Yamaha PSR-S650 | Reference Manual - Page 14
1 Press the [FUNCTION] button. 2 Press the CATEGORY [] buttons repeatedly to call up "Style Volume." Style Volume Setting range is 000-127 3 Use the dial to set the Style Volume. NOTE • For instructions on adjusting the volume of the keyboard performance, see page 3. Reference Manual 14 - Yamaha PSR-S650 | Reference Manual - Page 15
various appropriate instrument sounds to match the Style. These are the basic parts of the Style, containing the drum and percussion rhythm patterns. These are the rhythmic chord backing parts, commonly used with piano or guitar Voices. This part is used for sustained instruments such as strings - Yamaha PSR-S650 | Reference Manual - Page 16
hand (in the auto accompaniment section of the keyboard). 1 Press and hold the [ACMP] button for longer than a second to call up the Chord Fingering type select display. 2 Use in chapter 2 in the Owner's Manual cannot be detected in the AI Fingered mode. "AI" stands for "Artificial - Yamaha PSR-S650 | Reference Manual - Page 17
Style-Related Settings Chord Types Recognized in the Multi Finger C Seventh flatted fifth [7b5] Seventh augmented [7aug] Seventh suspended fourth [7sus4] Suspended second [sus2] Normal Voicing 1 - 3 - 5 1 - 2 - 3 - 5 1 - (3) - 5 - 6 1 - 2 - 3 - (5) - 6 1 - 3 - (5) - 7 1 - 2 Reference Manual 17 - Yamaha PSR-S650 | Reference Manual - Page 18
Variation (Sections) The instrument features a wide variety of Style "sections" that allow you to vary the arrangement of the accompaniment to match the Song you are playing. Play the Intro Press one of the INTRO [I]-[III] buttons to add an introduction as soon as Style Playback is started. When - Yamaha PSR-S650 | Reference Manual - Page 19
Style-Related Settings Setting the Split Point Set the point on the keyboard that separates the right and left-hand sections (Split Point). When Auto Accompaniment is off, keys played in the left-hand section are used for playing the Left Voice. When Auto Accompaniment is on, the left-hand section - Yamaha PSR-S650 | Reference Manual - Page 20
storage location Play Preset Styles Installation Style Creator (Owner's Manual) (page 30) Transfer (page 51) USB flash memory Connect Expansion Styles User Style Load USB Style Save Expansion Styles and User Styles can be selected using the [EXPANSION/USER] button. Reference Manual 20 - Yamaha PSR-S650 | Reference Manual - Page 21
User Styles and USB Styles. Preset Styles and Expansion Styles cannot be used for the save destination. The setups you created will be saved as part of Style data. 1 Select the desired User Style or USB Style to [1]-[4] buttons to call up the new One Touch Setting in the Style. Reference Manual 21 - Yamaha PSR-S650 | Reference Manual - Page 22
Owner's Manual. Adjusting the Song Volume This lets you adjust the volume balance between Song playback and the sound you play on the keyboard -127 3 Use the dial to set the Song Volume. NOTE • For instructions on adjusting the volume of the keyboard performance, see page 3. Reference Manual 22 - Yamaha PSR-S650 | Reference Manual - Page 23
the [1/9]-[8/16] buttons. No track number ... No data. Unlit ... Contains no data or is muted. Lit in green ... Contains data and is played Track number without border ... Track contains data but is muted. Track number with border ... Track contains data and is not muted. Reference Manual 23 - Yamaha PSR-S650 | Reference Manual - Page 24
"Random." If you want to restore the normal playback mode, select "Normal." 4 Press the [DEMO] button to start random playback. The Songs specified as the Demo Group will play back in random order. You can stop playback at any time by pressing the [DEMO] or [START/STOP] button. Reference Manual 24 - Yamaha PSR-S650 | Reference Manual - Page 25
. Your own performance Computer Song storage location Play Preset Songs (001-009) Record (Owner's Manual) Transfer (page 51) USB flash memory Connect User Songs (001-005) User Songs (006-) Load USB Songs Save User Songs can be selected using the [USER] button. Reference Manual 25 - Yamaha PSR-S650 | Reference Manual - Page 26
is engaged. 1 Select a User Song or a Song on a USB flash memory that contains the data you want to edit. Available Songs are limited to SMF format with file extension: ".mid." Preset Songs cannot be used for editing. 2 Press and hold the [REC] button for longer than a second to call up the Song - Yamaha PSR-S650 | Reference Manual - Page 27
Ch Transpose This allows you to transpose the recorded data of individual channels up or down by a maximum of eighth notes are the shortest in the track, you should use eighth note as the Quantize size. After 1/8 note quantization , if you use the eighth note + eighth note triplet setting, - Yamaha PSR-S650 | Reference Manual - Page 28
Mixer display, refer to Chapter 6 in the Owner's Manual. Use the TEMPO buttons to adjust the Tempo. Editing Songs Hold for longer than a second To return USB"; if you want to save to internal memory, select "Save To USER" in the display. Pressing the [USB] button alternates the save destination - Yamaha PSR-S650 | Reference Manual - Page 29
[1] button moves the cursor to the left, and the [2] button moves it to the right. • Use the dial to select a character for the current cursor location. The following different types of characters are display. 11 Press the [EXIT] button to exit from the Song Edit display. Reference Manual 29 - Yamaha PSR-S650 | Reference Manual - Page 30
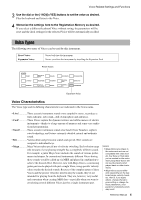
Creating Original Styles (Style Creator) This instrument has a Style Creator feature that lets you record and save your own original Styles. Recorded Styles can be played in the same manner as the preset Styles. Style Structure Style data consists of 14 sections, each of which has eight separate - Yamaha PSR-S650 | Reference Manual - Page 31
finished, you can exit from the Style Creator. When the saving operation of recorded data is not finished, a confirmation message appears asking if you want to exit from the Style Creator without saving the data. Press the [+/YES] button to exit, or the [-/NO] button to cancel. Reference Manual 31 - Yamaha PSR-S650 | Reference Manual - Page 32
. Erase unwanted data from the instrument to make more memory available. NOTE • Adjust individual track vol- umes before recording. You can use the Mixer function to adjust individual track volumes before proceeding with step 2. For details, refer to chapter 6 in the Owner's Manual. Current section - Yamaha PSR-S650 | Reference Manual - Page 33
Styles (Style Creator) Beat settings If you create a new Style from scratch, you need to set the Beat. If you use an existing Style you create a Style based on an existing Style, the following message appears. Press the [+/YES] button to clear (discard) all sections in the Style. Reference Manual 33 - Yamaha PSR-S650 | Reference Manual - Page 34
Styles (Style Creator) Section Settings The Style Creator provides following two basic ways: • Record parts from the keyboard (using Realtime Recording) Perform "Select a section" and "Beat settings," then go on to "Part Settings." • Assemble various sections from existing Styles the STYLE CONTROL - Yamaha PSR-S650 | Reference Manual - Page 35
Styles (Style Creator) 4 Rotate the dial or directly press one the STYLE category buttons to select a source Style. You can select the currently edited Style. Use returns to the one in step 2 above. NOTE • Depending on the data size of source and destination sections, the source section may not be - Yamaha PSR-S650 | Reference Manual - Page 36
sure to set the measure length when you want to create a Style from scratch. When using an existing Style, set as necessary. You cannot set the measure length for the set a length smaller than that of the previous one, any data existing beyond the new length will be deleted. Reference Manual 36 - Yamaha PSR-S650 | Reference Manual - Page 37
Creating Original Styles (Style Creator) Part Settings Selecting a Recording Part 1 Press the CATEGORY [] buttons repeatedly until "Part" appears in the display. 2 Rotate until "Chorus Level" appears in the display. 2 Rotate the dial and set the Chorus depth. Range: 0-127 Reference Manual 37 - Yamaha PSR-S650 | Reference Manual - Page 38
Creating Original Styles (Style Creator) Unlit, does not contain data or is a non-playing Part (muted) Lit in green, contains data and selected as playing Part Lit in red, recorded Part Rhythm Part recording If you select a rhythm Part for recording on page 37, follow the instructions below - Yamaha PSR-S650 | Reference Manual - Page 39
(Style Creator) 3 Play the keyboard and record the drum Voices. Since the entire Style plays repeatedly, you can record at any point you like. 4 Press the [START/STOP] button to stop recording. Clear the recorded drum Voices To clear the recorded drum Voices, after starting recording (refer to - Yamaha PSR-S650 | Reference Manual - Page 40
Creating Original Styles (Style Creator) Editing (Quantize and part clear) Quantize This function allows the recorded Part is not specified, Quantize cannot be set. Specify the Part for recording and then use the Quantize function. • The undo icon on the display will disappear if you exit from the - Yamaha PSR-S650 | Reference Manual - Page 41
Creating Original Styles (Style Creator) Clearing a recorded Part Select a desired section for clearing, and then follow the instructions below. 1 Press the CATEGORY [] buttons repeatedly until "Part Clear" appears in the display. 2 To select a Part for clearing, press and hold the desired - Yamaha PSR-S650 | Reference Manual - Page 42
be created. If you select "Save To USER" as a save destination, the recorded data will be saved to the [EXPANSION/USER] button. Save destination File name If you want to overwrite the existing user Style file, select the file by using the dial, then go on to step 3. Reference Manual 42 - Yamaha PSR-S650 | Reference Manual - Page 43
delete a User Style from a [EXPANSION/USER] button, or select "USB Delete" if you want to delete a User Style file on a USB flash memory. 3 Use the Dial to select the User Style data you want to delete. 4 Press the [EXECUTE] button. 5 Press the [+/YES] button to delete the file. Reference Manual 43 - Yamaha PSR-S650 | Reference Manual - Page 44
] buttons are used to make ON/ OFF type settings: [+/ YES] = ON, [-/NO] = OFF. Press the [-/NO] and [+/YES] buttons simultaneously to recall the default setting (excepting the initial setup of MIDI). • Decrement described in the "Initialization" section in the Owner's Manual. Reference Manual 44 - Yamaha PSR-S650 | Reference Manual - Page 45
* Determines the octave range for the Main Voice. 000-64-127 (Left - Center - Right) * Determines the pan position of the Main Voice in the stereo image. A value of "0" results in the sound being panned full left, while "127" results in the sound being panned full right. Reference Manual 45 - Yamaha PSR-S650 | Reference Manual - Page 46
performance data (MIDI) in one convenient operation. ON/OFF ON/OFF ON OFF Determines whether the instrument's keyboard controls the internal tone generator (ON) or not (OFF). Determines whether the instrument synchronizes to the internal clock (OFF) or an external clock (ON). Reference Manual 46 - Yamaha PSR-S650 | Reference Manual - Page 47
1-16, OFF 1 (Demo), 2 (Preset), 3 (User), 4 (Download), 5 (USB) 1 (Normal), 2 (Random) ON/OFF TG Mode XG/Normal Auto Power off LANGUAGE OFF, 5, 10, 15, 30, 60, 120 Language English/Japanese Default setting Description ON Determines whether keyboard performance data of the instrument is - Yamaha PSR-S650 | Reference Manual - Page 48
, and how to transfer a file. For details about connection with a computer and driver installation, refer to the chapter "Connecting to a Computer" in the Owner's Manual. MIDI Settings for transferring performance data with a computer PC Mode Setting "PC Mode" in the Function display makes the - Yamaha PSR-S650 | Reference Manual - Page 49
to a Computer MIDI Settings These settings pertain to performance data transmission and reception. Item Local External Clock Song Out Style Out Keyboard Out Range/ Settings Description Local control determines whether or not notes played on the instru- ON/OFF ment are sounded by its internal - Yamaha PSR-S650 | Reference Manual - Page 50
panel setup and ensure that the same sound is produced upon playback. NOTE • The playback sound of the Drum Kit Voice may differ from recording sound. 1 Press the [FUNCTION] button. 2 Use the CATEGORY [] buttons to select "Initial Setup." 3 Press [+/YES] to send. Reference Manual 50 - Yamaha PSR-S650 | Reference Manual - Page 51
Downloader. Transferring Data by using the Musicsoft Downloader For Musicsoft Downloader operating instructions see the Help menu: launch the Musicsoft Downloader application and click "Help." Data that can be transferred between the instrument and a computer • Backup data (PSR-S650.BUP) • Styles - Yamaha PSR-S650 | Reference Manual - Page 52
a computer. To recall the settings, move the "PSR-S650.BUP" file from a computer to "System Drive" under "Electronic Musical Instruments." Transferring Styles and Songs you have recorded on the instrument to a computer Operation Using Musicsoft Downloader, move the file from "Flash Memory" under - Yamaha PSR-S650 | Reference Manual - Page 53
25 User Style 20 V Volume (Metronome 6 Volume (Song 22 Volume (Style 14 Volume (Voice 3 E Effects 9 Expansion Style 20 Expansion Voice 4 External Clock 49 F File Transition 51 Fingering 16 FullKeyboard 16 Functions 44 H Harmony 9 Harmony Volume 46 I Initial Setup 50 K Keyboard Out
-
 1
1 -
 2
2 -
 3
3 -
 4
4 -
 5
5 -
 6
6 -
 7
7 -
8
-
9
-
10
-
11
-
12
-
13
-
14
-
15
-
16
-
17
-
18
-
19
-
20
-
21
-
22
-
23
-
24
-
25
-
26
-
27
-
28
-
29
-
30
-
31
-
32
-
33
-
34
-
35
-
36
-
37
-
38
-
39
-
40
-
41
-
42
-
43
-
44
-
45
-
46
-
47
-
48
-
49
-
50
-
51
-
52
-
53
 |
 |
DIGITAL WORKSTATION
Reference Manual
Explains advanced features of the PSR-S650. After reading the Owner’s Manual and
you want more detailed information about PSR-S650 features, refer to the Reference Manual.
EN