Yamaha PSR-S710 Reference Manual
Yamaha PSR-S710 Manual
 |
View all Yamaha PSR-S710 manuals
Add to My Manuals
Save this manual to your list of manuals |
Yamaha PSR-S710 manual content summary:
- Yamaha PSR-S710 | Reference Manual - Page 1
DIGITAL WORKSTATION Reference Manual This Reference Manual explains advanced features of the PSR-S910/S710 that are not explained in the Owner's Manual. Please read the Owner's Manual first, before reading this Reference Manual. EN - Yamaha PSR-S710 | Reference Manual - Page 2
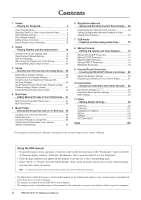
, Style, etc.) for Each Song - 64 Creating a Set of Favorite Records 64 Editing Records 65 Saving the Record as a Single File 66 Viewing Record Information on the Internet (MUSIC FINDER Plus 67 6 Registration Memory - Saving and Recalling Custom Panel Setups - 68 Disabling Recall of Specific - Yamaha PSR-S710 | Reference Manual - Page 3
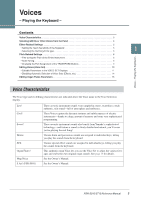
individual keys, letting you play the sounds from the keyboard. This authentic organ Voice lets you use the Voice Set to adjust the various footages and craft your own original organ sounds. See page 15 for details. See the Owner's Manual. See the Owner's Manual. PSR-S910/S710 Reference Manual 3 - Yamaha PSR-S710 | Reference Manual - Page 4
of GM/XG Voices, GM2 Voices, etc. NOTE (PSR-S910) You can find the "Legacy" folder in this display. This folder contains previous Yamaha keyboards' Voices (such as PSR-S900, PSR-S700, etc.) for data compatibility with other models. 6 Select the desired Voice. 4 PSR-S910/S710 Reference Manual - Yamaha PSR-S710 | Reference Manual - Page 5
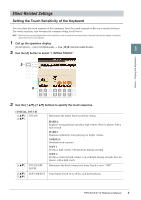
Keyboard You can adjust the touch response of the instrument (how the sound responds to the way you play the keys). Best for players with a light touch. Determines the fixed volume level when Touch is set to "OFF." Turns Initial Touch on or off for each keyboard part. PSR-S910/S710 Reference Manual - Yamaha PSR-S710 | Reference Manual - Page 6
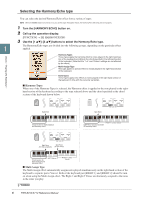
on the right-hand section of the keyboard to separate parts (Voices). Both of the keyboard part [RIGHT 1] and [RIGHT 2] should be turn on when using the Multi Assign effect. The Right 1 and Right 2 Voices are alternately assigned to the notes in the order you play. 6 PSR-S910/S710 Reference Manual - Yamaha PSR-S710 | Reference Manual - Page 7
lowest velocity value at which the harmony note will sound. This allows you to selectively apply the harmony by your playing strength, letting you create harmony accents in the melody. The harmony effect is applied when you play the key strongly (above the set value). PSR-S910/S710 Reference Manual - Yamaha PSR-S710 | Reference Manual - Page 8
feature of this scale is that each key has its own unique character. The scale was used extensively during the time of Bach and Beethoven, and even now it is often used when performing period music on the harpsichord. Use these tunings when playing Arabic music. 8 PSR-S910/S710 Reference Manual - Yamaha PSR-S710 | Reference Manual - Page 9
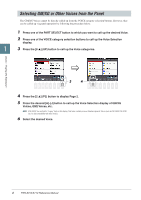
the pitch of Song playback. MASTER When this is selected, the TRANSPOSE [-]/[+] buttons affect the overall pitch of the instrument, except audio playback. You can confirm the setting here by viewing the pop-up window called up via the TRANSPOSE [-]/[+] buttons. PSR-S910/S710 Reference Manual 9 - Yamaha PSR-S710 | Reference Manual - Page 10
for the ORGAN FLUTES Voices compared to other Voices. For instructions on editing the ORGAN FLUTES Voices on page 11. 3 5 Voices - Playing the Keyboard - 4 4 As necessary, use the [A]/[B] buttons power to the instrument off without executing the Save operation. 10 PSR-S910/S710 Reference Manual - Yamaha PSR-S710 | Reference Manual - Page 11
on offset Received Velocity (Actual KeyOn speed) Offset=0 (-127) Voices - Playing the Keyboard - 1 DEPTH Determines the velocity sensitivity, or how much the level of the Voice smooth transition in pitch from the first note played on the keyboard to the next. PSR-S910/S710 Reference Manual 11 - Yamaha PSR-S710 | Reference Manual - Page 12
to which the MODULATION wheel modulates the amplitude, or the tremolo effect. Voices - Playing the Keyboard - ■ SOUND Page FILTER Filter is a processor that changes the timbre or tone of a effect. Cutoff range Frequency (pitch) Resonance Frequency (pitch) 12 PSR-S910/S710 Reference Manual - Yamaha PSR-S710 | Reference Manual - Page 13
how quickly the sound decays to silence after the key is released. The lower the value, the quicker the decay. Voices - Playing the Keyboard - VIBRATO Vibrato is a quavering, vibrating sound effect the VOICE CONTROL [SUSTAIN] button on the panel is turned on. PSR-S910/S710 Reference Manual 13 - Yamaha PSR-S710 | Reference Manual - Page 14
of the Low and High EQ bands. For information about EQ, refer to page 78. ■ HARMONY Page Same as in the [ keyboard part. 2 3 3 Use the [4 ▲▼]-[7 ▲▼] buttons to enable/disable automatic calling up of the settings (ON or OFF) independently for each parameter group. 14 PSR-S910/S710 Reference Manual - Yamaha PSR-S710 | Reference Manual - Page 15
the power to the instrument off without executing the Save operation. ■ FOOTAGE Page Refer to the Owner's Manual, chapter 1. 1 ■ VOLUME/ATTACK Page Same as the FOOTAGE Page. Voices - Playing the Keyboard - VOICE SET "EFFECT/EQ" Page explained on page 13. PSR-S910/S710 Reference Manual 15 - Yamaha PSR-S710 | Reference Manual - Page 16
Making Style File Format Settings 31 Styles - Playing Rhythm and Accompaniment - Selecting the Chord Fingering Type Style playback can be controlled by the chords you play in the chord section of the keyboard. Depending on the chord, some notes may be omitted. 16 PSR-S910/S710 Reference Manual - Yamaha PSR-S710 | Reference Manual - Page 17
Style chords. Although the AI Full Keyboard type is designed to work with many songs, some arrangements may not be suitable for use with this feature. This type is similar to Full Keyboard only for Style playback. NOTE "AI" stands for "Artificial Intelligence." PSR-S910/S710 Reference Manual 17 - Yamaha PSR-S710 | Reference Manual - Page 18
of the keyboard with the Style stopped, and recorded regardless of the setting here. Please note that both the Voice that is sounded and the chord data will be recorded when set to "STYLE," and only the chord data will be recorded when set to "OFF" or "FIXED." 18 PSR-S910/S710 Reference Manual - Yamaha PSR-S710 | Reference Manual - Page 19
of the initial default tempo for the selected Style. This determines whether the Style Channel On/Off status changes or not when you change Styles. HOLD The Style Channel On/Off status of the previous Style is maintained. RESET All Style Channels are set to On. PSR-S910/S710 Reference Manual 19 - Yamaha PSR-S710 | Reference Manual - Page 20
by pressing the desired key on the keyboard while holding the [G] or [H] button. NOTE Split Point (L) cannot be set lower than Split Point (S). You can specify each Split Point by note name. "STYLE" indicates Split Point (S) and "LEFT" indicates Split Point (L). 20 PSR-S910/S710 Reference Manual - Yamaha PSR-S710 | Reference Manual - Page 21
Style Selection display and save the panel settings as a Style file. CAUTION The panel settings memorized to each OTS button will be lost if you change the Style or turn the power off without executing the Save operation. Styles - Playing Rhythm and Accompaniment - PSR-S910/S710 Reference Manual - Yamaha PSR-S710 | Reference Manual - Page 22
28. • CHANNEL Edits data for each channel-quantizing, changing velocity, etc. See page 30. • PARAMETER Changes the settings related for Style File Format. See page 31. • EDIT Lets you enter notes one by one to create your Style (Step Recording). See page 26. 22 PSR-S910/S710 Reference Manual - Yamaha PSR-S710 | Reference Manual - Page 23
up the RECORD display again, press the [F] (REC CH) button. NOTE You can specify the sections to be recorded by using the Section buttons on the panel. Refer to step 3 on page 26. NOTE You cannot select INTRO 4 and ENDING 4 sections directly via the panel operation. PSR-S910/S710 Reference Manual 23 - Yamaha PSR-S710 | Reference Manual - Page 24
button, [1 ▲]-[8 ▲]. You can cancel the deletion by pressing the same numbered button again before releasing your finger from the [J] button. NOTE When recording channels BASS-PHR2 based on the existing Style, you have to delete the original data before recording. 24 PSR-S910/S710 Reference Manual - Yamaha PSR-S710 | Reference Manual - Page 25
button to close the RECORD display. 13 Press the [I] (SAVE) button to execute the Save operation. CAUTION The edited Style will be lost if you change to another Style or turn the power to the instrument off , any appropriate chord or chord progression can be used. PSR-S910/S710 Reference Manual 25 - Yamaha PSR-S710 | Reference Manual - Page 26
instructions on Step Recording, refer to pages 45-48. For information on the EDIT display (Event List display), refer to page 58. Style Assembly Style Assembly allows you to create a single Style select INTRO 4 and ENDING 4 sections directly via the panel operation. 26 PSR-S910/S710 Reference Manual - Yamaha PSR-S710 | Reference Manual - Page 27
. • OFF Mutes the selected channel in the ASSEMBLY Page. 7 Press the [J] (SAVE) button to execute the Save operation. CAUTION The edited Style will be lost if you change to another Style or turn the power to the instrument off without executing the Save operation. PSR-S910/S710 Reference Manual 27 - Yamaha PSR-S710 | Reference Manual - Page 28
edit menu, then edit the data by using the [1 ▲▼]-[8 ▲▼] buttons. Styles - Playing Rhythm and Accompaniment - 1 GROOVE This lets you add swing to the cases, "A" types produce minimum effect, "B" types produce medium effect, and "C" types produce maximum effect. 28 PSR-S910/S710 Reference Manual - Yamaha PSR-S710 | Reference Manual - Page 29
be undone. 3 Press the [I] (SAVE) button to execute the Save operation. CAUTION The edited Style will be lost if you change to another Style or turn the power to the instrument off without executing the Save operation. Styles - Playing Rhythm and Accompaniment - PSR-S910/S710 Reference Manual 29 - Yamaha PSR-S710 | Reference Manual - Page 30
one level; only the previous operation can be undone. 5 Press the [I] (SAVE) button to execute the Save operation. CAUTION The edited Style will be lost if you change to another Style or turn the power to the instrument off without executing the Save operation. 30 PSR-S910/S710 Reference Manual - Yamaha PSR-S710 | Reference Manual - Page 31
guitar parts. NOTE The Style files created on the PSR-S910/S710 can only be played back on instruments which are compatible with SFF GE. 1 In the PARAMETER Page, use the [A]/[B] buttons to select the edit menu. For details of the edit menu, see page 32. 1 4 2 3 PSR-S910/S710 Reference Manual 31 - Yamaha PSR-S710 | Reference Manual - Page 32
BASS is set to "OFF," the "Source Root" and "Source Chord" parameters are changed to "Play Root" and "Play Chord," respectively. In this case, you can change chords and hear the resulting sound for all channels. NOTE This is not applied when NTR is set to GUITAR. 32 PSR-S910/S710 Reference Manual - Yamaha PSR-S710 | Reference Manual - Page 33
as close as possible to the previous note range. For example, the notes C3, E3 and G3 in the key of C become C3, F3 and A3 when they are transposed to F. Use this setting for channels that contain respond only to major/minor chords, such as Intros and Endings. PSR-S910/S710 Reference Manual 33 - Yamaha PSR-S710 | Reference Manual - Page 34
These set the note range (highest and lowest notes) for Voices recorded to the Style channels. By judicious setting of this range lowest note is C3 and the highest is D4. Root changes CM C#M FM Notes played E3-G3-C4 E#3-G#3-C#4 F3-A3-C4 High Limit Low Limit 34 PSR-S910/S710 Reference Manual - Yamaha PSR-S710 | Reference Manual - Page 35
note is retriggered with a new attack at the root note of the next chord. ROOT However, the octave of the new note remains the same. 2 Styles - Playing Rhythm and Accompaniment - PSR-S910/S710 Reference Manual 35 - Yamaha PSR-S710 | Reference Manual - Page 36
[B] SONG SETTING and set the TRACK 2 parameter to any channel except "OFF" (page 41). RIGHT (next parameter) and LEFT cannot be turned off at the same time. Enables/disables display of the right-hand key range. RIGHT and LEFT (above) cannot be turned off at the same time. 36 PSR-S910/S710 Reference - Yamaha PSR-S710 | Reference Manual - Page 37
(OK) button. 3 Songs - Recording Your Performances and Creating Songs - [1 ▲▼] [2 ▲▼] LEFT CH RIGHT CH [3 ▲▼]/ KEY SIG[4 ▲▼] NATURE [5 ▲▼] QUANTIZE Determines which MIDI channel in the Song data is used for to select the smallest note value used in the Song. PSR-S910/S710 Reference Manual 37 - Yamaha PSR-S710 | Reference Manual - Page 38
key. The root note is indicated as Do. For example, in the key of G major the root note of "Sol" would be indicated as "Do." As with "Fixed Do," the indication differs depending on the selected language. 3 Songs - Recording Your Performances and Creating Songs - 38 PSR-S910/S710 Reference Manual - Yamaha PSR-S710 | Reference Manual - Page 39
buttons Text display 3 Songs - Recording Your Performances and Creating Songs - Press the picture is specified in the Song data, the BACKGROUND setting cannot be changed. NOTE For information on available image files, refer to the MAIN PICTURE parameter on page 103. PSR-S910/S710 Reference Manual - Yamaha PSR-S710 | Reference Manual - Page 40
CHORD on (page 36) allows you to see the chord information. NOTE When playing back a Song and a Style at the same time, the tempo value set in the Song is automatically used. When the Song playback is stopped, the Style playback is also stopped at the same time. 40 PSR-S910/S710 Reference Manual - Yamaha PSR-S710 | Reference Manual - Page 41
part of the Guide function and the Song Score function. AUTO CH SET When set to "ON," this automatically sets the proper MIDI channels for the Right- and Left hand parts pre-programmed in the commercially available Song data. Normally, this should be set to "ON." PSR-S910/S710 Reference Manual 41 - Yamaha PSR-S710 | Reference Manual - Page 42
.) 1 Select the desired Song for practicing the keyboard or singing. 2 Call up the setting display. [FUNCTION] → [B] SONG SETTING 3 Use the [A]/[B] buttons to select the desired Guide function type. Songs - Recording Your Performances and Creating Songs - 42 PSR-S910/S710 Reference Manual - Yamaha PSR-S710 | Reference Manual - Page 43
part of the Song data (page 57). For Songs to which the Guide settings have been saved, the Guide function will be automatically turned on and the related settings will be recalled when the Song is selected. Songs - Recording Your Performances and Creating Songs - PSR-S910/S710 Reference Manual 43 - Yamaha PSR-S710 | Reference Manual - Page 44
Songs - Recording Your Performances and Creating Songs - 4 Press the SONG PLAY/PAUSE) button to start playback. 5 Play the keyboard. The instrument automatically matches your performance on the keyboard to the Song playback and chords, no matter what keys hand. 44 PSR-S910/S710 Reference Manual - Yamaha PSR-S710 | Reference Manual - Page 45
SONG [■] (STOP) buttons simultaneously. A blank Song ("New Song") is called up for recording. NOTE Selecting a blank Song initializes the panel settings. 2 Call up the operation display. [FUNCTION] → [F] DIGITAL REC MENU → [A] SONG CREATOR → TAB [E][F] 1-16 3 4 PSR-S910/S710 Reference Manual 45 - Yamaha PSR-S710 | Reference Manual - Page 46
Recording by using the [A]-[J] buttons and [1 ▲▼]-[8 ▲▼] buttons. Refer to the example on page 47 for specific instructions. When a note is input, the location (bar: beat: clock), note name, velocity and length are shown as a list. 3 Songs - Recording -note. 46 PSR-S910/S710 Reference Manual - Yamaha PSR-S710 | Reference Manual - Page 47
a key on the keyboard while executing the operation. Select the Voice for recording after calling up the Step Recording display. NOTE Since the music score displayed on the instrument is generated from the recorded MIDI data, it may not appear exactly the same as shown here. Songs - Recording Your - Yamaha PSR-S710 | Reference Manual - Page 48
key on the keyboard, press the [6 ▲▼] button. Do not release the G3 key recorded Song data will be lost if you select another Song or turn the power to the instrument off without executing the Save operation. Songs - Recording Your Performances and Creating Songs - 48 PSR-S910/S710 Reference Manual - Yamaha PSR-S710 | Reference Manual - Page 49
] → [F] DIGITAL REC MENU → [A] SONG CREATOR → TAB [E][F] CHORD 4 Press the [G] (STEP REC) button to call up the STEP RECORD display. 3 5 Start Step Recording. About these buttons, refer to page 46. Songs - Recording Your Performances and Creating Songs - PSR-S910/S710 Reference Manual 49 - Yamaha PSR-S710 | Reference Manual - Page 50
the [6 ▲▼] button to select the quarter-note length. 2-3 Play the chords F, and G7 in the chord section of the keyboard. 2-1 2-3 F G7 2-2 NOTE To enter fill-ins, turn the [AUTO FILL IN] button to ON, and simply press the desired MAIN VARIATION [A]-[D] button. 50 PSR-S910/S710 Reference Manual - Yamaha PSR-S710 | Reference Manual - Page 51
Press the [I] (SAVE) button to execute the Save operation. CAUTION The recorded Song data will be lost if you select another Song or turn the power to the instrument off without executing the Save operation. Songs - Recording Your Performances and Creating Songs - PSR-S910/S710 Reference Manual 51 - Yamaha PSR-S710 | Reference Manual - Page 52
Out measure (set with the corresponding display button), at which point recording stops and normal playback continues. This setting maintains all data after the point at which recording is stopped. You can set the Punch Out measure by pressing the [6 ▲▼] buttons. 52 PSR-S910/S710 Reference Manual - Yamaha PSR-S710 | Reference Manual - Page 53
7 8 *1 To avoid overwriting measures 1-2, start recording from measure 3. *2 To stop recording, press the [REC] button at the end of measure 5. Previously recorded data Newly recorded data Deleted data Songs - Recording Your Performances and Creating Songs - 3 PSR-S910/S710 Reference Manual 53 - Yamaha PSR-S710 | Reference Manual - Page 54
the [I] (SAVE) button to execute the Save operation. CAUTION The recorded Song data will be lost if you select another Song or turn the power to the instrument off without executing the Save operation. Songs - Recording Your Performances and Creating Songs - 54 PSR-S910/S710 Reference Manual - Yamaha PSR-S710 | Reference Manual - Page 55
for this. Songs - Recording Your Performances and Creating Songs - [2 ▲▼]/ CHANNEL [3 ▲▼] Determines which MIDI channel in the Song data is to recording. Quarter-note length Original data (assuming 4/4 meter) Quantizing strength =100 Quantizing strength =50 PSR-S910/S710 Reference Manual - Yamaha PSR-S710 | Reference Manual - Page 56
1 SOURCE 2 DESTINATION Determines the MIDI channel (1-16) to be mixed. All MIDI events of the channel specified of Drum kits, the instruments assigned to each key will be changed. [F] CH 1-8/CH 9-16 Songs - Recording Your Performances and Creating Songs - 56 PSR-S910/S710 Reference Manual - Yamaha PSR-S710 | Reference Manual - Page 57
the settings in the Lyrics display. MIC SETTING (PSR-S910) Records the microphone and the Vocal Harmony settings in the Mixing Console display. [8 ▲] [8 ▼] MARK ON MARK OFF Add or remove a checkmark to the selected item. Checked items are recorded to the Song. PSR-S910/S710 Reference Manual 57 - Yamaha PSR-S710 | Reference Manual - Page 58
editing and restores the original value. NOTE After you edit events in the CHORD tab display, press the [F] (EXPAND) button to convert the data into Song data. NOTE Chord section data recorded with Realtime Recording cannot be indicated and edited on this display. 58 PSR-S910/S710 Reference Manual - Yamaha PSR-S710 | Reference Manual - Page 59
copy, and paste the data. ■ Lyrics Events (LYRICS Page) Name Allows you to enter the Song name. Lyrics Allows you to enter lyrics. Code CR: Enters a line break in the lyrics text. LF: Clears the currently displayed lyrics and displays the next set of lyrics. PSR-S910/S710 Reference Manual 59 - Yamaha PSR-S710 | Reference Manual - Page 60
Recording Your Performances and Creating Songs - [C] MAIN Displays all main types of events. [D] CTRL. CHG Displays all specific Control Change message events. [E] STYLE Displays all types of Style Page. 3 Press the [EXIT] button to execute the settings. 60 PSR-S910/S710 Reference Manual - Yamaha PSR-S710 | Reference Manual - Page 61
create the Multi Pad data from scratch, press the [C] (NEW BANK) button to call up an empty bank. 5 Press the [H] (REC) button to enter the recording standby status for the Multi Pad selected in step 4. PSR-S910/S710 Reference Manual 61 - Yamaha PSR-S710 | Reference Manual - Page 62
61, press the TAB [F] button to select the EDIT Page. The EDIT page indicates the Event list, which lets you record notes with absolutely precise timing. This Step Recording procedure is essentially the same as that for Song Recording by pressing the [F] button. 62 PSR-S910/S710 Reference Manual - Yamaha PSR-S710 | Reference Manual - Page 63
See below. Deletes the selected Multi Pads. For details on the naming and deleting procedures, refer to the Owner's Manual. Copying the Multi Pad 1 Press the [3 ▼] button in step 4 above. 2 Select . 4 Press the [4 ▼] (PASTE) button to execute the Copy operation. PSR-S910/S710 Reference Manual 63 - Yamaha PSR-S710 | Reference Manual - Page 64
Display 1 Select the record you want to delete from the FAVORITE display. 2 Press the [H] (DELETE FROM FAVORITE) button, then press the [G] (YES) button to actually delete the record. Music Finder - Calling Up Ideal Setups (Voice, Style, etc.) for Each Song - 64 PSR-S910/S710 Reference Manual - Yamaha PSR-S710 | Reference Manual - Page 65
Style automatically be set up to start with an Intro section. For SONG or AUDIO records, this field cannot be changed. [5 ▲▼]/ GENRE [6 ▲▼] Selects the desired genre. [7 ▲▼] GENRE NAME Creates a new genre. [I] DELETE RECORD Deletes the currently selected record. PSR-S910/S710 Reference Manual - Yamaha PSR-S710 | Reference Manual - Page 66
to another location beforehand. The records called up are added to the record currently in the instrument. Selecting this button aborts the operation (the selected file is not called up). Music Finder - Calling Up Ideal Setups (Voice, Style, etc.) for Each Song - 66 PSR-S910/S710 Reference Manual - Yamaha PSR-S710 | Reference Manual - Page 67
FINDER +) button to open the Web page. The information of the selected record is shown. 4 Press the [EXIT] button to exit the browser screen and return to the MUSIC FINDER 5 display. Music Finder - Calling Up Ideal Setups (Voice, Style, etc.) for Each Song - PSR-S910/S710 Reference Manual 67 - Yamaha PSR-S710 | Reference Manual - Page 68
Voices or effect settings while keeping the same accompaniment Style. This is where the Freeze function comes in handy power off without exiting from this display, the settings will be lost. 4 Press the [FREEZE] button on the panel to turn the Freeze function on. 68 PSR-S910/S710 Reference Manual - Yamaha PSR-S710 | Reference Manual - Page 69
when you want to quickly switch between settings-without having to take your hands from the keyboard. The convenient Registration Sequence function lets you call up the eight setups in any order you Registration Memory - Saving and Recalling Custom Panel Setups - PSR-S910/S710 Reference Manual 69 - Yamaha PSR-S710 | Reference Manual - Page 70
saved to the instrument when you exit from this display. However, if you turn the power off without exiting from this display, the settings will be lost. Confirming the Registration page 69). Registration Memory - Saving and Recalling Custom Panel Setups - 70 PSR-S910/S710 Reference Manual - Yamaha PSR-S710 | Reference Manual - Page 71
file. 1 Press the REGIST BANK [+] and [-] buttons simultaneously to call up the REGISTRATION BANK Selection display. 2 Press the [6 ▼] (SAVE) button to save the Bank file. 6 PSR-S910/S710 Reference Manual 71 Registration Memory - Saving and Recalling Custom Panel Setups - - Yamaha PSR-S710 | Reference Manual - Page 72
USB Audio - Playback and Recording Audio Files - This function is fully explained in the Owner's Manual. Refer to the corresponding chapter in the Owner's Manual. Mixing Console - Editing the Volume and Tonal Balance - Contents Editing VOL/VOICE Parameters 72 • Song Auto Revoice 72 Editing - Yamaha PSR-S710 | Reference Manual - Page 73
be replaced (Voices usually used when playing back). Selects the Voices used to replace the XG Voices (when SONG AUTO REVOICE is set to ON). [F] ALL REVOICE Replaces all of the replaceable XG Voices with the each part by adjusting the cutoff frequency (page 12). PSR-S910/S710 Reference Manual 73 - Yamaha PSR-S710 | Reference Manual - Page 74
- 8 BOARD), respectively. Please note that the "KEYBOARD" also transposes the keyboard pitch of Style playback and the Multi Pads (since these are also affected by keyboard play in the left-hand section). Mixing Console - Editing the Volume and Tonal Balance - 74 PSR-S910/S710 Reference Manual - Yamaha PSR-S710 | Reference Manual - Page 75
only to Style/Song parts. SONG CHANNEL 1-16 8 DSP2, DSP3, DSP4 RIGHT 1, RIGHT 2, LEFT, SONG CHANNEL 1-16, Microphone sound* (PSR-S910) Any unused DSP blocks are automatically assigned to the appropriate parts (channels) as needed. One DSP block is available only for one of the keyboard parts or - Yamaha PSR-S710 | Reference Manual - Page 76
re-selected effect configuration is displayed at the upper left side box in the display. NOTE Keep in mind that in some cases noise may result if you adjust the effect parameters while playing the instrument. Mixing Console - Editing the Volume and Tonal Balance - 76 PSR-S910/S710 Reference Manual - Yamaha PSR-S710 | Reference Manual - Page 77
. 6 Press the [I] (SAVE) button to save the effect. When recalling the saved effect, use the same procedure as in steps 4-5 of "Selecting an Effect Type." 8 PSR-S910/S710 Reference Manual 77 Mixing Console - Editing the Volume and Tonal Balance - - Yamaha PSR-S710 | Reference Manual - Page 78
called "Shape" or "Q") Freq (Frequency) 5 bands → LOW LOWMID MID HIGHMID HIGH EQ1 EQ2 EQ3 EQ4 EQ5 Mixing Console - Editing the Volume and Tonal Balance - 78 PSR-S910/S710 Reference Manual - Yamaha PSR-S710 | Reference Manual - Page 79
and saved. The saved EQ can be recalled from the EQ tab display by using the [A]/[B] buttons. 8 Mixing Console - Editing the Volume and Tonal Balance - PSR-S910/S710 Reference Manual 79 - Yamaha PSR-S710 | Reference Manual - Page 80
Directly to the Internet - Internet Direct Connection - Connecting the PSR-S910/S710 Directly to the Internet - Contents Editing the Browser Settings 80 Registering the [7 ▲▼] (OK) button to close the display. To cancel, press the [8 ▲▼] (CANCEL) button. 80 PSR-S910/S710 Reference Manual - Yamaha PSR-S710 | Reference Manual - Page 81
Internet Direct Connection - Connecting the PSR-S910/S710 Directly to the Internet - Registering Bookmarks of Your Favorite Pages You can "bookmark" the to the browser. The bookmarked page can be opened by pressing the [2 ▲▼] (VIEW) button in the Bookmark display. PSR-S910/S710 Reference Manual 81 - Yamaha PSR-S710 | Reference Manual - Page 82
as well as delete unnecessary bookmarks from the list. Internet Direct Connection - Connecting the PSR-S910/S710 Directly to the Internet - [1 ▲▼] (UP/DOWN) Moves the selection position in the . Closes the Bookmark display and returns to the browser display. 82 PSR-S910/S710 Reference Manual - Yamaha PSR-S710 | Reference Manual - Page 83
. 10 CAUTION Settings in the OVERALL SETTING Page are automatically saved to the instrument when you exit from the display. However, if you turn the power off without exiting from this display, the settings will be lost. PSR-S910/S710 Reference Manual 83 - Yamaha PSR-S710 | Reference Manual - Page 84
keyboard and/or the notes of the song song data control over harmony is turned off. When set to one of the values 1-16, note data (played from a Song on the PSRS910 or external MIDI sequencer) contained on the corresponding channel is used to control the harmony. 84 PSR-S910/S710 Reference Manual - Yamaha PSR-S710 | Reference Manual - Page 85
keyboard (with the [ACMP] turned off and the [LEFT] turned on), and chords contained in Song data for controlling the harmony. (Not available if the Song does not contain any chord data.) The following parameters determine which data in a recorded Song Devices - 10 PSR-S910/S710 Reference Manual 85 - Yamaha PSR-S710 | Reference Manual - Page 86
function gives you special settings for making announcements between songs, separate from the settings for your singing performance when you exit from the display. However, if you turn the power off without exiting from this display, the settings will be lost. 86 PSR-S910/S710 Reference Manual - Yamaha PSR-S710 | Reference Manual - Page 87
Devices - 3 Select a Vocal Harmony type to be edited by using the [A]-[J] buttons. 3 4 4 Press the [8 ▼] (EDIT) button to call up the VOCAL HARMONY EDIT display. 10 PSR-S910/S710 Reference Manual 87 - Yamaha PSR-S710 | Reference Manual - Page 88
settings here will be lost if you change to another Vocal Harmony type or you turn the power off without executing the save operation. Vocal Harmony Edit parameters VOCODER TYPE Determines how the harmony corresponding gender change is applied to the lead vocal. 88 PSR-S910/S710 Reference Manual - Yamaha PSR-S710 | Reference Manual - Page 89
stereo (pan) position of the first (lowest), second, and third (highest) harmony note. Random The stereo position of the sound will change randomly whenever the keyboard is played. This is effective when the - Using Your Instrument with Other Devices - 10 PSR-S910/S710 Reference Manual 89 - Yamaha PSR-S710 | Reference Manual - Page 90
functions to the pedal-punch in/out of Song (page 52) and Registration Sequence (page 69). If you keyboard part on this display. Allows you to use a foot controller to control the volume. You can turn this pedal function on or off for each part on this display. 90 PSR-S910/S710 Reference Manual - Yamaha PSR-S710 | Reference Manual - Page 91
while the pedal is pressed. Portamento is produced when notes are played legato style (i.e., a note is played while the preceding note is still held). The or off for each keyboard part on this display. Connections - Using Your Instrument with Other Devices - 10 PSR-S910/S710 Reference Manual 91 - Yamaha PSR-S710 | Reference Manual - Page 92
key on the keyboard, the velocity with which you press the key determines the percussion volume. Same as the PART ON/OFF [RIGHT 1] button. Same as the PART ON/OFF [RIGHT 2] button. Same as the PART ON/OFF [LEFT] button. Calls up the next/previous One Touch Setting. 92 PSR-S910/S710 Reference Manual - Yamaha PSR-S710 | Reference Manual - Page 93
via MIDI reception data (page 98) 5 When you've finished editing, press the [EXIT] button to return to the MIDI template Selection display. 6 Select USER tab display by using the TAB [E][F] buttons, then press the [6 ▼] (SAVE) button to save the edited template. 10 PSR-S910/S710 Reference Manual - Yamaha PSR-S710 | Reference Manual - Page 94
you play/control the chord root in Style playback with a MIDI pedal unit. This template lets you play the bass part for Style playback by using a MIDI pedal unit. No MIDI signals are sent or received. Connections - Using Your Instrument with Other Devices - 10 94 PSR-S910/S710 Reference Manual - Yamaha PSR-S710 | Reference Manual - Page 95
of MIDI chord exclusive data (chord detect. root and type) on or off. The "Rx" setting turns MIDI reception and recognition of MIDI chord exclusive data generated by external equipment on or off. Connections - Using Your Instrument with Other Devices - 10 PSR-S910/S710 Reference Manual 95 - Yamaha PSR-S710 | Reference Manual - Page 96
▲▼]-[8 ▲▼] button to determine the types of data to be sent. The following MIDI messages can be set on the TRANSMIT/RECEIVE display. NOTE (Note events page 59 CC (Control Change page 59 PC (Program Change page 59 PB (Pitch Bend page 59 AT (Aftertouch page 59 96 PSR-S910/S710 Reference Manual - Yamaha PSR-S710 | Reference Manual - Page 97
is as follows: ● MIDI reception [MIDI IN] jack [USB TO HOST] jack ● MIDI transmission [MIDI OUT] jack [USB TO HOST] jack Port handling USB1 Merge USB2 MIDI/USB1 01-16 USB2 01-16 MIDI/USB 01-16 Connections - Using Your Instrument with Other Devices - 10 PSR-S910/S710 Reference Manual 97 - Yamaha PSR-S710 | Reference Manual - Page 98
the [I] (ALL OFF) button. Setting the Chord Type for Style Playback via MIDI Receive The explanations here apply to the CHORD DETECT Page in step MIDI data received over the channels. 10 The operation procedure is basically the same as that of the BASS display above. 98 PSR-S910/S710 Reference Manual - Yamaha PSR-S710 | Reference Manual - Page 99
). [4 ▲▼] FADE OUT TIME Determines the time it takes for the volume to fade out, or go from maximum to minimum (range of 0-20.0 seconds). [5 ▲▼] FADE OUT HOLD TIME Determines the time the volume is held at 0 following the fade out (range of 0-5.0 seconds). 11 PSR-S910/S710 Reference Manual 99 - Yamaha PSR-S710 | Reference Manual - Page 100
other words, instead of being changed via Registration Memory, One Touch Setting, Music Finder, or Song and sequence data. Use the [1 ▲▼]-[7 ▲▼] buttons to select the desired parameter, then [6 ▲▼] Sets the velocity. Utility - Making Global Settings - 11 100 PSR-S910/S710 Reference Manual - Yamaha PSR-S710 | Reference Manual - Page 101
which the pop-up windows close. (Pop-up windows are displayed when you press buttons such as TEMPO, TRANSPOSE or UPPER OCTAVE, etc.) SCREEN OUT Refer to the Owner's Manual, chapter 10. Utility - Making Global Settings - 11 PSR-S910/S710 Reference Manual 101 - Yamaha PSR-S710 | Reference Manual - Page 102
Owner's Manual, chapter 10. Turns the Song Auto Open function on or off. When this is set to "ON" and the media selected in the Device List above is inserted, the instrument automatically calls up the first Song in the media. Utility - Making Global Settings - 11 102 PSR-S910/S710 Reference Manual - Yamaha PSR-S710 | Reference Manual - Page 103
the opening display when you turn the power on. Refer to the Owner's Manual. [J] MAIN PIC- Lets you select background picture for the Main display. You can select a TURE picture from among various pictures provided on the Preset Page. After (PSR-S910) selecting, press the [EXIT] button to - Yamaha PSR-S710 | Reference Manual - Page 104
settings of the selected Bank. The same can be done also by turning the [STANDBY/ON] button ON while holding the B5 key (right-most B key on the keyboard). 2 Press the [D] (FACTORY RESET) button to execute the Factory Reset operation for all checkmarked items. 104 PSR-S910/S710 Reference Manual - Yamaha PSR-S710 | Reference Manual - Page 105
FILES UTILITY and microphone setting display (PSR-S910) are handled as a single System Setup file. Refer to the Data List for details on which parameters belong to the System Setup. [G] MIDI SETUP The MIDI settings including the MIDI Making Global Settings - 11 PSR-S910/S710 Reference Manual 105 - Yamaha PSR-S710 | Reference Manual - Page 106
90 Freeze 68 Frequency 78 FULL KEYBOARD 17 G Gain 78 GLIDE 91 GM 4 GROOVE 22, 28 Guide 42 GUITAR 33 H HARMO. (Harmonic Content 12 HARMONIC CONTENT 73 HARMONIC MINOR 33 HARMONY 14 Harmony Type 6 HARMONY/ECHO 6 HIGH KEY 34 Home page setting 80 106 PSR-S910/S710 Reference Manual - Yamaha PSR-S710 | Reference Manual - Page 107
Connection 80 K Karao-Key 43 KEY SIGNATURE 37 KEYBOARD (Transpose 9 KEYBOARD/PANEL 5, 9 KIRNBERGER 8 L Legacy 4 LENG (Length 15 LFO 12 Live 3 Local Control 95 Loop Recording 23 Lyrics 39 LYRICS (Song Creator 45 Lyrics Events 59 LYRICS LANGUAGE 42 M MAIN PICTURE 103 MASTER (Transpose - Yamaha PSR-S710 | Reference Manual - Page 108
MIDI 95 Step Recording (Multi Pad 62 Step Recording (Song 45, 49 Step Recording (Style 26 STOP (RTR 35 STOP ACMP 18 STRENGTH 29 STROKE 34 Style 16 Style Assembly 26 STYLE CREATOR 22 Style File Format 31 STYLE SETTING 18 STYLE W WERCKMEISTER 8 X XG 4 108 PSR-S910/S710 Reference Manual
-
 1
1 -
 2
2 -
 3
3 -
 4
4 -
 5
5 -
 6
6 -
 7
7 -
8
-
9
-
10
-
11
-
12
-
13
-
14
-
15
-
16
-
17
-
18
-
19
-
20
-
21
-
22
-
23
-
24
-
25
-
26
-
27
-
28
-
29
-
30
-
31
-
32
-
33
-
34
-
35
-
36
-
37
-
38
-
39
-
40
-
41
-
42
-
43
-
44
-
45
-
46
-
47
-
48
-
49
-
50
-
51
-
52
-
53
-
54
-
55
-
56
-
57
-
58
-
59
-
60
-
61
-
62
-
63
-
64
-
65
-
66
-
67
-
68
-
69
-
70
-
71
-
72
-
73
-
74
-
75
-
76
-
77
-
78
-
79
-
80
-
81
-
82
-
83
-
84
-
85
-
86
-
87
-
88
-
89
-
90
-
91
-
92
-
93
-
94
-
95
-
96
-
97
-
98
-
99
-
100
-
101
-
102
-
103
-
104
-
105
-
106
-
107
-
108
 |
 |
EN
This Reference Manual explains advanced features of the PSR-S910/S710 that are not explained in the
Owner’s Manual. Please read the Owner’s Manual first, before reading this Reference Manual.
Reference Manual
DIGITAL WORKSTATION