Yamaha PSR-S910 Reference Manual - Page 37
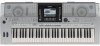
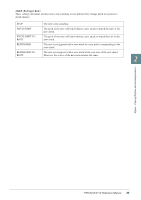
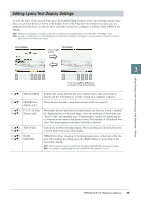
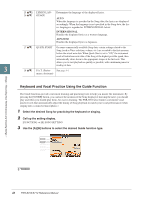
Pressing the [8, SET UP button calls up the detailed setting display. You can set
 |
View all Yamaha PSR-S910 manuals
Add to My Manuals
Save this manual to your list of manuals |
Page 37 highlights
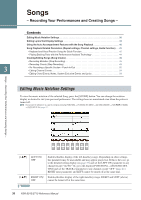
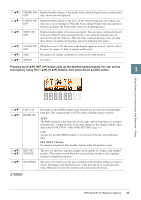
[3 ▲▼] [4 ▲▼] [5 ▲▼] [6 ▲▼] [7 ▲▼] [8 ▲▼] CHORD ON/ Enables/disables display of the chords. If the selected Song does not contain chord OFF data, chords are not displayed. LYRICS ON/ Enables/disables display of the lyrics. If the selected Song does not contain lyric OFF data, lyrics are not displayed. When the Song contains Pedal events, pressing these buttons can display the Pedal events, instead of displaying Lyrics. NOTE ON/ OFF Enables/disables display of the note name (pitch). The note name is indicated at the left of the note. When the space between the notes is too small, the indication may be moved to the top left of the note. When the Song contains Fingering events, pressing these buttons can display the fingering, instead of displaying note names. COLOR ON/ When this is set to ON, the notes in the display appear in color (C: red, D: yellow, OFF E: green, F: orange, G: blue, A: purple, and B: gray). SIZE Determines the display resolution (or zoom level) of the notation. SET UP See below. Pressing the [8 ▲▼] (SET UP) button calls up the detailed setting display. You can set the view type by using the [1 ▲▼]-[6 ▲▼] buttons, then press the [8 ▲] (OK) button. 3 Songs - Recording Your Performances and Creating Songs - [1 ▲▼] [2 ▲▼] LEFT CH RIGHT CH [3 ▲▼]/ KEY SIG[4 ▲▼] NATURE [5 ▲▼] QUANTIZE Determines which MIDI channel in the Song data is used for the left-hand/righthand part. This setting returns to AUTO when a different Song is selected. AUTO The MIDI channels in the Song data for the right- and left-hand parts are assigned automatically-setting the parts to the same channel as the channel which is specified in the [FUNCTION] → [B] SONG SETTING (page 41). 1-16 Assigns the specified MIDI channel (1-16) to each of the left- and right-hand parts. OFF (LEFT CH only) No channel assignment. This disables display of the left-hand key range. This lets you enter key signature changes in the middle of a Song, at the stopped position. This menu is useful when the selected Song contains no key signature settings for displaying notation. This gives you control over the note resolution in the notation, letting you shift or correct the timing of all displayed notes so that they line up to a particular note value. Make sure to select the smallest note value used in the Song. PSR-S910/S710 Reference Manual 37
-
 1
1 -
2
-
3
-
4
-
5
-
6
-
7
-
8
-
9
-
10
-
11
-
12
-
13
-
14
-
15
-
16
-
17
-
18
-
19
-
20
-
21
-
22
-
23
-
24
-
25
-
26
-
27
-
28
-
29
-
30
-
31
-
 32
32 -
 33
33 -
 34
34 -
 35
35 -
 36
36 -
 37
37 -
 38
38 -
 39
39 -
 40
40 -
 41
41 -
 42
42 -
43
-
44
-
45
-
46
-
47
-
48
-
49
-
50
-
51
-
52
-
53
-
54
-
55
-
56
-
57
-
58
-
59
-
60
-
61
-
62
-
63
-
64
-
65
-
66
-
67
-
68
-
69
-
70
-
71
-
72
-
73
-
74
-
75
-
76
-
77
-
78
-
79
-
80
-
81
-
82
-
83
-
84
-
85
-
86
-
87
-
88
-
89
-
90
-
91
-
92
-
93
-
94
-
95
-
96
-
97
-
98
-
99
-
100
-
101
-
102
-
103
-
104
-
105
-
106
-
107
-
108
 |
 |