Yamaha QY700 Owner's Manual - Page 110
Recording mode
 |
View all Yamaha QY700 manuals
Add to My Manuals
Save this manual to your list of manuals |
Page 110 highlights
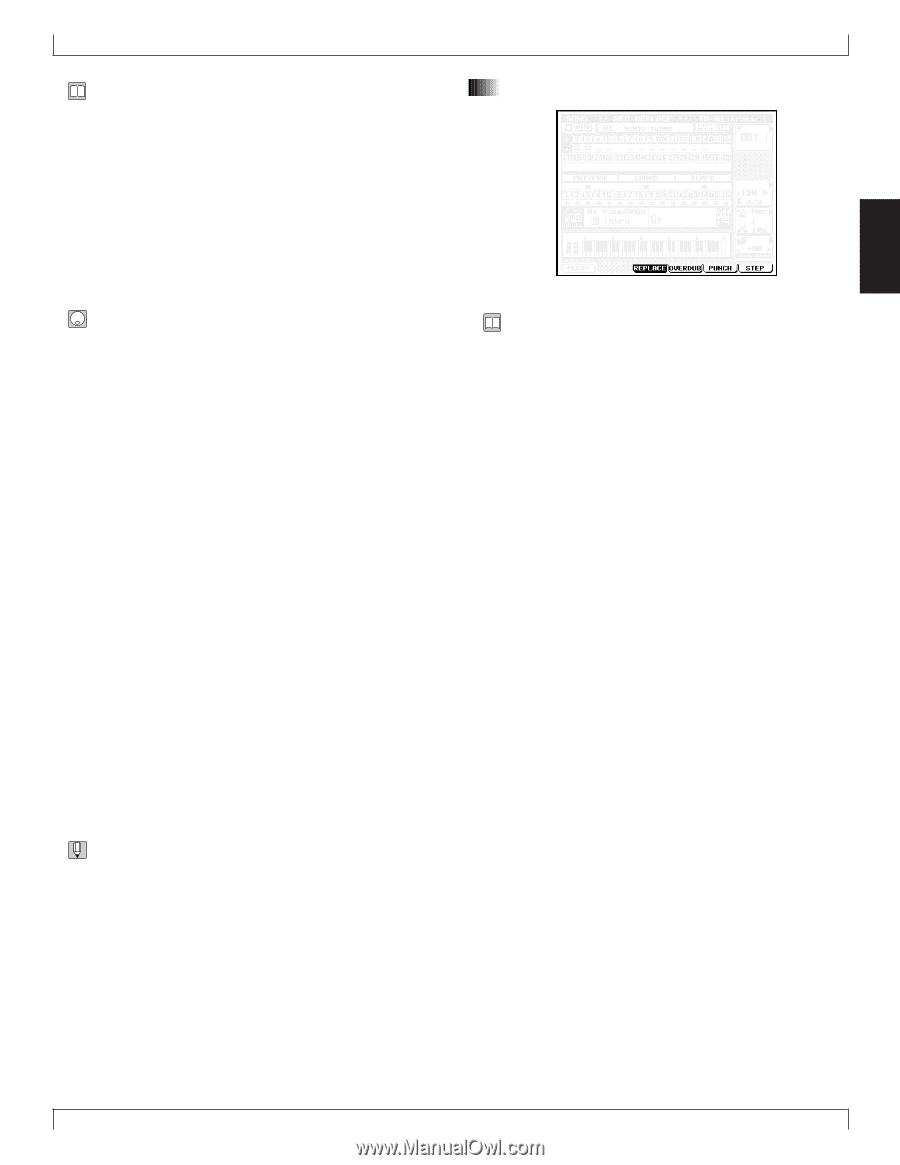
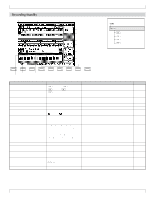
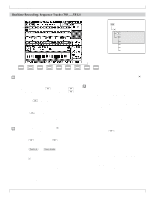
• You use SONG RECORDING mode to record your songs. • You start a recording session from the SONG PLAY screen by pressing the e key. This puts you into Recording Standby. You can then select the recording method and set the relevant parameters, before beginning the actual recording. • If you are using realtime recording, you can use the MULTITRACK feature to simultaneously record all incoming MIDI channels (1 to 16) onto the corresponding sequence tracks. This is useful when you want to record a multipart recording from a computer or another sequencer in real time. (→ p.110) 1. At the SONG PLAY screen, select the destination song (by song number). Also set up the voice and the effects. 2. Again at the SONG PLAY screen, press e to enter Recording Standby. 3. Set the recording mode, and the relevant recording parameters. Parameters include: track, meter, starting point (by measure), tempo, click beat, click mode, count, and transposition. 4. Press p to start recording. w The PLAY indicator comes on (either solid or blinking). • You can now record on any track. Tracks that are already recorded can be played back while you record on some other track. • If you want to use patterns, you should begin by recording the PATTERN and CHORD tracks. 5. When you are ready, press s to terminate recording and return to the SONG PLAY screen. 6. You can now edit or manipulate your recorded data using SONG EDIT mode (→ p.129) and any of the song jobs (→ p.138). 7. When you are satisfied with the results, save your recorded song to disk. (→ p.307) • If you press e while in Recording Standby, the QY700 returns to SONG PLAY screen. Most of the parameters listed in the table above are described in the explanations for the SONG PLAY screen (→ p.72). Below are described only those parameters that have not yet been explained: the recording mode, the multitrack switch, the recording track, and the meter. 1. Recording mode 5. Song Recording 2 • The QY700 offers four different recording modes. The first three modes (REPLACE, OVERDUB, and PUNCH) are realtime modes, while the STEP mode is used for step recording. • With realtime recording, the QY700 operates as a multitrack recorder, recording the performance data as it is played. With step recording, you input the music one note at a time (→ p.120). • You use REPLACE mode when you want to overwrite an already recorded track with new data. The first recording is lost, and the new one takes its place. You use this mode, for example, when you are unsatisfied with the results of the first recording and want to redo it. • You use OVERDUB when you want to add more data to a track that already contains data. This feature lets you build up a complex phrase out of a series of realtime recordings. • You use PUNCH mode when you want to record (in real time) over a specific area of the track only. In this case, you must set the start and end points before you begin the recording. This feature allows you to redo segments that you don't like, while retaining the segments that you do like. Note that PUNCH mode always replaces (destroys) the original data over the specified area. (→ p.118) Chapter 2. SONG MODE 109
-
 1
1 -
2
-
3
-
4
-
5
-
6
-
7
-
8
-
9
-
10
-
11
-
12
-
13
-
14
-
15
-
16
-
17
-
18
-
19
-
20
-
21
-
22
-
23
-
24
-
25
-
26
-
27
-
28
-
29
-
30
-
31
-
32
-
33
-
34
-
35
-
36
-
37
-
38
-
39
-
40
-
41
-
42
-
43
-
44
-
45
-
46
-
47
-
48
-
49
-
50
-
51
-
52
-
53
-
54
-
55
-
56
-
57
-
58
-
59
-
60
-
61
-
62
-
63
-
64
-
65
-
66
-
67
-
68
-
69
-
70
-
71
-
72
-
73
-
74
-
75
-
76
-
77
-
78
-
79
-
80
-
81
-
82
-
83
-
84
-
85
-
86
-
87
-
88
-
89
-
90
-
91
-
92
-
93
-
94
-
95
-
96
-
97
-
98
-
99
-
100
-
101
-
102
-
103
-
104
-
 105
105 -
 106
106 -
 107
107 -
 108
108 -
 109
109 -
 110
110 -
 111
111 -
 112
112 -
 113
113 -
 114
114 -
 115
115 -
116
-
117
-
118
-
119
-
120
-
121
-
122
-
123
-
124
-
125
-
126
-
127
-
128
-
129
-
130
-
131
-
132
-
133
-
134
-
135
-
136
-
137
-
138
-
139
-
140
-
141
-
142
-
143
-
144
-
145
-
146
-
147
-
148
-
149
-
150
-
151
-
152
-
153
-
154
-
155
-
156
-
157
-
158
-
159
-
160
-
161
-
162
-
163
-
164
-
165
-
166
-
167
-
168
-
169
-
170
-
171
-
172
-
173
-
174
-
175
-
176
-
177
-
178
-
179
-
180
-
181
-
182
-
183
-
184
-
185
-
186
-
187
-
188
-
189
-
190
-
191
-
192
-
193
-
194
-
195
-
196
-
197
-
198
-
199
-
200
-
201
-
202
-
203
-
204
-
205
-
206
-
207
-
208
-
209
-
210
-
211
-
212
-
213
-
214
-
215
-
216
-
217
-
218
-
219
-
220
-
221
-
222
-
223
-
224
-
225
-
226
-
227
-
228
-
229
-
230
-
231
-
232
-
233
-
234
-
235
-
236
-
237
-
238
-
239
-
240
-
241
-
242
-
243
-
244
-
245
-
246
-
247
-
248
-
249
-
250
-
251
-
252
-
253
-
254
-
255
-
256
-
257
-
258
-
259
-
260
-
261
-
262
-
263
-
264
-
265
-
266
-
267
-
268
-
269
-
270
-
271
-
272
-
273
-
274
-
275
-
276
-
277
-
278
-
279
-
280
-
281
-
282
-
283
-
284
-
285
-
286
-
287
-
288
-
289
-
290
-
291
-
292
-
293
-
294
-
295
-
296
-
297
-
298
-
299
-
300
-
301
-
302
-
303
-
304
-
305
-
306
-
307
-
308
-
309
-
310
-
311
-
312
-
313
-
314
-
315
-
316
-
317
-
318
-
319
-
320
-
321
-
322
-
323
-
324
-
325
-
326
-
327
-
328
-
329
-
330
-
331
-
332
-
333
-
334
 |
 |