Yamaha QY700 Owner's Manual - Page 113
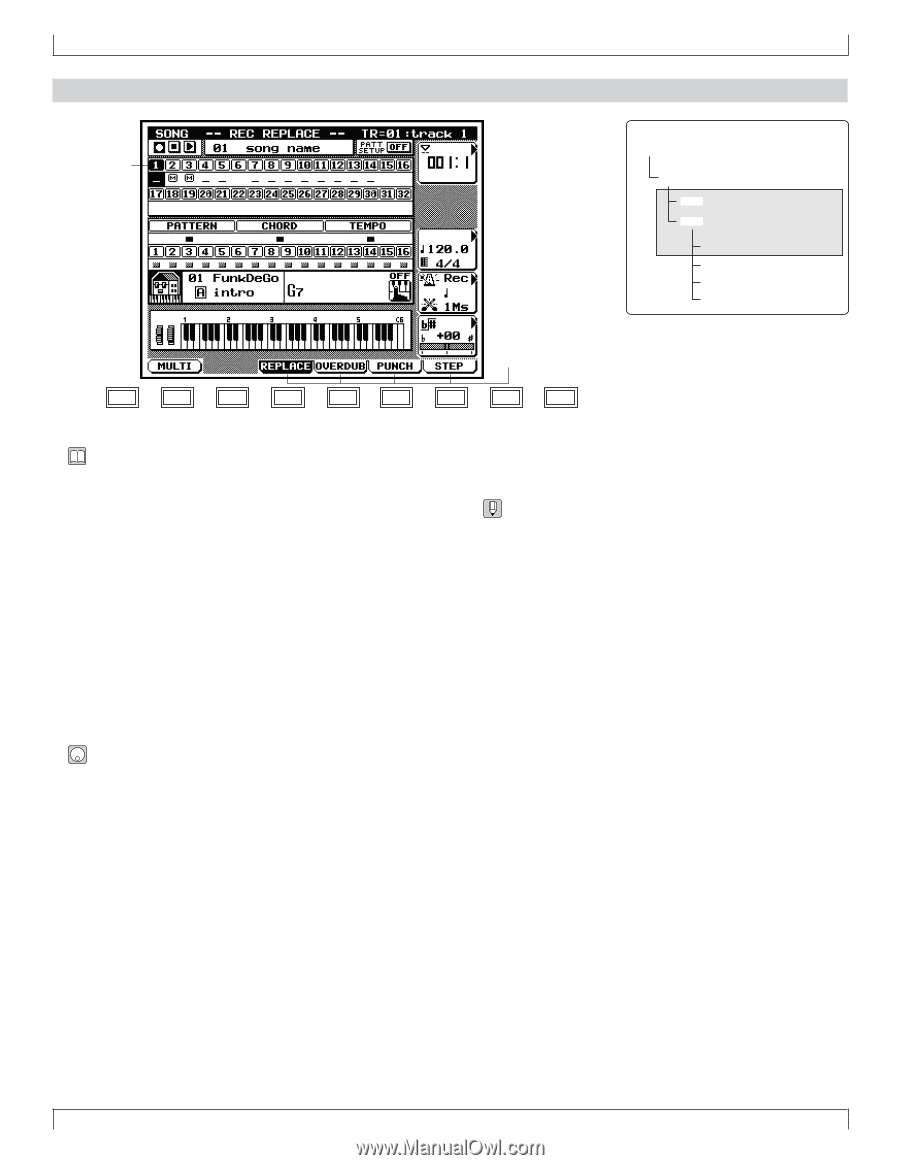
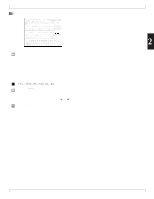
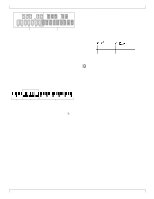
The QY700 displays the Recording Standby The RE
 |
View all Yamaha QY700 manuals
Add to My Manuals
Save this manual to your list of manuals |
Page 113 highlights
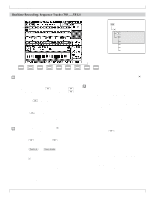
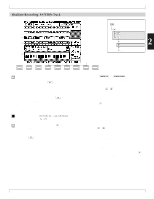
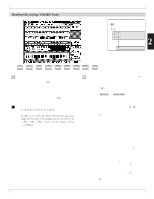
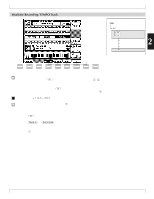
5. Song Recording Realtime Recording: Sequence Tracks (TR1,...,TR32) Recording track sSONG PLAY eSong recording 3Replace 4Overdub TR1~TR32 PATTERN CHORD TEMPO Recording mode SHIFT F1 F2 F3 F4 F5 F6 SHIFT EXIT • You use this function to record a performance in real time. You can input the performance using the QY700 microkeyboard, a remote MIDI keyboard, or some other type of remote MIDI device • This section describes the 3 (REPLACE ) and 4 (OVERDUB) realtime recording methods. The 5 (PUNCH) method, which is also realtime, is described on a later page. • You use the 3 (REPLACE) method when you want to overwrite any data already existing on the track - for example, when you want to redo a phrase that you are not satisfied with. • You use 4 (OVERDUB) when you want to add your new performance data to the data already contained in the track. This allows you to build up a complex phrase by recording it as a combination of several parts. 1. At the SONG PLAY screen, press e. w The QY700 displays the Recording Standby page. The RE- CORDING indicator comes on. 2. Press 3 (REPLACE) or 4 (OVERDUB) to select the recording method. 3. Press u or d as necessary to select the track you want to record. 4. Press p. w The PLAY indicator begins flashing. The QY700 counts out the specified number of lead-in measures (as set by the COUNT parameter; see page 78), and then begins the recording. 5. Input the performance data from the microkeyboard or your remote MIDI instrument. 6. When you are ready to stop recording, press s. w The QY700 returns to the SONG PLAY screen. • You can use song job 00 (UNDO/REDO) to cancel a recording that you have just made. This allows you to recover data that you have inadvertently over-recorded. (→ p.141) • Remember to set the appropriate parameters (such as measure, tempo, meter, click beat, click mode, count, and transposition) before beginning the recording. (→ p.109) • If you have selected a style number and section, the QY700 will start pattern replay at the same time that it starts to record. If you don't want to hear a pattern, set the style number to 00. • If you have selected a pattern whose section connection is set to End, the QY700 will automatically stop recording when the pattern playback reaches its end. If you do not want this to happen, select a different pattern or else change the section connection setting. (→ p.202) • You can use the 1 (MULTI) function to make a simultaneous recording of multiple MIDI channels. (→ p.110) • Sequence tracks can record system-exclusive data, subject to memory constraints. (You can use your QY700 as a MIDI data filer.) • If you input your recording using the QY700 keyboard keys, the velocity for each note is set to 88( f ). If you want true recording of velocity values, use a remote MIDI keyboard for the input. • Before recording onto the QY700 from a remote keyboard, go to UTILITY mode and set the MIDI "echoback" setting to "RecMonitor". (→ p.292) 112 Chapter 2. SONG MODE
-
 1
1 -
2
-
3
-
4
-
5
-
6
-
7
-
8
-
9
-
10
-
11
-
12
-
13
-
14
-
15
-
16
-
17
-
18
-
19
-
20
-
21
-
22
-
23
-
24
-
25
-
26
-
27
-
28
-
29
-
30
-
31
-
32
-
33
-
34
-
35
-
36
-
37
-
38
-
39
-
40
-
41
-
42
-
43
-
44
-
45
-
46
-
47
-
48
-
49
-
50
-
51
-
52
-
53
-
54
-
55
-
56
-
57
-
58
-
59
-
60
-
61
-
62
-
63
-
64
-
65
-
66
-
67
-
68
-
69
-
70
-
71
-
72
-
73
-
74
-
75
-
76
-
77
-
78
-
79
-
80
-
81
-
82
-
83
-
84
-
85
-
86
-
87
-
88
-
89
-
90
-
91
-
92
-
93
-
94
-
95
-
96
-
97
-
98
-
99
-
100
-
101
-
102
-
103
-
104
-
105
-
106
-
107
-
 108
108 -
 109
109 -
 110
110 -
 111
111 -
 112
112 -
 113
113 -
 114
114 -
 115
115 -
 116
116 -
 117
117 -
 118
118 -
119
-
120
-
121
-
122
-
123
-
124
-
125
-
126
-
127
-
128
-
129
-
130
-
131
-
132
-
133
-
134
-
135
-
136
-
137
-
138
-
139
-
140
-
141
-
142
-
143
-
144
-
145
-
146
-
147
-
148
-
149
-
150
-
151
-
152
-
153
-
154
-
155
-
156
-
157
-
158
-
159
-
160
-
161
-
162
-
163
-
164
-
165
-
166
-
167
-
168
-
169
-
170
-
171
-
172
-
173
-
174
-
175
-
176
-
177
-
178
-
179
-
180
-
181
-
182
-
183
-
184
-
185
-
186
-
187
-
188
-
189
-
190
-
191
-
192
-
193
-
194
-
195
-
196
-
197
-
198
-
199
-
200
-
201
-
202
-
203
-
204
-
205
-
206
-
207
-
208
-
209
-
210
-
211
-
212
-
213
-
214
-
215
-
216
-
217
-
218
-
219
-
220
-
221
-
222
-
223
-
224
-
225
-
226
-
227
-
228
-
229
-
230
-
231
-
232
-
233
-
234
-
235
-
236
-
237
-
238
-
239
-
240
-
241
-
242
-
243
-
244
-
245
-
246
-
247
-
248
-
249
-
250
-
251
-
252
-
253
-
254
-
255
-
256
-
257
-
258
-
259
-
260
-
261
-
262
-
263
-
264
-
265
-
266
-
267
-
268
-
269
-
270
-
271
-
272
-
273
-
274
-
275
-
276
-
277
-
278
-
279
-
280
-
281
-
282
-
283
-
284
-
285
-
286
-
287
-
288
-
289
-
290
-
291
-
292
-
293
-
294
-
295
-
296
-
297
-
298
-
299
-
300
-
301
-
302
-
303
-
304
-
305
-
306
-
307
-
308
-
309
-
310
-
311
-
312
-
313
-
314
-
315
-
316
-
317
-
318
-
319
-
320
-
321
-
322
-
323
-
324
-
325
-
326
-
327
-
328
-
329
-
330
-
331
-
332
-
333
-
334
 |
 |