Yamaha QY700 Owner's Manual - Page 136
Graphic screen
 |
View all Yamaha QY700 manuals
Add to My Manuals
Save this manual to your list of manuals |
Page 136 highlights
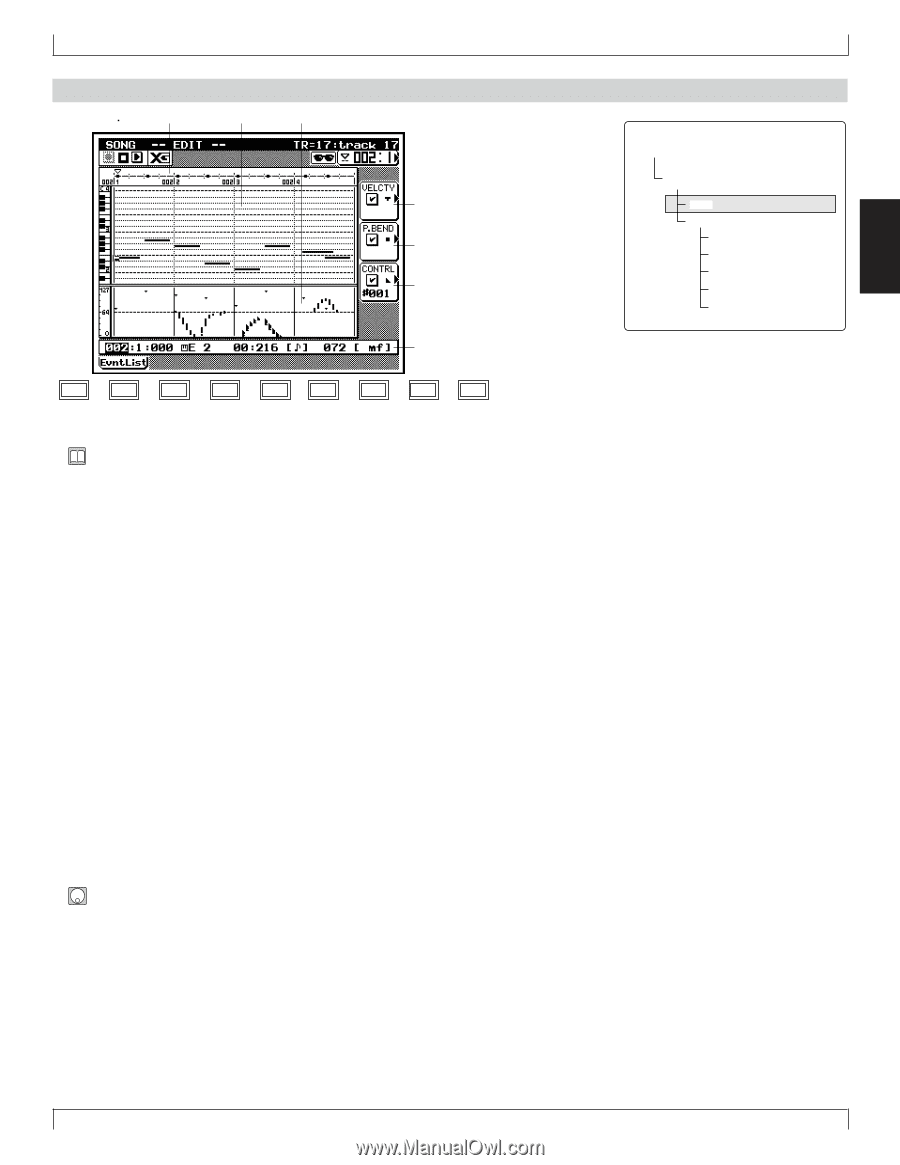
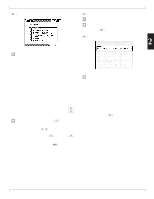
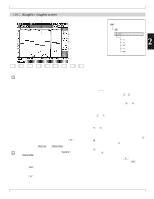
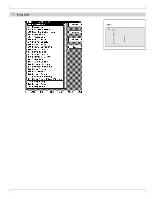
1 (Graphic) Graphic screen 1.Beat graph 2.Piano roll 3.Point graph 5.Velocity 6.Pitchbend 7.Control change Control number 4.Event line SHIFT F1 F2 F3 F4 F5 F6 SHIFT EXIT 6. Song Editing sSONG PLAY e Song Edit 1 Graphic 1 Event list 2 XG View 3 Track name 4 View Filter 5 Delete 6 Insert 2 • The graphic editing page shows the following data in graphical form: note events, velocity values, pitchbend events, and control changes. The page is divided into three different graphs: a beat graph, a piano roll, and a point graph. In addition, an event line along the bottom of the screen indicates the values for the currently selected event. • The screen presents two cursors. The graph cursor, in the graphical part of the screen, selects the event to be edited. The edit cursor, along the bottom line, selects the value to be edited. • Note that a location pointer along the top of the screen always points to the current location of the graph cursor. • You adjust the various values (such as gate times and pitchbend levels) by entering changes directly on the event line along the bottom of the page, using the same procedures that you use when working at the Event List screen (→ p.131). The changes that you make produce corresponding changes in the graphical part of the screen. • It is not possible to insert or delete events at this screen. If you wish to make an insertion or deletion, you must return to the Event List screen. • You can return to the Event List screen by pressing 1 (EvntList). You can change the track being edited at any time by pressing u or d. 1. At the SONG PLAY screen, press u or d to select the track you want to edit. • On the SONG PLAY screen, the selected track (the "keyboard track") is indicated by highlight. 2. Press e to enter SONG EDIT submode (Event List screen). 3. Press 1(Graphic) to move to the graphical edit screen. 4. Move the graph cursor to the event that you want to edit. You can use various methods, as follows. Notice that the location pointer along the top of the screen always points to the current position of the graph cursor. • Press d [D1] to move the location entry area. Select the measure using the data dial, n, y, or the numeric keypad. • You can always move the graph cursor rapidly across the screen using the shuttle dial or the r or f key. If you move the cursor more slowly with the shuttle dial, the QY700 will play out note events as the cursor passes. • You can move the graph cursor one event at a time by pressing u or d. Again, the QY700 will reproduce note events when the cursor lands on them. 5. When you reach an event that you want to edit, use l or r to move the edit cursor (on the bottom line) to the value you want to change: the measure, the beat, the clock count, or any of the arguments. Then change the selected value using the data dial, n/ y, or the numeric keypad. Regardless of the entry method, you must press e to register the value. • The new settings will blink on the screen until you press e to register them. If you move the graph cursor before pressing e, the original values will remain in effect. 6. When you are finished, press 1 (EvntList) to return to the Event List screen, or press e to return to the SONG PLAY screen. Chapter 2. SONG MODE 135
-
 1
1 -
2
-
3
-
4
-
5
-
6
-
7
-
8
-
9
-
10
-
11
-
12
-
13
-
14
-
15
-
16
-
17
-
18
-
19
-
20
-
21
-
22
-
23
-
24
-
25
-
26
-
27
-
28
-
29
-
30
-
31
-
32
-
33
-
34
-
35
-
36
-
37
-
38
-
39
-
40
-
41
-
42
-
43
-
44
-
45
-
46
-
47
-
48
-
49
-
50
-
51
-
52
-
53
-
54
-
55
-
56
-
57
-
58
-
59
-
60
-
61
-
62
-
63
-
64
-
65
-
66
-
67
-
68
-
69
-
70
-
71
-
72
-
73
-
74
-
75
-
76
-
77
-
78
-
79
-
80
-
81
-
82
-
83
-
84
-
85
-
86
-
87
-
88
-
89
-
90
-
91
-
92
-
93
-
94
-
95
-
96
-
97
-
98
-
99
-
100
-
101
-
102
-
103
-
104
-
105
-
106
-
107
-
108
-
109
-
110
-
111
-
112
-
113
-
114
-
115
-
116
-
117
-
118
-
119
-
120
-
121
-
122
-
123
-
124
-
125
-
126
-
127
-
128
-
129
-
130
-
 131
131 -
 132
132 -
 133
133 -
 134
134 -
 135
135 -
 136
136 -
 137
137 -
 138
138 -
 139
139 -
 140
140 -
 141
141 -
142
-
143
-
144
-
145
-
146
-
147
-
148
-
149
-
150
-
151
-
152
-
153
-
154
-
155
-
156
-
157
-
158
-
159
-
160
-
161
-
162
-
163
-
164
-
165
-
166
-
167
-
168
-
169
-
170
-
171
-
172
-
173
-
174
-
175
-
176
-
177
-
178
-
179
-
180
-
181
-
182
-
183
-
184
-
185
-
186
-
187
-
188
-
189
-
190
-
191
-
192
-
193
-
194
-
195
-
196
-
197
-
198
-
199
-
200
-
201
-
202
-
203
-
204
-
205
-
206
-
207
-
208
-
209
-
210
-
211
-
212
-
213
-
214
-
215
-
216
-
217
-
218
-
219
-
220
-
221
-
222
-
223
-
224
-
225
-
226
-
227
-
228
-
229
-
230
-
231
-
232
-
233
-
234
-
235
-
236
-
237
-
238
-
239
-
240
-
241
-
242
-
243
-
244
-
245
-
246
-
247
-
248
-
249
-
250
-
251
-
252
-
253
-
254
-
255
-
256
-
257
-
258
-
259
-
260
-
261
-
262
-
263
-
264
-
265
-
266
-
267
-
268
-
269
-
270
-
271
-
272
-
273
-
274
-
275
-
276
-
277
-
278
-
279
-
280
-
281
-
282
-
283
-
284
-
285
-
286
-
287
-
288
-
289
-
290
-
291
-
292
-
293
-
294
-
295
-
296
-
297
-
298
-
299
-
300
-
301
-
302
-
303
-
304
-
305
-
306
-
307
-
308
-
309
-
310
-
311
-
312
-
313
-
314
-
315
-
316
-
317
-
318
-
319
-
320
-
321
-
322
-
323
-
324
-
325
-
326
-
327
-
328
-
329
-
330
-
331
-
332
-
333
-
334
 |
 |