Yamaha QY700 Owner's Manual - Page 141
Copy Track.
 |
View all Yamaha QY700 manuals
Add to My Manuals
Save this manual to your list of manuals |
Page 141 highlights
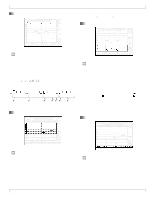
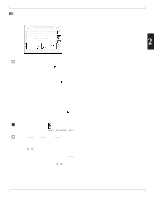
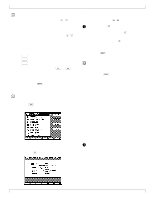
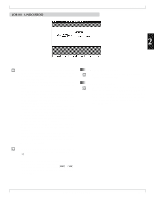
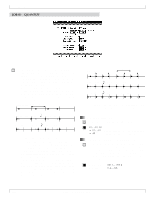
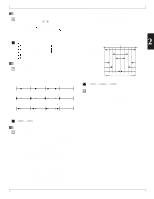
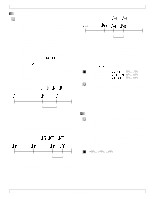
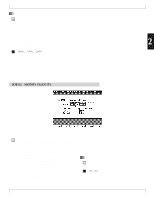
7. Song Jobs • You use the QY700 song jobs to perform various operations on the songs that you have recorded. • You select the job from the job menu using u, d, or the data dial. As an alternative, you can select a job by entering the job number at the numeric keypad. You can also make your selection using the function keys, as described below. • Note that the job menu is too large to fit entirely on the screen. But you can scroll through the list using u, d, or the data dial. • The menu is divided into four groupings, in accordance with job type: event-related, measure-related, track-related, and song-related. You can jump the cursor to the first job in any of these grouping by pressing the corresponding key on the side of the screen. d [D1](Event) ......... jumps to 01 Quantize. d [D2](Measure) .... jumps to 16 Create Measure. d [D3](Track) ......... jumps to 18 Copy Track. d [D4](Song jumps to 23 Copy Song. • As the factory default, function keys 1 to 6 on the menu page automatically switch you into the job execution screens for jobs 00 to 05, respectively. But you can reassign each function key so that it accesses a job of your choice: just move the cursor to the job you want to assign, then hold down s and press the function key. Note that the function key assignments are displayed along the bottom line of the screen. 1. Go to the SONG PLAY screen and select the song and track that you want to work on. 2. Press j. w The screen displays the job menu. 3. Move the cursor to the job you want to execute, or else enter the job number using the numeric keypad. Then press e to open the job-execution screen. 4. Move the cursor to the various entry spaces on the job execution screen, and enter the required values using the data dial, n/y, or the numeric keypad. Do not press the e key until you are ready to execute the job. Even when entering values with the numeric keypad, you do not need to press e. 5. When you have entered all the values and are ready to execute the job, press e. w The QY700 executes the job. The screen displays "Executing...", and then "Completed". 6. Press e twice to return to the SONG PLAY screen. • Most jobs operate on a specified segment of the track, which you designate by selecting the start and end points (by measure and beat). If you make an invalid specification, the screen may return the message "No Data". If you see this message, press e to clear it. • You can use job 00 (Undo/Redo) to undo the results of a job that you have just executed (see next page). This allows you to recover from an incorrect job operation. Once you have "undone" a job, you can then "redo" it. In some cases you may find it useful to do successively "undo" and "redo" a job so that you can compare the pre-job and post-job versions of your data. • If you select a job that requires you to enter a segment designation, the screen will display boxes in which you can set the start point and end point (with a ~ character between the boxes). If you want the operation to begin at Measure 5 Beat 1 and terminate at Measure 8 Beat 4, for example, your specification would look like this: 005:1 ~ 008:4. • The number of beats per measure depends on the meter. If the meter is 4/4, for example, you can use a beat value of 1 to 4 when specifying the segment. If the meter is 8/4, then (since there are eight beats per measure) you can set the beat to any value between 1 and 8. • Note that the beat setting is linked to the measure setting. If you continuously increment (or decrement) the beat setting, the measure setting will change accordingly. Do not switch off the power while a job is executing (while the "Executing..." message is on the screen), as this may cause destruction of your song data. 140 Chapter 2. SONG MODE
-
 1
1 -
2
-
3
-
4
-
5
-
6
-
7
-
8
-
9
-
10
-
11
-
12
-
13
-
14
-
15
-
16
-
17
-
18
-
19
-
20
-
21
-
22
-
23
-
24
-
25
-
26
-
27
-
28
-
29
-
30
-
31
-
32
-
33
-
34
-
35
-
36
-
37
-
38
-
39
-
40
-
41
-
42
-
43
-
44
-
45
-
46
-
47
-
48
-
49
-
50
-
51
-
52
-
53
-
54
-
55
-
56
-
57
-
58
-
59
-
60
-
61
-
62
-
63
-
64
-
65
-
66
-
67
-
68
-
69
-
70
-
71
-
72
-
73
-
74
-
75
-
76
-
77
-
78
-
79
-
80
-
81
-
82
-
83
-
84
-
85
-
86
-
87
-
88
-
89
-
90
-
91
-
92
-
93
-
94
-
95
-
96
-
97
-
98
-
99
-
100
-
101
-
102
-
103
-
104
-
105
-
106
-
107
-
108
-
109
-
110
-
111
-
112
-
113
-
114
-
115
-
116
-
117
-
118
-
119
-
120
-
121
-
122
-
123
-
124
-
125
-
126
-
127
-
128
-
129
-
130
-
131
-
132
-
133
-
134
-
135
-
 136
136 -
 137
137 -
 138
138 -
 139
139 -
 140
140 -
 141
141 -
 142
142 -
 143
143 -
 144
144 -
 145
145 -
 146
146 -
147
-
148
-
149
-
150
-
151
-
152
-
153
-
154
-
155
-
156
-
157
-
158
-
159
-
160
-
161
-
162
-
163
-
164
-
165
-
166
-
167
-
168
-
169
-
170
-
171
-
172
-
173
-
174
-
175
-
176
-
177
-
178
-
179
-
180
-
181
-
182
-
183
-
184
-
185
-
186
-
187
-
188
-
189
-
190
-
191
-
192
-
193
-
194
-
195
-
196
-
197
-
198
-
199
-
200
-
201
-
202
-
203
-
204
-
205
-
206
-
207
-
208
-
209
-
210
-
211
-
212
-
213
-
214
-
215
-
216
-
217
-
218
-
219
-
220
-
221
-
222
-
223
-
224
-
225
-
226
-
227
-
228
-
229
-
230
-
231
-
232
-
233
-
234
-
235
-
236
-
237
-
238
-
239
-
240
-
241
-
242
-
243
-
244
-
245
-
246
-
247
-
248
-
249
-
250
-
251
-
252
-
253
-
254
-
255
-
256
-
257
-
258
-
259
-
260
-
261
-
262
-
263
-
264
-
265
-
266
-
267
-
268
-
269
-
270
-
271
-
272
-
273
-
274
-
275
-
276
-
277
-
278
-
279
-
280
-
281
-
282
-
283
-
284
-
285
-
286
-
287
-
288
-
289
-
290
-
291
-
292
-
293
-
294
-
295
-
296
-
297
-
298
-
299
-
300
-
301
-
302
-
303
-
304
-
305
-
306
-
307
-
308
-
309
-
310
-
311
-
312
-
313
-
314
-
315
-
316
-
317
-
318
-
319
-
320
-
321
-
322
-
323
-
324
-
325
-
326
-
327
-
328
-
329
-
330
-
331
-
332
-
333
-
334
 |
 |