Yamaha QY700 Owner's Manual - Page 172
Data display, Location, Part number, Velocity meter
 |
View all Yamaha QY700 manuals
Add to My Manuals
Save this manual to your list of manuals |
Page 172 highlights
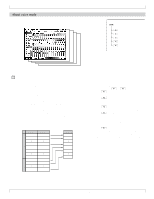
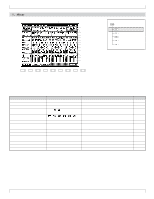
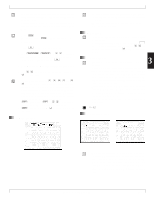
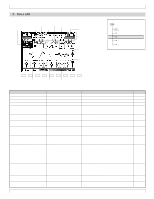
• Here you can make settings such as voice, effect, pan and volume for each part, that will apply when playing back or recording a song. • It is also possible to make settings while playing back a song, and you can also solo or mute tracks just as in Song mode. 1. Press v. w The indicator above v will light, and you will enter Voice mode. 2. Press 1 (Mixer) to access the mixer. 3. Use d/u or l/r to select a part. You can switch between the screens for parts 1- 16 and parts 17-32 by pressing 6. 4. Move the cursor to the parameter that you wish to set. 5. Use n/y, the data dial, or the numeric keypad → e to set the value. • In Voice mode, keys such as r, e, s, t and r/ f will function in the same way as in Song Play mode. You can use these keys to listen to the playback while you modify the settings in realtime. If the Recording Mode for song recording (→ p.106) is set either to Realtime Recording Replace or Overdub, or to Punch Recording, song recording can also be performed in Voice mode. • s + data dial or s + n/y will increase or decrease the setting of all parts by the same value. • s + numeric keypad → e will set all parts to the same value. 1. Data display 1. Mixer • The upper line shows the Voice Category / Program Number / Bank Number / Voice Name for the part where the cursor is located. • The lower line shows the name and value of the parameter where the cursor is located. 2. Location • Location indicates the playback location of the song in measures and beats. • To change the playback location of the song, press d [D1] to move the cursor to Location, and use n/y, the data dial, or numeric keypad → e to specify the desired measure. 3 3. Part number • This indicates the part number of the QY700's tone generator block. • On the QY700, the Track of the sequencer block and the Part of the tone generator block are connected according to the Song mode Out Channel setting TO TG. Before making voice settings, check the Song mode Out Channel TO TG setting, and be sure that you understand the relation between tracks and parts. (→ p.105) • The settings of the part which is connected to the pattern track by the Out Channel TO TG setting will automatically be overwritten whenever the pattern is switched by the Pattern Voice settings (→ p.225). • Highlight the part number (1-32) for which you wish to make settings. 0101 1101 1 - 32 4. Velocity meter • When you start playback, the velocity meter will appear. The velocity meter graphically indicates the velocity values of the musical notes that are transmitted from the song. • Mute or solo settings can be made independently for each track. Mute temporarily silences a track. Solo mutes the other tracks, allowing you to hear only the playback of a certain track. Chapter 3. VOICE MODE 171
-
 1
1 -
2
-
3
-
4
-
5
-
6
-
7
-
8
-
9
-
10
-
11
-
12
-
13
-
14
-
15
-
16
-
17
-
18
-
19
-
20
-
21
-
22
-
23
-
24
-
25
-
26
-
27
-
28
-
29
-
30
-
31
-
32
-
33
-
34
-
35
-
36
-
37
-
38
-
39
-
40
-
41
-
42
-
43
-
44
-
45
-
46
-
47
-
48
-
49
-
50
-
51
-
52
-
53
-
54
-
55
-
56
-
57
-
58
-
59
-
60
-
61
-
62
-
63
-
64
-
65
-
66
-
67
-
68
-
69
-
70
-
71
-
72
-
73
-
74
-
75
-
76
-
77
-
78
-
79
-
80
-
81
-
82
-
83
-
84
-
85
-
86
-
87
-
88
-
89
-
90
-
91
-
92
-
93
-
94
-
95
-
96
-
97
-
98
-
99
-
100
-
101
-
102
-
103
-
104
-
105
-
106
-
107
-
108
-
109
-
110
-
111
-
112
-
113
-
114
-
115
-
116
-
117
-
118
-
119
-
120
-
121
-
122
-
123
-
124
-
125
-
126
-
127
-
128
-
129
-
130
-
131
-
132
-
133
-
134
-
135
-
136
-
137
-
138
-
139
-
140
-
141
-
142
-
143
-
144
-
145
-
146
-
147
-
148
-
149
-
150
-
151
-
152
-
153
-
154
-
155
-
156
-
157
-
158
-
159
-
160
-
161
-
162
-
163
-
164
-
165
-
166
-
 167
167 -
 168
168 -
 169
169 -
 170
170 -
 171
171 -
 172
172 -
 173
173 -
 174
174 -
 175
175 -
 176
176 -
 177
177 -
178
-
179
-
180
-
181
-
182
-
183
-
184
-
185
-
186
-
187
-
188
-
189
-
190
-
191
-
192
-
193
-
194
-
195
-
196
-
197
-
198
-
199
-
200
-
201
-
202
-
203
-
204
-
205
-
206
-
207
-
208
-
209
-
210
-
211
-
212
-
213
-
214
-
215
-
216
-
217
-
218
-
219
-
220
-
221
-
222
-
223
-
224
-
225
-
226
-
227
-
228
-
229
-
230
-
231
-
232
-
233
-
234
-
235
-
236
-
237
-
238
-
239
-
240
-
241
-
242
-
243
-
244
-
245
-
246
-
247
-
248
-
249
-
250
-
251
-
252
-
253
-
254
-
255
-
256
-
257
-
258
-
259
-
260
-
261
-
262
-
263
-
264
-
265
-
266
-
267
-
268
-
269
-
270
-
271
-
272
-
273
-
274
-
275
-
276
-
277
-
278
-
279
-
280
-
281
-
282
-
283
-
284
-
285
-
286
-
287
-
288
-
289
-
290
-
291
-
292
-
293
-
294
-
295
-
296
-
297
-
298
-
299
-
300
-
301
-
302
-
303
-
304
-
305
-
306
-
307
-
308
-
309
-
310
-
311
-
312
-
313
-
314
-
315
-
316
-
317
-
318
-
319
-
320
-
321
-
322
-
323
-
324
-
325
-
326
-
327
-
328
-
329
-
330
-
331
-
332
-
333
-
334
 |
 |