Yamaha QY700 Owner's Manual - Page 184
Data display, Location
 |
View all Yamaha QY700 manuals
Add to My Manuals
Save this manual to your list of manuals |
Page 184 highlights
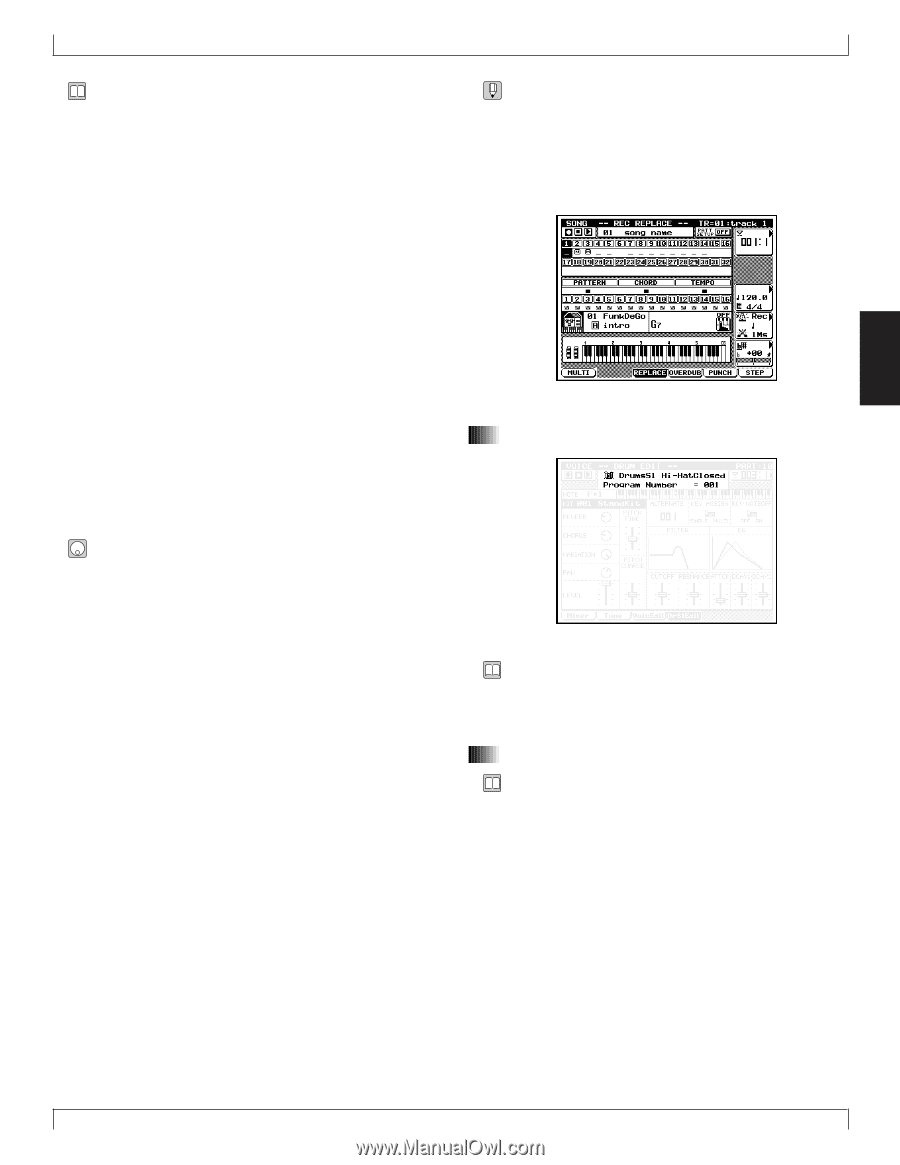
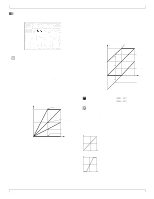
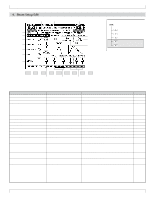
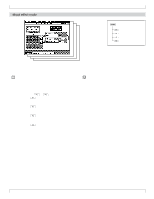
• By editing a drum setup, you can indirectly modify the drum voice. • The Drum Setup Edit menu will appear in the 4 and 5 positions in the bottom line, only if Drum Setup (Drum S1, Drum S2) is selected as the Voice Category. • If the same drum setup is selected for two or more parts, editing one drum setup will cause the other to be modified simultaneously. • Unlike normal voices, drum voices have a special structure in which different waves are assigned to each note C -1- C5. Also, each note to which a wave form is assigned is referred to as an instrument, and various parameters can be set for each instrument. • The types of instrument which are assigned to each note will depend on the drum kit. For the arrangements of each drum kit, refer to the separate "QY700 Reference Listings". • When you change drum kits, all instrument settings will be initialized. When editing a drum setup, you must first select the drum kit, and then select an instrument and set its parameters. • Of these parameters, the filter and EG parameters are relative adjustments to the voice which function by adding the specified value to the original value of the voice. Parameters other than these modify the voice by overwriting the original values of the voice. 1. Press v. w The indicator located above v will light, and you will enter Voice mode. 2. In the Mixer page, select either Drum Setup 1 or Drum Setup 2 as the Voice Category. w Either (DrsS1Edit) or (DrsS2Edit) will be displayed above 4 or 5. 3. Press either 4 (DrsS1Edit) or 5 (DrsS2Edit) to access the Drum Setup Edit page. 4. Move the cursor to Drum Kit and select the drum kit that will be the basis for your editing. 5. Use the microkeyboard to select the drum instrument that you wish to edit. 6. Move the cursor to the parameter that you wish to modify. 7. Use n/y, the data dial, or numeric keypad → e to specify the value. 4. Drum Setup Edit • In Voice mode, keys such as r, e, s, t and r/ f will function in the same way as in Song Play mode. You can use these keys to listen to the playback while you modify the settings in realtime. If the Recording Mode for song recording (→ p.109) is set either to Realtime Recording Replace or Overdub, or to Punch Recording, song recording can also be performed in Voice mode. 3 1. Data display • The upper line shows the drum setup and the currently selected instrument. • The lower line shows the program number of the currently selected drum voice. 2. Location • This indicates the playback location of the song in measures and beats. • To change the playback location of the song, press d [D1] to move the cursor to Location, and use n/y, the data dial, or numeric keypad → e to specify the measure. Chapter 3. VOICE MODE 183
-
 1
1 -
2
-
3
-
4
-
5
-
6
-
7
-
8
-
9
-
10
-
11
-
12
-
13
-
14
-
15
-
16
-
17
-
18
-
19
-
20
-
21
-
22
-
23
-
24
-
25
-
26
-
27
-
28
-
29
-
30
-
31
-
32
-
33
-
34
-
35
-
36
-
37
-
38
-
39
-
40
-
41
-
42
-
43
-
44
-
45
-
46
-
47
-
48
-
49
-
50
-
51
-
52
-
53
-
54
-
55
-
56
-
57
-
58
-
59
-
60
-
61
-
62
-
63
-
64
-
65
-
66
-
67
-
68
-
69
-
70
-
71
-
72
-
73
-
74
-
75
-
76
-
77
-
78
-
79
-
80
-
81
-
82
-
83
-
84
-
85
-
86
-
87
-
88
-
89
-
90
-
91
-
92
-
93
-
94
-
95
-
96
-
97
-
98
-
99
-
100
-
101
-
102
-
103
-
104
-
105
-
106
-
107
-
108
-
109
-
110
-
111
-
112
-
113
-
114
-
115
-
116
-
117
-
118
-
119
-
120
-
121
-
122
-
123
-
124
-
125
-
126
-
127
-
128
-
129
-
130
-
131
-
132
-
133
-
134
-
135
-
136
-
137
-
138
-
139
-
140
-
141
-
142
-
143
-
144
-
145
-
146
-
147
-
148
-
149
-
150
-
151
-
152
-
153
-
154
-
155
-
156
-
157
-
158
-
159
-
160
-
161
-
162
-
163
-
164
-
165
-
166
-
167
-
168
-
169
-
170
-
171
-
172
-
173
-
174
-
175
-
176
-
177
-
178
-
 179
179 -
 180
180 -
 181
181 -
 182
182 -
 183
183 -
 184
184 -
 185
185 -
 186
186 -
 187
187 -
 188
188 -
 189
189 -
190
-
191
-
192
-
193
-
194
-
195
-
196
-
197
-
198
-
199
-
200
-
201
-
202
-
203
-
204
-
205
-
206
-
207
-
208
-
209
-
210
-
211
-
212
-
213
-
214
-
215
-
216
-
217
-
218
-
219
-
220
-
221
-
222
-
223
-
224
-
225
-
226
-
227
-
228
-
229
-
230
-
231
-
232
-
233
-
234
-
235
-
236
-
237
-
238
-
239
-
240
-
241
-
242
-
243
-
244
-
245
-
246
-
247
-
248
-
249
-
250
-
251
-
252
-
253
-
254
-
255
-
256
-
257
-
258
-
259
-
260
-
261
-
262
-
263
-
264
-
265
-
266
-
267
-
268
-
269
-
270
-
271
-
272
-
273
-
274
-
275
-
276
-
277
-
278
-
279
-
280
-
281
-
282
-
283
-
284
-
285
-
286
-
287
-
288
-
289
-
290
-
291
-
292
-
293
-
294
-
295
-
296
-
297
-
298
-
299
-
300
-
301
-
302
-
303
-
304
-
305
-
306
-
307
-
308
-
309
-
310
-
311
-
312
-
313
-
314
-
315
-
316
-
317
-
318
-
319
-
320
-
321
-
322
-
323
-
324
-
325
-
326
-
327
-
328
-
329
-
330
-
331
-
332
-
333
-
334
 |
 |