Yamaha QY700 Owner's Manual - Page 229
Data display, Location, Track number, Track status
 |
View all Yamaha QY700 manuals
Add to My Manuals
Save this manual to your list of manuals |
Page 229 highlights
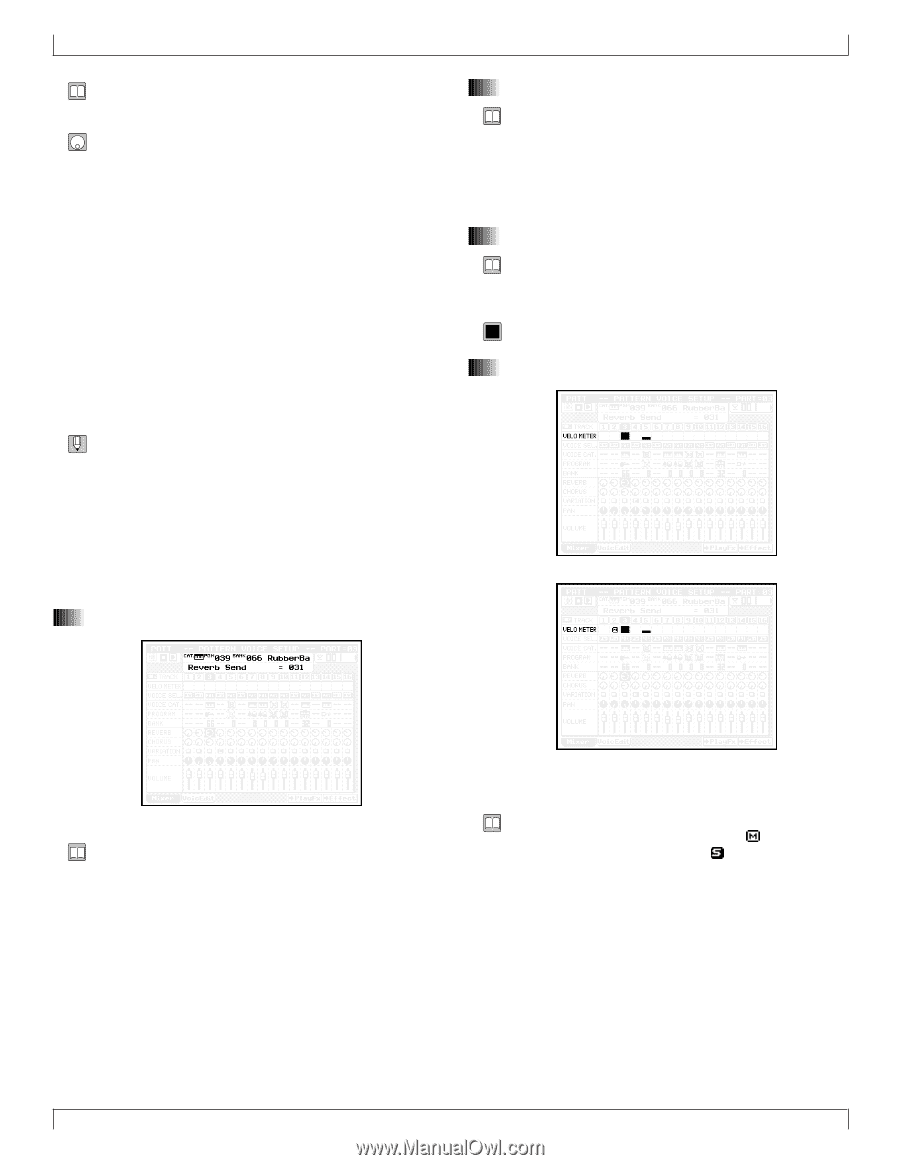
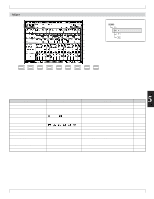
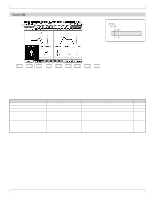
3. Pattern Voice submode • You use the Mixer page to set various parameters (such as voice, effects, pan, and volume) for each of the pattern tracks. 1. At the PATCH screen, press 2 (Voice). w The Pattern Voice Setup page appears. 2. If necessary, press 1 (Mixer) to select the Mixer page. 3. Press u/d or cursor keys as necessary to select the track (part) that you want to work on. 4. Move the cursor to the appropriate parameters, and set the values using the data dial, n/y, or the numeric keypad. 5. When you have finished, press e to return to the PATCH screen. • The playback keys (p, s, t, r/f) continue to function while you are adjusting the settings, so that you can monitor the results of your changes as you make them. • Adjustment shortcut 1: To adjust the cursor-selected parameter by an equal amount for all parts, hold down s while rotating the data dial or pressing n or y. • Adjustment Shortcut 2: To set the cursor-selected parameter to the same value on all parts, hold down s and enter the value at the numeric keypad. 1. Data display 2. Location • The location area shows the pattern's current playback location. • You can jump to a different location during playback by changing this value: Press d [D1] to move the cursor into this area, then select the new location using the data dial, n/y, or the numeric keypad. 3. Track number • The highlighted track number, and the track number at the top right of the screen, indicate the pattern track currently selected for editing. 0101 1101 1,...,16 4. Track status • The upper line of this area identifies the voice for the currently selected track (by voice category, program number, bank number, and voice name). • The second line of the area shows the current numerical value of the cursor-selected parameter. • You can choose to mute out one or more tracks, or to set one or more tracks for SOLO play. An mark appears to indicate that a track is muted; an mark indicates that it is set to SOLO. • If you set one or more tracks to SOLO, the QY700 automatically switches off playback from all other tracks. (The track-number borders change appearance to indicate the tracks that are temporarily switched off.) • During playback, the track-status area operates as a velocity meter, indicating the playback level of each track in real time. 228 Chapter 5. PATTERN MODE
-
 1
1 -
2
-
3
-
4
-
5
-
6
-
7
-
8
-
9
-
10
-
11
-
12
-
13
-
14
-
15
-
16
-
17
-
18
-
19
-
20
-
21
-
22
-
23
-
24
-
25
-
26
-
27
-
28
-
29
-
30
-
31
-
32
-
33
-
34
-
35
-
36
-
37
-
38
-
39
-
40
-
41
-
42
-
43
-
44
-
45
-
46
-
47
-
48
-
49
-
50
-
51
-
52
-
53
-
54
-
55
-
56
-
57
-
58
-
59
-
60
-
61
-
62
-
63
-
64
-
65
-
66
-
67
-
68
-
69
-
70
-
71
-
72
-
73
-
74
-
75
-
76
-
77
-
78
-
79
-
80
-
81
-
82
-
83
-
84
-
85
-
86
-
87
-
88
-
89
-
90
-
91
-
92
-
93
-
94
-
95
-
96
-
97
-
98
-
99
-
100
-
101
-
102
-
103
-
104
-
105
-
106
-
107
-
108
-
109
-
110
-
111
-
112
-
113
-
114
-
115
-
116
-
117
-
118
-
119
-
120
-
121
-
122
-
123
-
124
-
125
-
126
-
127
-
128
-
129
-
130
-
131
-
132
-
133
-
134
-
135
-
136
-
137
-
138
-
139
-
140
-
141
-
142
-
143
-
144
-
145
-
146
-
147
-
148
-
149
-
150
-
151
-
152
-
153
-
154
-
155
-
156
-
157
-
158
-
159
-
160
-
161
-
162
-
163
-
164
-
165
-
166
-
167
-
168
-
169
-
170
-
171
-
172
-
173
-
174
-
175
-
176
-
177
-
178
-
179
-
180
-
181
-
182
-
183
-
184
-
185
-
186
-
187
-
188
-
189
-
190
-
191
-
192
-
193
-
194
-
195
-
196
-
197
-
198
-
199
-
200
-
201
-
202
-
203
-
204
-
205
-
206
-
207
-
208
-
209
-
210
-
211
-
212
-
213
-
214
-
215
-
216
-
217
-
218
-
219
-
220
-
221
-
222
-
223
-
 224
224 -
 225
225 -
 226
226 -
 227
227 -
 228
228 -
 229
229 -
 230
230 -
 231
231 -
 232
232 -
 233
233 -
 234
234 -
235
-
236
-
237
-
238
-
239
-
240
-
241
-
242
-
243
-
244
-
245
-
246
-
247
-
248
-
249
-
250
-
251
-
252
-
253
-
254
-
255
-
256
-
257
-
258
-
259
-
260
-
261
-
262
-
263
-
264
-
265
-
266
-
267
-
268
-
269
-
270
-
271
-
272
-
273
-
274
-
275
-
276
-
277
-
278
-
279
-
280
-
281
-
282
-
283
-
284
-
285
-
286
-
287
-
288
-
289
-
290
-
291
-
292
-
293
-
294
-
295
-
296
-
297
-
298
-
299
-
300
-
301
-
302
-
303
-
304
-
305
-
306
-
307
-
308
-
309
-
310
-
311
-
312
-
313
-
314
-
315
-
316
-
317
-
318
-
319
-
320
-
321
-
322
-
323
-
324
-
325
-
326
-
327
-
328
-
329
-
330
-
331
-
332
-
333
-
334
 |
 |