Yamaha QY700 Owner's Manual - Page 234
Filter cutoff, and filter resonance
 |
View all Yamaha QY700 manuals
Add to My Manuals
Save this manual to your list of manuals |
Page 234 highlights
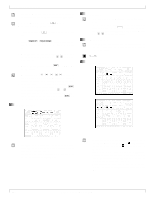
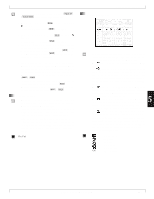
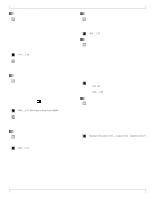
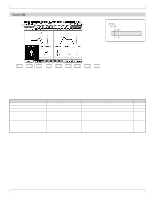
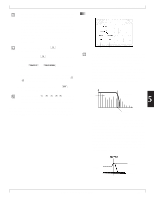
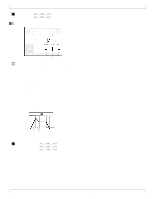
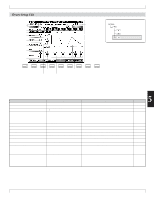
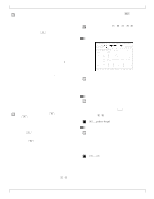
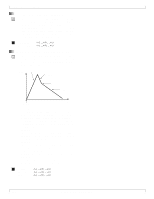
• You use this page to edit the sound characteristics of the voice(s) played on the selected track. You can make separate edit settings for each track. • Settings do not apply to the voices themselves, but only to the track. If the track's voice changes, the settings operate on the new voice. If you use the same voice on different tracks with different edit settings, the sound characteristics may be quite different. • These settings are applied as offsets to the voice's original, internal settings. 1. At the PATCH screen, press 2 (Voice). w The Pattern Voice Setup page appears. 2. If necessary, press 2 (VoicEdit) to select the Voice Edit page. 3. Press u or d as necessary to select the track. 4. Move the cursor to the parameter values you want to change, and set the values using the data dial, n/ y, or the numeric keypad. 5. When you have finished editing, press e to return to the PATCH screen. • The playback keys (p, s, t, r/f) continue to function while you are adjusting the settings, so that you can monitor the results of your changes as you make them. The first three parameters listed in the table above ("data display," "location," and "track number") are the same as on the Mixer page; refer to page 228. The remaining parameters are described below. 3. Pattern Voice submode 4. Filter cutoff, and filter resonance Filter cutoff Filter resonance • The CUTOFF value sets the cutoff frequency for the QY700's low-pass filter. Adjusting this value changes the voice's timbre. Settings are stored separately for each track. • Note that the filter is a low-pass type: it filters out the frequencies above (higher than) the cutoff point. • Setting the cutoff to a high value will allow the high-frequency harmonics (overtones) to pass, producing a relatively bright sound that is true to the voice's waveform. • Setting the cutoff to a low value will block out the higher harmonics, producing a darker and smoother sound. Loudness These components pass. These components are eliminated. Harmonics Cutoff frequency Frequency 5 • The RESONANCE value sets the resonance for the lowpass filter. As with the CUTOFF value, the RESONANCE setting affects the voice's timbre. Again, you can set the value separately for each track. • The term resonance here refers to the amplification (boost) applied to the frequencies in the vicinity of the cutoff point. A boost to the overtones within this range can have a significant impact on the sound. With careful adjustment, you can get very effective resonance characteristics - such as the body resonance of a string instrument, or the distinctive slur of an analog synthesizer. Volume Resonance Cutoff frequency Frequency Chapter 5. PATTERN MODE 233
-
 1
1 -
2
-
3
-
4
-
5
-
6
-
7
-
8
-
9
-
10
-
11
-
12
-
13
-
14
-
15
-
16
-
17
-
18
-
19
-
20
-
21
-
22
-
23
-
24
-
25
-
26
-
27
-
28
-
29
-
30
-
31
-
32
-
33
-
34
-
35
-
36
-
37
-
38
-
39
-
40
-
41
-
42
-
43
-
44
-
45
-
46
-
47
-
48
-
49
-
50
-
51
-
52
-
53
-
54
-
55
-
56
-
57
-
58
-
59
-
60
-
61
-
62
-
63
-
64
-
65
-
66
-
67
-
68
-
69
-
70
-
71
-
72
-
73
-
74
-
75
-
76
-
77
-
78
-
79
-
80
-
81
-
82
-
83
-
84
-
85
-
86
-
87
-
88
-
89
-
90
-
91
-
92
-
93
-
94
-
95
-
96
-
97
-
98
-
99
-
100
-
101
-
102
-
103
-
104
-
105
-
106
-
107
-
108
-
109
-
110
-
111
-
112
-
113
-
114
-
115
-
116
-
117
-
118
-
119
-
120
-
121
-
122
-
123
-
124
-
125
-
126
-
127
-
128
-
129
-
130
-
131
-
132
-
133
-
134
-
135
-
136
-
137
-
138
-
139
-
140
-
141
-
142
-
143
-
144
-
145
-
146
-
147
-
148
-
149
-
150
-
151
-
152
-
153
-
154
-
155
-
156
-
157
-
158
-
159
-
160
-
161
-
162
-
163
-
164
-
165
-
166
-
167
-
168
-
169
-
170
-
171
-
172
-
173
-
174
-
175
-
176
-
177
-
178
-
179
-
180
-
181
-
182
-
183
-
184
-
185
-
186
-
187
-
188
-
189
-
190
-
191
-
192
-
193
-
194
-
195
-
196
-
197
-
198
-
199
-
200
-
201
-
202
-
203
-
204
-
205
-
206
-
207
-
208
-
209
-
210
-
211
-
212
-
213
-
214
-
215
-
216
-
217
-
218
-
219
-
220
-
221
-
222
-
223
-
224
-
225
-
226
-
227
-
228
-
 229
229 -
 230
230 -
 231
231 -
 232
232 -
 233
233 -
 234
234 -
 235
235 -
 236
236 -
 237
237 -
 238
238 -
 239
239 -
240
-
241
-
242
-
243
-
244
-
245
-
246
-
247
-
248
-
249
-
250
-
251
-
252
-
253
-
254
-
255
-
256
-
257
-
258
-
259
-
260
-
261
-
262
-
263
-
264
-
265
-
266
-
267
-
268
-
269
-
270
-
271
-
272
-
273
-
274
-
275
-
276
-
277
-
278
-
279
-
280
-
281
-
282
-
283
-
284
-
285
-
286
-
287
-
288
-
289
-
290
-
291
-
292
-
293
-
294
-
295
-
296
-
297
-
298
-
299
-
300
-
301
-
302
-
303
-
304
-
305
-
306
-
307
-
308
-
309
-
310
-
311
-
312
-
313
-
314
-
315
-
316
-
317
-
318
-
319
-
320
-
321
-
322
-
323
-
324
-
325
-
326
-
327
-
328
-
329
-
330
-
331
-
332
-
333
-
334
 |
 |