Yamaha QY700 Owner's Manual - Page 77
Fingered-chord switch
 |
View all Yamaha QY700 manuals
Add to My Manuals
Save this manual to your list of manuals |
Page 77 highlights
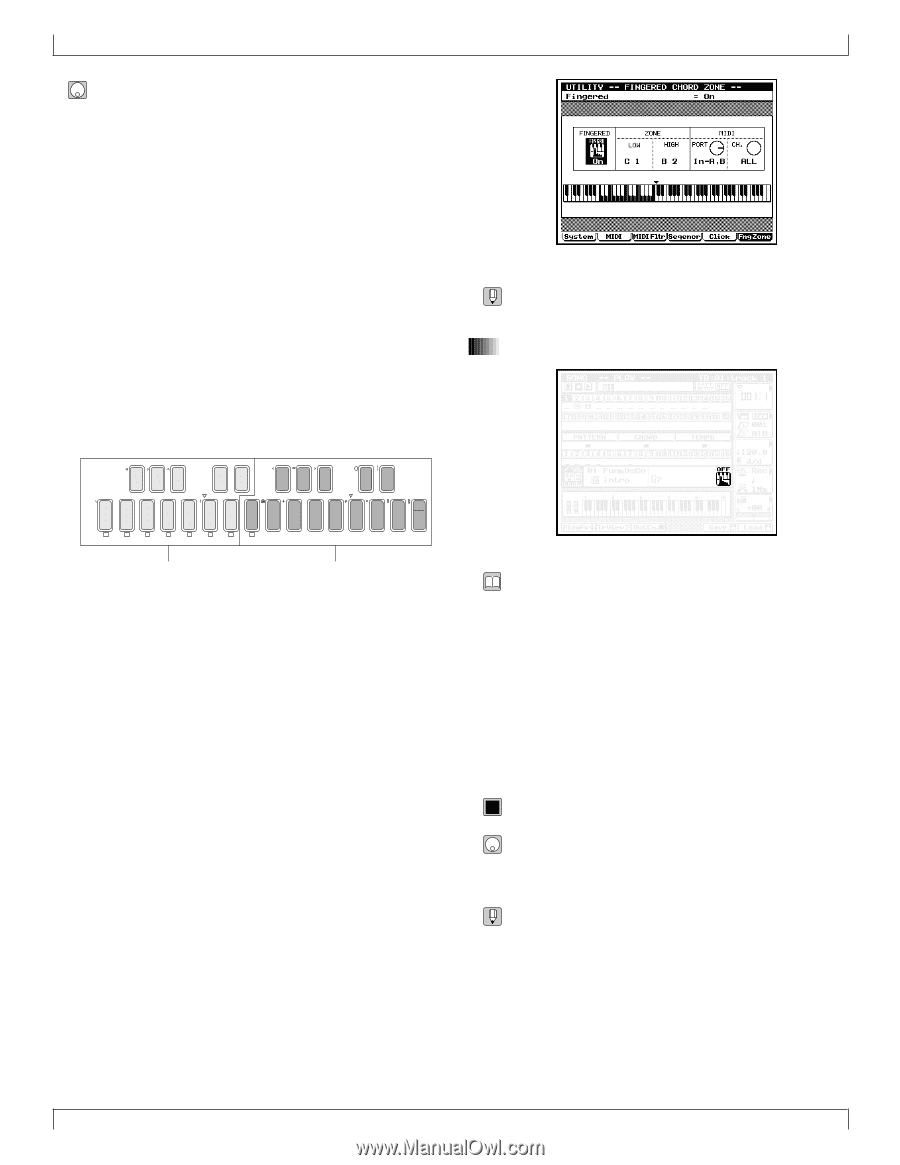
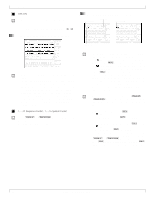
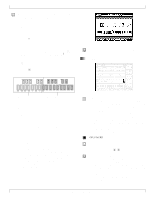
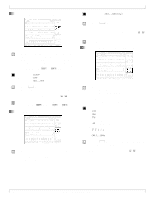
1. SONG PLAY s If you do not want to use fingered chording: 1. Set the fingered-chord switch to OFF. (See Section 7., below.) 2. Move the cursor to the chord root/type area on the screen. 3. Select the root by pressing a microkeyboard key from E2 to D 3. 4. Select the type by pressing a key from E3 to F4. 5. To set an on-bass : Hold down the left-side d[OCT DOWN] key and press a key from E2 to D 3. To set an original bass : Hold down the left-side u[OCT UP] key and press a key from E3 to F4. 6. Press e to register your entry. AF G BG A CA B ( DC D ) ED E F 7( 5) G 7( 9) H 7( 13) 7( 5) 7( 9) 7(13) a I 7sus4 sus4 J m7(11) 7( 11) c c _ ! ? # S % & _ / K L M N O P Q R S T U V W X Y Z E F G A B C D add9 M M7(9) M7 6(9) 6 7(9) add9 m7(9) mM7 dim 7 m m7 m6 m7( 5) aug SECTION A B C D E F G H Enter the chord root here. Enter the chord type here. s If you want to use fingered chording: 1. Go to UTILITY mode and set up the fingered-chord zone. (→ p.299) 2. Return to the SONG PLAY screen. Move the cursor to the fingered-chord switch area, and set the value to FINGRD (see Section 7 below). Leave the cursor in this area as you proceed. 3. Press down the keys for the appropriate chord, using either the QY700 microkeyboard or a remote MIDI keyboard. Be sure that all the keys you press are within the fingered-chord zone. The QY700 will automatically detect and register the root and type values. • To select the on-bass or original bass value: Continue to hold down the chord notes within the fingered-chord zone, while pressing one note (for the on-bass setting) or multiple notes (for the original-bass setting) in the keyboard area to the left of the zone. • For information about how to enter chords, refer to Chapter 1. (→ p.42) 7. Fingered-chord switch • This setting enables or disables the fingered-chord feature. • If you enable this feature (by setting the value to FINGRD), you will be able to enter chord values directly by playing the appropriate chord either at the microkeyboard or at a remote MIDI keyboard. Specifically, you can enter the root and type by playing the keys within the keyboard's fingeredchord zone (→ p.299), and you can enter the on-bass or original-bass value by playing the appropriate key(s) in the area to the left of the zone. See the procedure given in Section 6., directly above. • For general information about the fingered chord feature, refer to Chapter 1. (→ p.42) 0101 1101 OFF, FINGRD 1. Move the cursor to the fingered-chord switch area. 2. Use the data dial or n/y to select the setting. • You can use the fingered-chord feature to set up an autoaccompaniment for live-action keyboard play. First set the fingered-chord switch to FINGRD, and then select an empty song. You can then play the chord notes (for the accompaniment) in the fingered-zone area (→ p.299), while using the area to the right of the zone for normal play. The QY700 will produce your performance in the keyboard track's current voice. (But note that the area to the left of the zone is not available.) 76 Chapter 2. SONG MODE
-
 1
1 -
2
-
3
-
4
-
5
-
6
-
7
-
8
-
9
-
10
-
11
-
12
-
13
-
14
-
15
-
16
-
17
-
18
-
19
-
20
-
21
-
22
-
23
-
24
-
25
-
26
-
27
-
28
-
29
-
30
-
31
-
32
-
33
-
34
-
35
-
36
-
37
-
38
-
39
-
40
-
41
-
42
-
43
-
44
-
45
-
46
-
47
-
48
-
49
-
50
-
51
-
52
-
53
-
54
-
55
-
56
-
57
-
58
-
59
-
60
-
61
-
62
-
63
-
64
-
65
-
66
-
67
-
68
-
69
-
70
-
71
-
 72
72 -
 73
73 -
 74
74 -
 75
75 -
 76
76 -
 77
77 -
 78
78 -
 79
79 -
 80
80 -
 81
81 -
 82
82 -
83
-
84
-
85
-
86
-
87
-
88
-
89
-
90
-
91
-
92
-
93
-
94
-
95
-
96
-
97
-
98
-
99
-
100
-
101
-
102
-
103
-
104
-
105
-
106
-
107
-
108
-
109
-
110
-
111
-
112
-
113
-
114
-
115
-
116
-
117
-
118
-
119
-
120
-
121
-
122
-
123
-
124
-
125
-
126
-
127
-
128
-
129
-
130
-
131
-
132
-
133
-
134
-
135
-
136
-
137
-
138
-
139
-
140
-
141
-
142
-
143
-
144
-
145
-
146
-
147
-
148
-
149
-
150
-
151
-
152
-
153
-
154
-
155
-
156
-
157
-
158
-
159
-
160
-
161
-
162
-
163
-
164
-
165
-
166
-
167
-
168
-
169
-
170
-
171
-
172
-
173
-
174
-
175
-
176
-
177
-
178
-
179
-
180
-
181
-
182
-
183
-
184
-
185
-
186
-
187
-
188
-
189
-
190
-
191
-
192
-
193
-
194
-
195
-
196
-
197
-
198
-
199
-
200
-
201
-
202
-
203
-
204
-
205
-
206
-
207
-
208
-
209
-
210
-
211
-
212
-
213
-
214
-
215
-
216
-
217
-
218
-
219
-
220
-
221
-
222
-
223
-
224
-
225
-
226
-
227
-
228
-
229
-
230
-
231
-
232
-
233
-
234
-
235
-
236
-
237
-
238
-
239
-
240
-
241
-
242
-
243
-
244
-
245
-
246
-
247
-
248
-
249
-
250
-
251
-
252
-
253
-
254
-
255
-
256
-
257
-
258
-
259
-
260
-
261
-
262
-
263
-
264
-
265
-
266
-
267
-
268
-
269
-
270
-
271
-
272
-
273
-
274
-
275
-
276
-
277
-
278
-
279
-
280
-
281
-
282
-
283
-
284
-
285
-
286
-
287
-
288
-
289
-
290
-
291
-
292
-
293
-
294
-
295
-
296
-
297
-
298
-
299
-
300
-
301
-
302
-
303
-
304
-
305
-
306
-
307
-
308
-
309
-
310
-
311
-
312
-
313
-
314
-
315
-
316
-
317
-
318
-
319
-
320
-
321
-
322
-
323
-
324
-
325
-
326
-
327
-
328
-
329
-
330
-
331
-
332
-
333
-
334
 |
 |