Yamaha QY700 Owner's Manual - Page 90
Gate-time multiplier, Velocity offset, CopyTmp
 |
View all Yamaha QY700 manuals
Add to My Manuals
Save this manual to your list of manuals |
Page 90 highlights
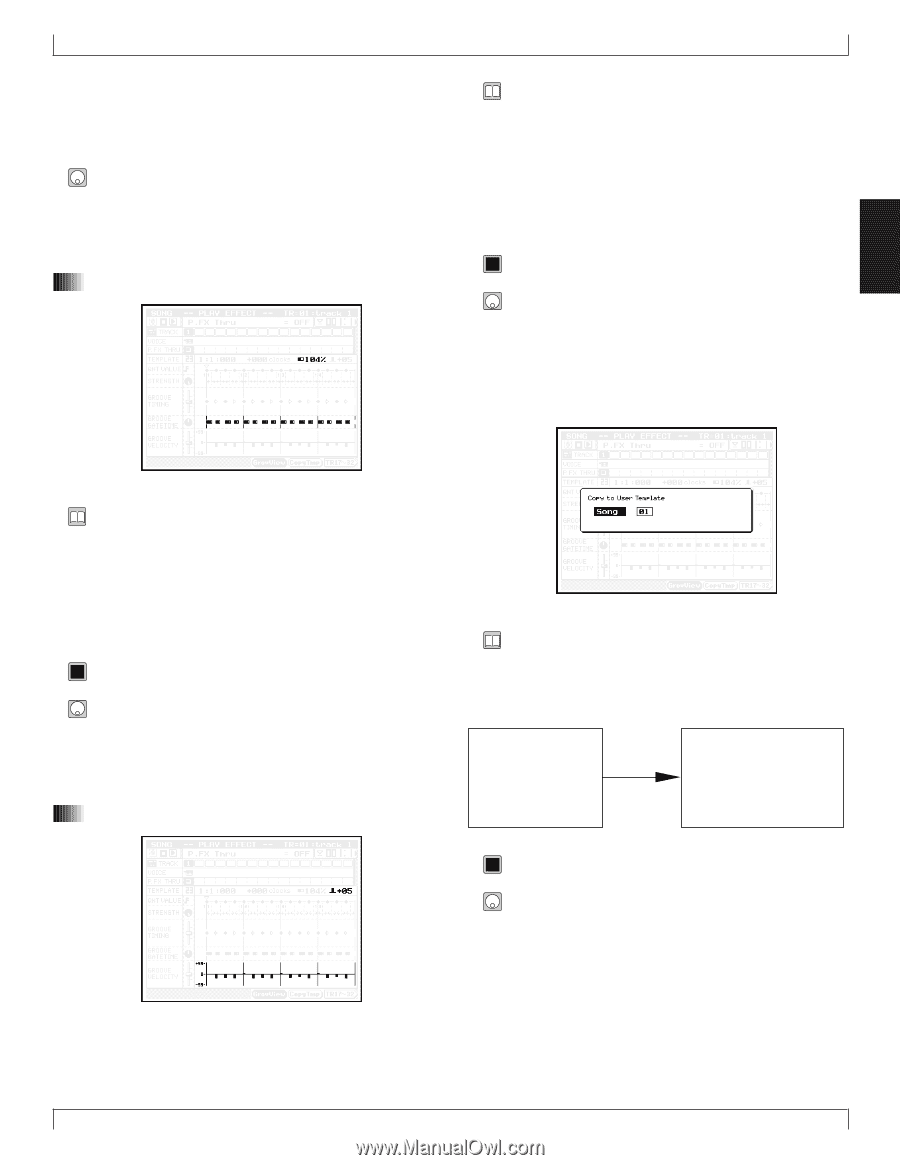
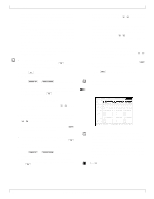
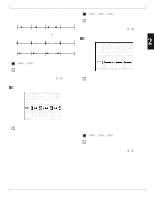
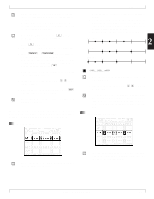
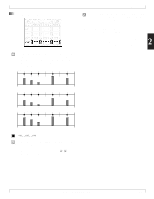
where "interval time" refers to the number of clock cycles between interval lines. Note that positive values shift notes toward the end of the song, while negative values shift them toward the beginning. 1. Move the cursor to the clock-shift setting (in the grid area) for the appropriate interval. 2. Adjust the value using the data dial, n/y , or the numeric keypad. 13. Gate-time multiplier 2. Play Effects • This value applies offsets to the velocity values. Again, off- sets can be different for each interval. • If you are using a preset template, you can not change these values. If you are using a user template, you can edit the values as described below. • This offset is only one of the factors determining the final velocity adjustment. Specifically, the velocity is adjusted by the combined action of the offset and the GROOVE VE- LOCITY setting (see Section 10 above). 0101 1101 -99%,...,00%,...,+99% 2 1. Move the cursor to the velocity-offset setting (in the grid area) for the appropriate interval. 2. Set the value using the data dial, n/y, or the numeric keypad. 5(CopyTmp) Copy template • This value adjusts the gate times for each interval. • If you are using a preset template, you can not change these values. If you are using a user template, you can edit the values as described below. • The multiplier is only one of the factors determining the final gate-time adjustment. Specifically, the gate time is adjusted by the combined action of the multiplier and the GROOVE GATETIME setting (see Section 9 above). 0101 1101 000%,...,100%,...,200% 1. Move the cursor to the gate-time multiplier setting (in the grid area) for the appropriate interval. 2. Set the value using the data dial, n/y, or the numeric keypad. 14. Velocity offset • This function copies the currently selected groove template into the user template for a designated song or style. • You can set up one user template for each song, and one for each style. • The values in the window select the destination. Currently selected groove template Copy User template for selected destination (song or style) 0101 1101 Destination: Song 01,...,20; Patt 01,...,64 1. At the "Groove View" page, select 5 (CopyTmp). w The screen displays the Copy to User Template window. 2. Select the destination values (Song or Patt in the left box, and the appropriate number in the right box) using the data dial, n/y, and numeric keypad. Chapter 2. SONG MODE 89
-
 1
1 -
2
-
3
-
4
-
5
-
6
-
7
-
8
-
9
-
10
-
11
-
12
-
13
-
14
-
15
-
16
-
17
-
18
-
19
-
20
-
21
-
22
-
23
-
24
-
25
-
26
-
27
-
28
-
29
-
30
-
31
-
32
-
33
-
34
-
35
-
36
-
37
-
38
-
39
-
40
-
41
-
42
-
43
-
44
-
45
-
46
-
47
-
48
-
49
-
50
-
51
-
52
-
53
-
54
-
55
-
56
-
57
-
58
-
59
-
60
-
61
-
62
-
63
-
64
-
65
-
66
-
67
-
68
-
69
-
70
-
71
-
72
-
73
-
74
-
75
-
76
-
77
-
78
-
79
-
80
-
81
-
82
-
83
-
84
-
 85
85 -
 86
86 -
 87
87 -
 88
88 -
 89
89 -
 90
90 -
 91
91 -
 92
92 -
 93
93 -
 94
94 -
 95
95 -
96
-
97
-
98
-
99
-
100
-
101
-
102
-
103
-
104
-
105
-
106
-
107
-
108
-
109
-
110
-
111
-
112
-
113
-
114
-
115
-
116
-
117
-
118
-
119
-
120
-
121
-
122
-
123
-
124
-
125
-
126
-
127
-
128
-
129
-
130
-
131
-
132
-
133
-
134
-
135
-
136
-
137
-
138
-
139
-
140
-
141
-
142
-
143
-
144
-
145
-
146
-
147
-
148
-
149
-
150
-
151
-
152
-
153
-
154
-
155
-
156
-
157
-
158
-
159
-
160
-
161
-
162
-
163
-
164
-
165
-
166
-
167
-
168
-
169
-
170
-
171
-
172
-
173
-
174
-
175
-
176
-
177
-
178
-
179
-
180
-
181
-
182
-
183
-
184
-
185
-
186
-
187
-
188
-
189
-
190
-
191
-
192
-
193
-
194
-
195
-
196
-
197
-
198
-
199
-
200
-
201
-
202
-
203
-
204
-
205
-
206
-
207
-
208
-
209
-
210
-
211
-
212
-
213
-
214
-
215
-
216
-
217
-
218
-
219
-
220
-
221
-
222
-
223
-
224
-
225
-
226
-
227
-
228
-
229
-
230
-
231
-
232
-
233
-
234
-
235
-
236
-
237
-
238
-
239
-
240
-
241
-
242
-
243
-
244
-
245
-
246
-
247
-
248
-
249
-
250
-
251
-
252
-
253
-
254
-
255
-
256
-
257
-
258
-
259
-
260
-
261
-
262
-
263
-
264
-
265
-
266
-
267
-
268
-
269
-
270
-
271
-
272
-
273
-
274
-
275
-
276
-
277
-
278
-
279
-
280
-
281
-
282
-
283
-
284
-
285
-
286
-
287
-
288
-
289
-
290
-
291
-
292
-
293
-
294
-
295
-
296
-
297
-
298
-
299
-
300
-
301
-
302
-
303
-
304
-
305
-
306
-
307
-
308
-
309
-
310
-
311
-
312
-
313
-
314
-
315
-
316
-
317
-
318
-
319
-
320
-
321
-
322
-
323
-
324
-
325
-
326
-
327
-
328
-
329
-
330
-
331
-
332
-
333
-
334
 |
 |