Yamaha RX-A820 Easy Start Guide
Yamaha RX-A820 Manual
 |
View all Yamaha RX-A820 manuals
Add to My Manuals
Save this manual to your list of manuals |
Yamaha RX-A820 manual content summary:
- Yamaha RX-A820 | Easy Start Guide - Page 1
C AV Receiver Ampli-tuner audio-vidéo Easy Setup Guide Manuel de configuration rapide English Français - Yamaha RX-A820 | Easy Start Guide - Page 2
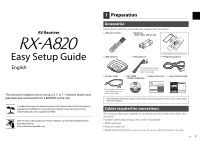
on the region of purchase. CD-ROM Safety Brochure (Owner's Manual) Easy Setup Guide *The supplied power cable varies depending on the region of purchase. • The illustrations of the main unit and remote control used in this guide are of the U.S.A. model, unless otherwise specified - Yamaha RX-A820 | Easy Start Guide - Page 3
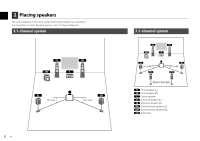
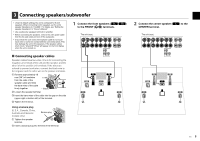
to "Owner's Manual". 5.1-channel system 1 2 9 3 4 10° to 30° 10° to 30° 5 2 En 7.1-channel system 1 2 9 3 4 10° to 30° 6 5 10° to 30° 7 30 cm (1 ft) or more 1 Front speaker (L) 2 Front speaker (R) 3 Center speaker 4 Surround speaker (L) 5 Surround speaker (R) 6 Surround back speaker - Yamaha RX-A820 | Easy Start Guide - Page 4
for 8-ohm speakers. When connecting 6-ohm speakers, set the unit's speaker impedance to "6 Ω MIN". For details, see "Setting the speaker impedance" in "Owner's Manual". • Use a subwoofer equipped with built-in amplifier. • Before connecting the speakers, remove the unit's power cable from the - Yamaha RX-A820 | Easy Start Guide - Page 5
unit (rear) FRONT CENTER SURROUND SPEAKERS SURROUND BACK/BI AMP ZONE 2/PRESENCE SINGLE SINGLE CENTER Audio pin cable AUDIO ZONE 2 OUT OUT FRONT SURROUND SUR. BACK PRE OUT 1 SUBWOOFER 2 EXTRA SP AC IN For 7.1-channel system Connect the surround back speakers (6/7) to the SURROUND BACK - Yamaha RX-A820 | Easy Start Guide - Page 6
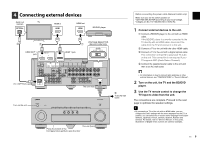
ARC HDMI 1 (BD/DVD) HDMI 2 HDMI 3 COMPONENT VIDEO PR PB Y VIDEO ANTENNA (RADIO) AM FM COMPONENT VIDEO PR REMOTE IN OUT PB VIDEO Y MONITOR OUT 12V 0.1A TRIGGER OUT HDMI 4 HDMI 5 HDMI 6 RS-232C HDMI 7 FRONT CENTER SURROUND SPEAKERS SURROUND BACK/BI AMP ZONE 2/PRESENCE SINGLE - Yamaha RX-A820 | Easy Start Guide - Page 7
room or leave the room. Preparing for YPAO SOURCE RECEIVER HDMI 1 2 3 4 5 6 7 V-AUX AV 1 2 3 4 AUDIO 5 6 1 2 TUNER USB MAIN ZONE 2 NET PARTY HDMI OUT BD DVD SCENE TV NET RADIO Turn on the subwoofer and set the volume to half. If the cross-over frequency is adjustable - Yamaha RX-A820 | Easy Start Guide - Page 8
(such as on top of AV equipment). a Use the cursor keys to select "Result" and press ENTER. b Use the cursor keys to select "Wiring". c Check the cable connections (+/-) of the speaker that was identified as being "Reverse" in the warning message. If the speaker is connected correctly: You can - Yamaha RX-A820 | Easy Start Guide - Page 9
multichannel audio (5.1-channel or more) to feel surround sound produced by the unit. SOURCE RECEIVER HDMI 1 2 3 4 5 6 7 V-AUX AV 1 2 3 4 AUDIO 5 6 1 2 TUNER USB MAIN ZONE 2 NET PARTY HDMI OUT BD DVD SCENE TV NET RADIO HDMI 1 1 Press HDMI 1 to select "HDMI 1" as the - Yamaha RX-A820 | Easy Start Guide - Page 10
ce produit est fourni sur CD-ROM. Pour en savoir plus sur ce produit, reportez-vous au Mode d'emploi fourni sur CD-ROM. Pour télécharger ce guide ainsi que le « Mode d'emploi » au format PDF, rendez-vous sur le site Web suivant : http://download.yamaha.com/ * Le câble d'alimentation fourni dépend - Yamaha RX-A820 | Easy Start Guide - Page 11
dans la pièce en vous reportant au diagramme suivant. Pour obtenir des informations sur les autres systèmes d'enceinte, consultez le « Mode d'emploi ». Système à 5.1 voies 1 2 9 3 4 10° à 30° 10° à 30° 5 2 Fr Système à 7.1 voies 1 2 9 3 4 10° à 30° 6 5 10° à 30° 7 30 cm ou plus - Yamaha RX-A820 | Easy Start Guide - Page 12
. 1 Raccordez les enceintes avant (1/ 2) aux bornes FRONT (//\). L'unité (arrière) FRONT CENTER SURROUND SPEAKERS SURROUND BACK/BI AMP ZONE 2/PRESENCE SINGLE SINGLE CENTER AUDIO OUT ZONE 2 OUT FRONT SURROUND SUR. BACK PRE OUT 1 SUBWOOFER 2 EXTRA SP AC IN 1 2 9 3 4 5 2 Raccordez - Yamaha RX-A820 | Easy Start Guide - Page 13
4 Raccordez le caisson de graves (9) à la prise SUBWOOFER (1). L'unité (arrière) FRONT CENTER SURROUND SPEAKERS SURROUND BACK/BI AMP ZONE 2/PRESENCE SINGLE SINGLE CENTER Câble de broche audio AUDIO ZONE 2 FRONT SURROUND SUR. BACK 1 SUBWOOFER 2 OUT OUT PRE OUT EXTRA SP AC IN Pour le - Yamaha RX-A820 | Easy Start Guide - Page 14
ARC HDMI 1 (BD/DVD) HDMI 2 HDMI 3 COMPONENT VIDEO PR PB Y VIDEO ANTENNA (RADIO) AM FM COMPONENT VIDEO PR REMOTE IN OUT PB VIDEO Y MONITOR OUT 12V 0.1A TRIGGER OUT HDMI 4 HDMI 5 HDMI 6 RS-232C HDMI 7 FRONT CENTER SURROUND SPEAKERS SURROUND BACK/BI AMP ZONE 2/PRESENCE SINGLE - Yamaha RX-A820 | Easy Start Guide - Page 15
mesure (environ 3 minutes). • Placez-vous dans un coin de la pièce ou quittez-la. SOURCE RECEIVER HDMI 1 2 3 4 5 6 7 V-AUX AV 1 2 3 4 AUDIO 5 6 1 2 TUNER USB MAIN ZONE 2 NET PARTY HDMI OUT Préparation à la fonction YPAO BD DVD SCENE TV NET RADIO Allumez le caisson de - Yamaha RX-A820 | Easy Start Guide - Page 16
de l'enceinte. Selon le type d'enceintes ou l'environnement, ce message peut apparaître, même si les enceintes sont correctement raccordées ère du soleil ou à des températures élevées (sur un équipement AV, etc.). a Utilisez les touches de curseur pour sélectionner « Result » et appuyez - Yamaha RX-A820 | Easy Start Guide - Page 17
audio multivoies (5.1 voies et plus). SOURCE RECEIVER HDMI 1 2 3 4 5 6 7 V-AUX AV 1 2 3 4 AUDIO 5 6 1 2 TUNER USB MAIN ZONE 2 NET PARTY HDMI OUT BD DVD SCENE TV NET RADIO HDMI 1 1 Appuyez sur HDMI 1 pour sélectionner « HDMI 1 » comme source d'entrée. HDMI1 VOL. SW - Yamaha RX-A820 | Easy Start Guide - Page 18
© 2012 Yamaha Corporation Printed in Malaysia ZA83170
-
 1
1 -
 2
2 -
 3
3 -
 4
4 -
 5
5 -
 6
6 -
 7
7 -
8
-
9
-
10
-
11
-
12
-
13
-
14
-
15
-
16
-
17
-
18
 |
 |
English
Français
Easy Setup Guide
Manuel de configuration rapide
C
AV Receiver
Ampli-tuner audio-vidéo