Yamaha RX-V1600 Owner's Manual
Yamaha RX-V1600 Manual
 |
UPC - 027108924229
View all Yamaha RX-V1600 manuals
Add to My Manuals
Save this manual to your list of manuals |
Yamaha RX-V1600 manual content summary:
- Yamaha RX-V1600 | Owner's Manual - Page 1
U RX-V1600 AV Receiver OWNER'S MANUAL - Yamaha RX-V1600 | Owner's Manual - Page 2
IMPORTANT SAFETY INSTRUCTIONS IMPORTANT SAFETY INSTRUCTIONS CAUTION RISK OF ELECTRIC SHOCK DO NOT OPEN CAUTION: TO REDUCE THE RISK OF ELECTRIC SHOCK, DO NOT REMOVE COVER (OR BACK). NO USER-SERVICEABLE PARTS INSIDE. REFER SERVICING TO QUALIFIED SERVICE PERSONNEL. • Explanation of Graphical Symbols - Yamaha RX-V1600 | Owner's Manual - Page 3
SECTION 810-21) GROUND CLAMPS POWER SERVICE GROUNDING ELECTRODE SYSTEM (NEC ART 250. PART H) FCC INFORMATION (for US customers) 1 IMPORTANT NOTICE: DO NOT MODIFY THIS UNIT! This product, when installed as indicated in the instructions contained in this manual, meets FCC requirements. Modifications - Yamaha RX-V1600 | Owner's Manual - Page 4
. 13 To prevent damage by lightning, keep the power cord and outdoor antennas disconnected from a wall outlet or the unit during a lightning storm. 14 Do not attempt to modify or fix this unit. Contact qualified YAMAHA service personnel when any service is needed. The cabinet should never be opened - Yamaha RX-V1600 | Owner's Manual - Page 5
6 Remote control 8 Zone 2/Zone 3 remote control 10 Front panel display 11 Rear panel 13 PREPARATION CONNECTIONS 14 Before connecting speakers 14 Connecting speakers 15 Using bi-wire and bi-AMP connections 19 Information on cables and jacks used for connections 20 Connecting HDMI components - Yamaha RX-V1600 | Owner's Manual - Page 6
Built-in 7-channel power amplifier ◆ Minimum RMS Output Power (0.04% THD, 20 Hz to 20 kHz, 8 Ω) Front: 120 W + 120 W Center: 120 W Surround: 120 W + 120 W Surround Back: 120 W + 120 W Sound field features ◆ Proprietary YAMAHA technology for the creation of sound fields ◆ THX Select2 ◆ Dolby - Yamaha RX-V1600 | Owner's Manual - Page 7
Please check that you received all of the following parts. Remote control POWER TV POWER AV STANDBY POWER A XM AUDIO SEL SLEEP ZONE 2 ZONE 3 GETTING STARTED Batteries (x6) (AAA, R03) Power cable Speaker terminal wrench Optimizer microphone AM loop antenna Indoor FM antenna 3 - Yamaha RX-V1600 | Owner's Manual - Page 8
of them correctly in accordance with your local regulations. ■ Installing batteries ■ Zone 2/Zone 3 remote control 2 1 3 2 1 3 1 Press the part and slide the battery compartment cover off. 1 Press the part and slide the battery compartment cover off. 2 Insert two supplied batteries (AAA, R03 - Yamaha RX-V1600 | Owner's Manual - Page 9
AUTO FM AUTO/MAN'L SPEAKERS ZONE ON/OFF ZONE CONTROL MULTI ZONE A B ZONE 2 ZONE 3 YPAO SILENT CINEMA S VIDEO VIDEO L AUDIO R OPTICAL OPTIMIZER MIC PHONES VIDEO/AUX TONE STRAIGHT CONTROL EFFECT PROGRAM PURE DIRECT VOLUME Approximately 6 m (20 ft) 30 30 POWER TV POWER AV STANDBY - Yamaha RX-V1600 | Owner's Manual - Page 10
MODE EDIT CATEGORY SEARCH MODE DISPLAY MAN'L/AUTO FM AUTO/MAN'L SPEAKERS ZONE ON/OFF ZONE CONTROL MULTI ZONE A B ZONE 2 ZONE 3 YPAO SILENT CINEMA S VIDEO VIDEO L AUDIO R OPTICAL OPTIMIZER MIC PHONES VIDEO/AUX TONE STRAIGHT CONTROL EFFECT PROGRAM PURE DIRECT VOLUME GH I 1 MASTER - Yamaha RX-V1600 | Owner's Manual - Page 11
(EFFECT) Turns the sound field programs on or off. When STRAIGHT is selected, 2-channel or multi-channel input signals are output directly from the respective speakers without effect processing. D Remote control sensor Receives infrared signals from the remote control. E TONE CONTROL Use to adjust - Yamaha RX-V1600 | Owner's Manual - Page 12
model and are operational only when XM is selected as the input source. For details, see "Remote control functions" on page 53. 1 2 3 POWER TV POWER AV STANDBY POWER ENTERTAIN MOVIE 2 3 4 THX STANDARD SELECT EXTD SUR. 5 6 7 8 1 MEMORY 2 9 0 A SPEAKERS B +10 ENT. FREQ/TEXT EON - Yamaha RX-V1600 | Owner's Manual - Page 13
inward to the ON position. B POWER Turns on this unit, Zone 2 between AUTO, HDMI, COAX/OPT and ANALOG when one component is connected to two remote control codes for other components, see page 94. I MUTE Mutes the sound. Press again to restore the audio output to the previous volume level. CONTROLS - Yamaha RX-V1600 | Owner's Manual - Page 14
model and are operational only when XM is selected as the input source. For details, see "Zone 2/Zone 3 remote control functions" on page 54. 1 2 3 4 XM POWER Switches the remote control ID between ID1 and ID2 (see page 95). 5 POWER Turns on or Zone 3. 8 MUTE Mutes the sound of Zone 2 or Zone 3. - Yamaha RX-V1600 | Owner's Manual - Page 15
CONTROLS AND FUNCTIONS Note The XM indicator is only applicable to the U.S.A. model. 1 23 4 5 6 7 890A V-AUX DVR/VCR 2 VCR 1 DIGITAL YPAO unit is receiving a stereo signal for an FM stereo broadcast connected. C SILENT CINEMA indicator Lights up when headphones are connected and a sound - Yamaha RX-V1600 | Owner's Manual - Page 16
the channel components of the current digital input signal. L CR SL SB SR Presence and surround back speaker indicators Light up according to the number of presence and surround back speakers set for PRESENCE SP (see page 79) and SB L/R SP (see page 79) in MANUAL SETUP when TEST TONE in MANUAL SETUP - Yamaha RX-V1600 | Owner's Manual - Page 17
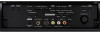
this inlet to plug in the supplied power cable (see page 30). 0 XM jack (U.S.A. model only) See page 52 for connection information. A HDMI IN/OUT connectors See page 108 for connection information. B RS-232C terminal This is a control expansion terminal for factory use only. Consult you dealer for - Yamaha RX-V1600 | Owner's Manual - Page 18
Subwoofer The use of a subwoofer, such as the YAMAHA Active Servo Processing Subwoofer System, is effective not only for reinforcing bass frequencies from any or all channels include sounds that filmmakers intend to locate a little farther back behind the screen in order to create more theater-like - Yamaha RX-V1600 | Owner's Manual - Page 19
Canada model cannot output to two pairs of speaker systems simultaneously. CENTER terminals Connect a center speaker to these terminals. SURROUND ZONE 2(3) terminals Connect surround speakers to these terminals. SUBWOOFER jack Connect a subwoofer with a built-in amplifier, such as the YAMAHA Active - Yamaha RX-V1600 | Owner's Manual - Page 20
CONNECTIONS 1 Remove approximately 10 mm (3/8 in) of insulation from each of the speaker cables. 10 mm (3/8 in) 5 Tighten the knob to secure the wire using the supplied speaker terminal wrench. Speaker terminal wrench 2 Twist the exposed wires of the cable - Yamaha RX-V1600 | Owner's Manual - Page 21
speaker 6 Surround back left speaker 7 Surround right speaker 8 Surround left speaker 9 Presence right speaker 10 Presence left speaker ■ Connecting the banana plug (With the exception of U.K., Europe and Asia models) First, tighten the knob and then insert the banana plug connector into the end of - Yamaha RX-V1600 | Owner's Manual - Page 22
CONNECTIONS (U.S.A. model) Front speakers (A) Right Left Subwoofer with built-in amplifier 1 2 3 Center speaker Front speakers (B) 4 R+ SPEAKERS - A- +L FRONT+ - B- CENTER + - + FRONT PRE OUT R L SURROUND R+ R SUBWOOFER L CENTER R+ SINGLE (SB) R L SURROUND BACK/PRESENCE - Yamaha RX-V1600 | Owner's Manual - Page 23
while the other is connected to the combined mid and tweeter section. With this arrangement each amplifier operates over a restricted frequency range. This restricted range presents each amplifier with a much simpler job and each amplifier is less likely to influence the sound in some way. The - Yamaha RX-V1600 | Owner's Manual - Page 24
to the main power until all connections between components are complete. ■ Cable indications For analog signals left analog cables L right analog cables R For digital signals optical cables O coaxial cables C For video signals video cables V S-video cables S For HDMI signals ■ Analog - Yamaha RX-V1600 | Owner's Manual - Page 25
Digital and DTS signals input at the HDMI IN 1 or HDMI IN 2 jack can be output at the HDMI OUT jack only when HDMI SET is set to OTHER (see page 82). • 2-channel PCM, Dolby Digital and DTS signals except multi-channel PCM signals input at the HDMI IN 1 or HDMI IN 2 jack can be output at the - Yamaha RX-V1600 | Owner's Manual - Page 26
four types of video jacks (composite, component, S-video and HDMI). Connection depends on the availability of input jacks on your monitor. VIDEO jacks can be deinterlaced from 480i to 480p. Set CMPNT I/P to ON in MANUAL SETUP to activate this feature (see page 85). • The analog video signals input at - Yamaha RX-V1600 | Owner's Manual - Page 27
In this case, the HDMI indicator flashes irregularly and HDCP ERROR appears in the front panel display as if the DVI monitors do not support the HDCP copy protection standards. IN 1 HDMI out DVD Player Cable TV or Satellite tuner HDMI out Video monitor HDMI in IN 2 OUT HDMI (U.S.A. model) 23 - Yamaha RX-V1600 | Owner's Manual - Page 28
VIDEO AUDIO R L DVD DVD IN 1 MONITOR OUT Video monitor Video in HDMI in IN 2 OUT DIGITAL OUTPUT HDMI MONITOR OUT OUTPUT (U.S.A. model) Note Check the availability of jacks on your DVD player and select one type of connection for audio/video input/output. However, in case you make an - Yamaha RX-V1600 | Owner's Manual - Page 29
other video components CONNECTIONS HDMI out Optical out Cable TV or satellite tuner Audio out Video out O (U.S.A. model) DIGITAL INPUT COAXIAL COMPONENT VIDEO Y PB PR VIDEO S VIDEO VIDEO AUDIO R L OPTICAL DVR/ VCR 2 DTV CBL/ SAT IN 1 CBL/SAT CBL/ SAT IN VCR 1 OUT - Yamaha RX-V1600 | Owner's Manual - Page 30
CONNECTIONS ■ Connecting to the MULTI CH INPUT jacks This unit is equipped with 6 additional input jacks (left and right FRONT, CENTER, left and right SURROUND and SUBWOOFER) for discrete multi-channel input from a multi-format player, external decoder, sound processor or pre-amplifier. If you set - Yamaha RX-V1600 | Owner's Manual - Page 31
Audio out O RL RL (U.S.A. model) DIGITAL INPUT COAXIAL CD CD OPTICAL MD/TAPE CD-R DIGITAL OUTPUT CONNECTIONS O Optical in MD recorder or use an in-line boosting transformer or MC-head amplifier when connecting to these jacks. • Connect your turntable to the GND terminal to reduce noise - Yamaha RX-V1600 | Owner's Manual - Page 32
BACK/PRESENCE 5 1 FRONT PRE OUT jacks Front channel line output jacks. 2 SURROUND PRE OUT jacks Surround channel line output jacks. 3 SUBWOOFER PRE OUT jack Connect a subwoofer with built-in amplifier, such as the YAMAHA Active Servo Processing Subwoofer System, to this jack. 4 SURROUND BACK - Yamaha RX-V1600 | Owner's Manual - Page 33
if an outdoor AM antenna is connected to this unit. • A property installed outdoor antenna provides clearer reception than an indoor one. If you experience poor reception quality, an outdoor antenna may improve the quality. Consult the nearest authorized YAMAHA dealer or service center about outdoor - Yamaha RX-V1600 | Owner's Manual - Page 34
When all connections are complete, turn on the power of this unit. 1,4 2,3 (U.S.A. model) MAIN ZONE FM AUTO/MAN'L SPEAKERS ZONE ON/OFF ZONE CONTROL MULTI ZONE A B ZONE 2 ZONE 3 YPAO SILENT CINEMA S VIDEO VIDEO L AUDIO R OPTICAL OPTIMIZER MIC PHONES VIDEO/AUX TONE STRAIGHT CONTROL - Yamaha RX-V1600 | Owner's Manual - Page 35
PREPARATION CONNECTIONS 3 Press MAIN ZONE ON/OFF, ZONE 2 ON/OFF or ZONE 3 ON/OFF on the front panel (or POWER on the remote control) to turn on this unit, Zone 2 or Zone 3. ON/OFF POWER or Setting the speaker impedance Follow the procedure below to change the impedance setting for all speakers. - Yamaha RX-V1600 | Owner's Manual - Page 36
for loud test tones to be output during the AUTO SETUP procedure. • If the AUTO SETUP procedure stops and error messages appear on the screen, follow the troubleshooting on page 115. YPAO performs the following checks and makes appropriate adjustments to give you the best possible sound from your - Yamaha RX-V1600 | Owner's Manual - Page 37
AUTO SETUP procedure (YPAO). If there is MIN MAX MIN MAX Subwoofer POWER TV POWER AV STANDBY POWER A XM AUDIO SEL THX STANDARD SELECT EXTD SUR. 5 6 7 8 1 MEMORY 2 9 0 A SPEAKERS B +10 ENT. REC DISC SKIP OFF ON MACRO LEARN CLEAR RE-NAME 1 2-9 SET MENU . ;AUTO SETUP ;MANUAL - Yamaha RX-V1600 | Owner's Manual - Page 38
and perform no adjustments. Note When using THX speakers, set SIZE to SKIP and make speaker in accordance with the sound of your front speakers. the speaker connection and manually adjust each setup parameter, run MANUAL SETUP (see page 75). Note If E-10:INTERNAL ERROR appears during testing - Yamaha RX-V1600 | Owner's Manual - Page 39
may be longer than the actual distance depending on the characteristics of your subwoofer. • In the EQ results, different values may be set for the in the OSD. SET MENU . ;AUTO SETUP ;MANUAL SETUP . ;INFORMATION [ ]/[ ]:Up/Down [ENTER]:Enter 10 Press ENTER to confirm your selection. The SET MENU - Yamaha RX-V1600 | Owner's Manual - Page 40
supports CDs encoded in DTS. Also, check the sound output level of your CD player before you play back a CD encoded in DTS. Basic operations 2 Turn on the power of the video monitor connected to this unit. (U.S.A. model 10 ENT. Front panel Remote control 4 POWER TV POWER AV STANDBY POWER - Yamaha RX-V1600 | Owner's Manual - Page 41
sound field programs. PROGRAM or Front panel STEREO 1 MUSIC ENTERTAIN MOVIE 2 3 4 THX STANDARD SELECT EXTD SUR. 5 6 7 8 1 MEMORY 2 9 0 A SPEAKERS B +10 ENT. Remote control at THX calibrated loudness, just turn down the volume control by 4dB. However, unlike a movie theater where - Yamaha RX-V1600 | Owner's Manual - Page 42
channels. 1 Press TONE CONTROL on the front panel repeatedly to select TREBLE or BASS. TONE CONTROL ■ Muting the sound output Use this feature to mute the sound output. 1 Press MUTE on the remote control you connect headphones to the PHONES jack while listening to CINEMA DSP or HiFi DSP sound field - Yamaha RX-V1600 | Owner's Manual - Page 43
(or one of the input selector buttons on the remote control), press MULTI CH INPUT so that MULTI CH INPUT disappears from the front panel display and the video monitor. ■ Enjoying multi-channel software in 6.1/7.1 channel surround If you connected one or two surround back speakers, use this feature - Yamaha RX-V1600 | Owner's Manual - Page 44
back in multiple channels. 1 Set AMP/SOURCE/TV to AMP and then press STANDARD on the remote control to switch between the Surround and Enhanced programs. AMP SOURCE TV STANDARD 6 You can also press MOVIE or THX on the remote control to select the MOVIE THEATER or THX programs. MOVIE 4 THX or - Yamaha RX-V1600 | Owner's Manual - Page 45
PURE DIRECT mode. • When a multi-channel signal (Dolby Digital or DTS) is input, this unit automatically switches to the corresponding analog input. When DTS is selected as an input mode, no sound will be heard. • No sound will be output from the subwoofer. • TONE CONTROL on the front panel and the - Yamaha RX-V1600 | Owner's Manual - Page 46
connected to the AC OUTLETS. 1 Select an input source and start playback on the source component. ■ Downmixing to 2 channels You can enjoy 2-channel stereo playback from multichannel sources. Rotate the PROGRAM selector (or set AMP/SOURCE/TV to AMP and then press STEREO on the remote control - Yamaha RX-V1600 | Owner's Manual - Page 47
if HDMI IN 1 and HDMI IN 2 jacks are not assigned. Use I/O ASSIGNMENT in INPUT MENU to reassign the respective input jacks (see page 83). Press AUDIO SELECT on the front panel or AUDIO SEL on the remote control to select an input mode. AUDIO SELECT or Front panel POWER TV POWER AV STANDBY POWER - Yamaha RX-V1600 | Owner's Manual - Page 48
connection between this unit and sound HDMI Resolution Resolution of the HDMI signals input or output at the HDMI IN/OUT jacks of this unit. Analog Resolution Resolution of the analog signals input or output at the video component jacks of this unit. 3 Press SET MENU on the remote control - Yamaha RX-V1600 | Owner's Manual - Page 49
FM AUTO/MAN'L SPEAKERS ZONE ON/OFF ZONE CONTROL MULTI ZONE A B ZONE 2 ZONE 3 YPAO SILENT CINEMA S VIDEO VIDEO L AUDIO R OPTICAL OPTIMIZER MIC PHONES VIDEO/AUX TONE STRAIGHT CONTROL EFFECT PROGRAM PURE DIRECT VOLUME 2 1 Turn on the power of this unit and all connected components - Yamaha RX-V1600 | Owner's Manual - Page 50
TV Front panel or TUNER Remote control Preset station group and number Frequency of Reception the received band station V-AUX DVR/VCR 2 VCR 1 CBL/SAT DTV DVD MD/TAPE CD-R CD PHONO TUNER XM A1:AM 1070 kHz AUTO dB VOLUME SP A Sci-Fi L R Name of the sound field program 4 Press PRESET - Yamaha RX-V1600 | Owner's Manual - Page 51
h to manually tune into CONTROL MULTI ZONE A B ZONE 2 ZONE 3 YPAO SILENT CINEMA S VIDEO VIDEO L AUDIO R OPTICAL OPTIMIZER MIC PHONES VIDEO/AUX TONE STRAIGHT CONTROL EFFECT PROGRAM PURE DIRECT VOLUME 1 32 1 Press FM/AM on the front panel (or BAND on the remote control) to select FM - Yamaha RX-V1600 | Owner's Manual - Page 52
it manually and store it by following the procedure in "Manual preset tuning". ■ Customized automatic preset tuning You can specify a preset station group and a preset station number from which this unit stores the FM stations received stops when the received stations have all been - Yamaha RX-V1600 | Owner's Manual - Page 53
You can also store up to 40 FM or AM stations (8 stations in each of the 5 groups, A1 to E8) manually. Note You must first set AMP/SOURCE/TV to SOURCE and then press TUNER on the remote control to select TUNER as the input source. (U.S.A. model) 3 Press A/B/C/D/E on the front panel repeatedly to - Yamaha RX-V1600 | Owner's Manual - Page 54
preset tuning" on page 47 or "Manual preset tuning" on page 49. (U.S.A. model) V-AUX DVR/VCR 2 VCR 1 FM AUTO/MAN'L SPEAKERS ZONE ON/OFF ZONE CONTROL MULTI ZONE A B ZONE 2 ZONE 3 YPAO SILENT CINEMA S VIDEO VIDEO L AUDIO R OPTICAL OPTIMIZER MIC PHONES VIDEO/AUX TONE STRAIGHT CONTROL - Yamaha RX-V1600 | Owner's Manual - Page 55
MAN'L/AUTO FM AUTO/MAN'L SPEAKERS ZONE ON/OFF ZONE CONTROL MULTI ZONE A B ZONE 2 ZONE 3 YPAO SILENT CINEMA S VIDEO VIDEO L AUDIO R OPTICAL OPTIMIZER MIC PHONES VIDEO/AUX TONE STRAIGHT CONTROL EFFECT PROGRAM PURE DIRECT VOLUME Front panel Remote control 1,3 1,3 2,4 (U.S.A. model - Yamaha RX-V1600 | Owner's Manual - Page 56
respective owners. XM Satellite Radio connections Connect the XM Connect-and-Play digital antenna accessory (sold separately) to the XM jack on the rear of this unit. (For details, refer to the operating instructions provided with the XM Connect-and-Play digital antenna accessory). (U.S.A. model - Yamaha RX-V1600 | Owner's Manual - Page 57
MODE DISPLAY MAN'L/AUTO FM AUTO/MAN'L SPEAKERS ZONE ON/OFF ZONE CONTROL MULTI ZONE A B ZONE 2 ZONE 3 YPAO SILENT CINEMA S VIDEO VIDEO L AUDIO R OPTICAL OPTIMIZER MIC PHONES VIDEO/AUX TONE STRAIGHT CONTROL EFFECT PROGRAM (U.S.A. model) 1 CATEGORY (All Channel Search mode) Changes - Yamaha RX-V1600 | Owner's Manual - Page 58
ZONE A B ZONE 2 ZONE 3 YPAO SILENT CINEMA S VIDEO VIDEO L AUDIO R OPTICAL OPTIMIZER MIC PHONES VIDEO/AUX TONE STRAIGHT CONTROL EFFECT PROGRAM PURE DIRECT VOLUME 1 3 1 Rotate the INPUT selector (or set AMP/ SOURCE/TV to SOURCE and then press XM on the remote control) to select XM as - Yamaha RX-V1600 | Owner's Manual - Page 59
check the connection. • The ANTENNA parameter cannot be adjusted by using the remote control. 3 Press PRESET/TUNING/CH l / h (or PRESET/CH k / n on the remote control) to select channel 0. PRESET/CH PRESET/TUNING/CH or A-E/CAT. ENTER Selecting the XM Satellite Radio mode (U.S.A. model) MAIN - Yamaha RX-V1600 | Owner's Manual - Page 60
Number Access mode" on page 58. ■ All Channel Search mode 3 To change the channel category, press CATEGORY (or A-E/CAT. l / h on the remote control) repeatedly. A/B/C/D/E CATEGORY or PRESET/CH A-E/CAT. ENTER (U.S.A. model) Front panel Remote control MAIN ZONE ON/OFF MASTER ON OFF INPUT - Yamaha RX-V1600 | Owner's Manual - Page 61
MODE EDIT CATEGORY SEARCH MODE DISPLAY MAN'L/AUTO FM AUTO/MAN'L SPEAKERS ZONE ON/OFF ZONE CONTROL MULTI ZONE A B ZONE 2 ZONE 3 YPAO SILENT CINEMA S VIDEO VIDEO L AUDIO R OPTICAL OPTIMIZER MIC PHONES VIDEO/AUX TONE STRAIGHT CONTROL EFFECT PROGRAM PURE DIRECT VOLUME 3 42 1 Carry - Yamaha RX-V1600 | Owner's Manual - Page 62
THX STANDARD SELECT EXTD SUR. 5 6 7 8 1 MEMORY 2 9 0 A SPEAKERS B +10 ENT. FREQ/TEXT EON MODE PTY SEEK START (U.S.A. model) 2 3 4 1 Carry out "Selecting the XM Satellite Radio mode" on page 55. 2 Press SEARCH MODE (or SRCH MODE on the remote control the desired channel number. For - Yamaha RX-V1600 | Owner's Manual - Page 63
EDIT CATEGORY SEARCH MODE DISPLAY MAN'L/AUTO FM AUTO/MAN'L SPEAKERS ZONE ON/OFF ZONE CONTROL MULTI ZONE A B ZONE 2 ZONE 3 YPAO SILENT CINEMA S VIDEO VIDEO L AUDIO R OPTICAL OPTIMIZER MIC PHONES VIDEO/AUX TONE STRAIGHT CONTROL EFFECT PROGRAM 3 4 2,5 PURE DIRECT VOLUME 3 While - Yamaha RX-V1600 | Owner's Manual - Page 64
page 88). Note If a status message or an error message appears in the front panel display, see TROUBLESHOOTING on page 113. ■ Displaying the XM Satellite Radio information in the OSD Press DISPLAY on the front panel or on the remote control. The following screen is displayed in the OSD. TUNING - Yamaha RX-V1600 | Owner's Manual - Page 65
to toggle between the following XM information display modes. TUNING MODE AUTO/MAN'L Front panel Channel name/number or Channel category ON SCREEN DISPLAY Remote control Artist name/Song title When the channel number/name is displayed: V-AUX DVR/VCR 2 VCR 1 CBL/SAT DTV DVD MD/TAPE CD - Yamaha RX-V1600 | Owner's Manual - Page 66
YAMAHA has done with the digital sound field processor. You can enjoy good quality sound with the factory preset parameters. Although you do not have to change the initial settings, you can change some of the parameters to better suit the input source or your listening room. POWER TV POWER AV - Yamaha RX-V1600 | Owner's Manual - Page 67
SIZE;;1.0 EDITING SOUND FIELD PARAMETERS Memory back-up The memory back-up circuit prevents the stored data from being lost. However, the stored data will be lost in case the power cord is disconnected from the AC wall outlet for more than one week. ■ Resetting parameters to the factory values To - Yamaha RX-V1600 | Owner's Manual - Page 68
. Source Remote control button Category and Program STEREO 1 2ch Stereo ENTERTAINMENT TV Sports MULTI 2-CH 3 ENTERTAINMENT Mono Movie ENTERTAINMENT Game MOVIE THEATER Spectacle MOVIE THEATER Sci-Fi 4 MOVIE THEATER Adventure MOVIE THEATER General Features Downmixes multi-channel sources to - Yamaha RX-V1600 | Owner's Manual - Page 69
SOUND FIELD PROGRAM DESCRIPTIONS Source MULTI 2-CH MULTI 2-CH Remote control button Category and Program THX THX Cinema THX 5 THX Game THX THX Select2 Cinema STANDARD DOLBY DIGITAL STANDARD q D+PLIIx Movie STANDARD DOLBY D EX STANDARD DTS STANDARD DTS 96/24 STANDARD DTS+PLIIx Movie - Yamaha RX-V1600 | Owner's Manual - Page 70
when playing music sources, like CD, FM/AM broadcasting, tapes, etc. Program selection methods vary depending on sound field program types. For details on how to select sound field programs, see "Basic operations" on page 36. Source Remote control button Category and Program STEREO 2ch Stereo - Yamaha RX-V1600 | Owner's Manual - Page 71
is repeatedly reflected around a room, the larger the hall is, the longer the time between the original reflected sound and the subsequent reflections. By controlling the time between the reflected sounds, you can change the apparent size of the virtual venue. Changing this parameter from one to - Yamaha RX-V1600 | Owner's Manual - Page 72
sound Large value = 10 ■ S. INIT. DLY (Surround initial delay) Function: Adjusts the delay between the direct sound and the first reflection on the surround side of the sound field. You can only adjust this parameter when at least two front channels and two surround channels are used. Control - Yamaha RX-V1600 | Owner's Manual - Page 73
. The shorter the reverberation time, the more dead the listening room environment seems. Control range: 1.0 to 5.0 s Reverberation Source sound Reverberation Early reflections 60 dB 60 dB 60 dB Sound source REV.TIME Short reverberation REV.TIME REV.TIME Long reverberation Small value - Yamaha RX-V1600 | Owner's Manual - Page 74
effect. OFF, ON DIMENSION (Dimension) Function: Gradually adjusts the sound field either towards the front or towards the rear. Control range: -3 ( left and right speakers. Control range: 0 (center channel sound is output only from center speaker) to 7 (center channel sound is output only from - Yamaha RX-V1600 | Owner's Manual - Page 75
some channels that can only be used partially when they are adjusted to specific aspects of movies, such as special sound L R SL SR SBL SBR SL SR SBL SBR SL SR SBL SBR when surround back speakers are connected PL PR C L R PL PR C L R PL PR C L R SL SR SBL SBR PL - Yamaha RX-V1600 | Owner's Manual - Page 76
R PL PR C L R SL SR SBL SBR SL SR SBL SBR SL SR SBL SBR THX THX Game PL PR C L R PL PR C L R PL PR C L R PL PR C L R PL PR C L R STANDARD DOLBY DIGITAL PRO LOGIC DTS MOVIE THEATER Enhanced DOLBY DIGITAL PRO LOGIC DTS SL SR SBL SBR PL PR C L R SL SR - Yamaha RX-V1600 | Owner's Manual - Page 77
SOUND FIELD PROGRAM SPEAKER LAYOUTS 2-channel audio 2-channel audio (monaural) (stereo) 5.1/6.1-channel audio *1 5.1/6.1-channel audio *2 5.1/6.1-channel audio *3 PL PR C L R PL PR C L R SL SR SBL SBR Movie/Game SL SR SBL SBR Movie/Music/Game PL PR C L R MOVIE THEATER - Yamaha RX-V1600 | Owner's Manual - Page 78
SOUND FIELD PROGRAM SPEAKER LAYOUTS MOVIE THEATER Enhanced Neo:6 Cinema 2-channel audio 2-channel audio 5.1/6.1-channel (monaural) (stereo) audio *1 PL PR C L R PL PR C L R 5.1/6.1-channel audio *2 5.1/6.1-channel audio *3 SL SR SBL SBR SL SR SBL SBR When Priority is set to - Yamaha RX-V1600 | Owner's Manual - Page 79
speaker. Adjusts the delay time of each speaker. Adjusts the THX settings. Turns the test tone output on or off for the SPEAKER SET, SP LEVEL and SP DISTANCE settings. Page 78 80 80 81 81 2 SOUND MENU Use to manually adjust speaker settings or compensate for video signal processing delays when - Yamaha RX-V1600 | Owner's Manual - Page 80
or to recall the previous settings for the input mode selected in INPUT MENU. Initializes the parameters of a group of sound field programs. Specifies the location of the speakers connected to the SPEAKERS B terminals on the rear panel of this unit. Adjusts the XM Satellite Radio settings. Page 85 - Yamaha RX-V1600 | Owner's Manual - Page 81
SETUP Using MANUAL SETUP Use the remote control to access and adjust each THX STANDARD SELECT EXTD. SUR 5 6 7 8 A SPEAKERS B 9 0 +10 ENT. (U.S.A. model) 1 1,5 5 y You can change the MANUAL SETUP parameters while the unit is reproducing sound. Note You cannot change some MANUAL - Yamaha RX-V1600 | Owner's Manual - Page 82
in Dolby Digital or DTS sources. Choices: SWFR (subwoofer), FRONT, BOTH THX recommendation: SWFR LFE/BASS OUT [SWFR FRONT BOTH • Select SWFR if you connect a subwoofer. LFE and low-frequency signals from other channels are directed to the subwoofer according to the speaker settings. • Select FRONT - Yamaha RX-V1600 | Owner's Manual - Page 83
of the surround back channel are directed to the speakers connected to this unit. Choices: NONE, YES PRESENCE SP MANUAL subwoofer. Choices: 40Hz, 60Hz, 80Hz, 90Hz, 100Hz, 110Hz, 120Hz, 160Hz, 200Hz THX recommendation: 80Hz CROSS OVER FREQ;;;80Hz(THX) Subwoofer phase SUBWOOFER PHASE If bass sounds - Yamaha RX-V1600 | Owner's Manual - Page 84
, this is not possible in most home situations. Thus, a certain amount of delay must be applied to the sound from each speaker so that all sounds arrive at the listening position at the same time. C)SP DISTANCE . UNIT;;;;;;;;feet FRONT L;;;10.0ft FRONT R;;;10.0ft CENTER;;;;10.0ft [ ]/[ ]:Up/Down - Yamaha RX-V1600 | Owner's Manual - Page 85
Test tone E)TEST TONE Turns the test tone output on or off for the SPEAKER SET, SP LEVEL and SP DISTANCE settings. Choices: ON, OFF MANUAL SETUP Using SOUND MENU Use to manually L/R speakers. Choices: -6 to +6 (dB) A)EQUALIZER . CHANNEL;;FRONT L - + 63Hz 0.0dB 160Hz 0.0dB 400Hz 0.0dB - Yamaha RX-V1600 | Owner's Manual - Page 86
p p MANUAL SETUP Test tone TEST Turns the test tone output on or off to compare the tonal 0 dB. • Select OFF not to bypass the tone control at any time. ■ HDMI set E)HDMI SET Use to adjust the HDMI support audio. E)HDMI SET SUPPORT AUDIO: RX-V1600 []:Adjust p p C)DYNAMIC RANGE . SP: MIN STD - Yamaha RX-V1600 | Owner's Manual - Page 87
to reassign the respective jacks and effectively connect more components. Once the inputs have been reassigned, you can select the corresponding component by using the INPUT selector on the front panel or the input selector buttons on the remote control. Note The default settings are displayed with - Yamaha RX-V1600 | Owner's Manual - Page 88
MANUAL on the remote control to exit from specific subwoofer and surround channels when a source component is connected to the MULTI CH INPUT jacks. If you input 8-channel channel signals. • Select 8CH if you input 8-channel signals. Note If ZONE2 AMP is set to SUR, PRNS or BOTH (see page 87), no sound - Yamaha RX-V1600 | Owner's Manual - Page 89
be initialized to the factory presets. Use the V-RESET feature in the ADVANCED being input. MANUAL SETUP Video conversion V CONV HDMI interlace/ progressive up-conversion of the analog video signals. y When using the THX • If your video monitor does not support the analog video signals with 480p of - Yamaha RX-V1600 | Owner's Manual - Page 90
MANUAL SETUP HDMI interlace/progressive up-conversion HDMI I/P Use this feature to activate or deactivate the HDMI for the input sources connected to the DIGITAL INPUT jacks when you turn on the power of this unit. GUARD is set to ON, you cannot use the test tone or select any other SET MENU items. • - Yamaha RX-V1600 | Owner's Manual - Page 91
with VOLUME +/- on the remote control. • Select FIX to fix the ZONE 3 OUTPUT volume level to a standard line level. Zone 2 amplifier ZONE2 AMP Use to select how the ZONE 2 speakers are amplified. Choices: EXT, SUR, PRNS, BOTH • Select EXT if you want to connect your Zone 2 speakers through - Yamaha RX-V1600 | Owner's Manual - Page 92
. • If NONE is displayed, the XM Satellite Radio antenna may not be firmly connected to the XM jack on the rear panel of this unit. Check the XM Satellite Radio connection. Note The ANTENNA parameter cannot be adjusted by using the remote control. Instead, you need to adjust the orientation of the - Yamaha RX-V1600 | Owner's Manual - Page 93
SET MENU and sound field program parameter settings on a monitor, it is much easier to see the available options and parameters than it is to read the information in the front panel display. Turn on the video monitor connected to this unit and then press ON SCREEN on the remote control repeatedly to - Yamaha RX-V1600 | Owner's Manual - Page 94
• Select CANCEL if you do not want to reset the parameters of this unit. • Select RESET to reset the parameters of this unit. Notes • This setting does not affect the ADVANCED SETUP menu item parameters. • The initial factory settings are activated next time you turn on the power of this unit. 90 - Yamaha RX-V1600 | Owner's Manual - Page 95
code is set to 2604. • Select ID2 when the remote control XM library code is set to 2605. Note You need to set the corresponding remote control code for the remote control. ■ Fan operation mode FAN MODE Use to set the operation of the cooling fan of this unit. Choices: AUTO, CONT. • Select AUTO to - Yamaha RX-V1600 | Owner's Manual - Page 96
regardless of whether they are connected to this unit. Factory setting: A...Tape deck Display window Component control area You can control up to 14 different components by setting appropriate remote control codes (see page 94). POWER TV POWER AV STANDBY POWER A B AUDIO SELECT SLEEP PHONO - Yamaha RX-V1600 | Owner's Manual - Page 97
Rec Stop Pause Play *1 This button functions only when the original remote control of the component has a POWER button. *2 These buttons can operate your TV without switching the input if the remote control code is set in DTV or PHONO. When the remote control code for your TV is set up in both the - Yamaha RX-V1600 | Owner's Manual - Page 98
DVR DVD - - 2500 2400 - - 2807 2102 Note You may not be able to operate your YAMAHA component even if a YAMAHA remote control code is preset as listed above. In this case, try setting another YAMAHA remote control code. 1 Set AMP/SOURCE/TV to SOURCE. AMP SOURCE TV 3 Press and hold LEARN for about - Yamaha RX-V1600 | Owner's Manual - Page 99
the end of this manual. STEREO 1 MUSIC ENTERTAIN MOVIE 2 3 4 THX STANDARD SELECT EXTD SUR. 5 6 7 8 1 MEMORY 2 9 0 A SPEAKERS B +10 ENT. Notes • You need to set the corresponding remote control tuner ID (see page 91). • When using multiple YAMAHA receivers/amplifiers, you may be able - Yamaha RX-V1600 | Owner's Manual - Page 100
(Refer to the operating instructions for the other remote control.) 1 Set AMP/SOURCE/ model) 3 Place this remote control about 5 to 10 cm (2 to 4 in) apart from the other remote control on a flat surface so that their infrared transmitters are aimed at each other. POWER TV A PHONO TUNER POWER AV - Yamaha RX-V1600 | Owner's Manual - Page 101
TV (U.S.A. model) 6 Press and hold the button you want to program on the other remote control until OK appears in the display window. NG appears in the display window if learning was unsuccessful. In this case, start over from step 5. ADVANCED OPERATION POWER TV A PHONO TUNER POWER AV XM - Yamaha RX-V1600 | Owner's Manual - Page 102
the remote control if you want to use a different name than the factory preset. This is useful when you have set the input selector to control a renaming mode. RE-NAME (U.S.A. model) 3 Press RE-NAME using a ballpoint pen or similar object. RE-NAME Note ERROR appears in the display window if - Yamaha RX-V1600 | Owner's Manual - Page 103
YAMAHA components) connected to this unit by connecting them to the AC OUTLETS on the rear panel of this unit. (Power control may not be synchronized with this unit depending on the component. For details, refer to the operating instructions for the connected component.) *2 When the remote control - Yamaha RX-V1600 | Owner's Manual - Page 104
REMOTE CONTROL FEATURES ■ MACRO operations Macro buttons POWER TV POWER AV STANDBY POWER A XM AUDIO SEL SLEEP PHONO TUNER CD MULTI CH IN V-AUX CBL/SAT MD/TAPE CD-R DTV VCR 1 DVR/VCR2 DVD (U.S.A. model) FREQ/RDS EON MODE PTY SEEK START REC DISC SKIP OFF ON MACRO LEARN CLEAR RE- - Yamaha RX-V1600 | Owner's Manual - Page 105
. You can set up to 10 steps (10 functions). After you have set 10 steps, FULL appears and the remote control automatically exits the macro mode. (U.S.A. model) POWER TV A POWER STANDBY AV 2 XM AUDIO SEL POWER SLEEP PHONO TUNER 3 CD MULTI CH IN MCR 2: AV POWER MCR 3: AUDIO SEL V-AUX CBL - Yamaha RX-V1600 | Owner's Manual - Page 106
reverts to the factory setting (or to the manufacturer setting if you have set remote control codes). 2 remote control returns to the learning mode. 6 Press LEARN again to exit. Notes • C;NG appears in the display window if clearing was unsuccessful. In this case, start over from step 4. • ERROR - Yamaha RX-V1600 | Owner's Manual - Page 107
seconds. C;OK appears in the display window if clearing was successful. (U.S.A. model) DTV VCR 1 DVR/VCR2 DVD REC DISC SKIP OFF ON MACRO LEARN factory setting (or to the manufacturer setting if you have set remote control codes). 4 Press CLEAR to exit the clearing mode. The remote control - Yamaha RX-V1600 | Owner's Manual - Page 108
• Some YAMAHA models are able to connect directly to the CONTROL OUT jack on this unit. If you own these products, you may not need to use an infrared emitter. Up to six YAMAHA components can be connected as shown. REMOTE IN REMOTE OUT IN REMOTE OUT IN REMOTE OUT Infrared signal receiver This - Yamaha RX-V1600 | Owner's Manual - Page 109
Selector Box or more than one loudspeaker per channel. Connection to a Passive Loudspeaker Selector Box or multiple speakers per channel could create an abnormally low impedance load resulting in amplifier damage. See this owner's manual for correct usage. Compliance with minimum speaker impedance - Yamaha RX-V1600 | Owner's Manual - Page 110
remote control is used to select the input source, "2: name of the selected input source" or "3: name of the selected input source" is displayed in the display window when Zone 2 or Zone 3 is selected respectively. INPUT or (U.S.A. model about the TUNER operations, see "FM/AM TUNING" on page 46. - Yamaha RX-V1600 | Owner's Manual - Page 111
sound output to the selected zone. ■ Adjusting the tonal quality of Zone 2 or Zone 3 Press CH +/- and TV VOL +/- on the remote control to adjust the high-frequency response (TREBLE) and the low-frequency response (BASS) respectively. Control range: -10 dB to +10 dB Control mode "ALL" POWER: turns on - Yamaha RX-V1600 | Owner's Manual - Page 112
jack when this unit is set to the standby mode or the power is turned off. • When connecting other HDMI components to this unit, refer to the instruction manuals for those components. • When HDMI audio signals are output from components like a DVD player, the audio signal format (such as sampling - Yamaha RX-V1600 | Owner's Manual - Page 113
unit or on another HDMI component connected to the HDMI OUT jack on the rear panel of this unit. Use the HDMI SET parameter in SOUND MENU to set the HDMI support audio (see page 82). Perform the following steps to listen to playback from an HDMI component. Note If an error message appears in the - Yamaha RX-V1600 | Owner's Manual - Page 114
HDMI components connected to this unit do not support the HDCP copy protection standards. Connect HDMI components that support the HDCP copy protection standards. SUPPORT AUDIO is set to OTHER and HDMI audio signals are not being played back on this unit. Set SUPPORT AUDIO to RX-V1600 in MANUAL - Yamaha RX-V1600 | Owner's Manual - Page 115
back on. The sleep timer has turned the unit off. Turn on the power, and play the source again. The sound is muted. Press MUTE to cancel a mute. Incorrect cable connections. Connect the cables properly. If the problem persists, the cables may be defective. Incorrect balance settings in the OSD - Yamaha RX-V1600 | Owner's Manual - Page 116
is set to ANALOG. Make an appropriate setting following the operations instructions for your component. Set the input mode to AUTO or COAX/OPT. A humming sound can be heard. Incorrect cable connections. Firmly connect the audio plugs. If the problem persists, the cables may be defective. No - Yamaha RX-V1600 | Owner's Manual - Page 117
■ Tuner TROUBLESHOOTING Problem Cause Remedy FM stereo reception is noisy. The characteristics of FM stereo broadcasts may cause this problem when the transmitter is too far away or the antenna input is poor. Check the antenna connections. Try using a high-quality directional FM antenna. Use - Yamaha RX-V1600 | Owner's Manual - Page 118
TROUBLESHOOTING ■ Remote control Problem The remote control does not work or function properly. The remote control does not learn new functions. Cause Remedy Wrong distance or angle. The remote control will function within a maximum range of 6 m (20 ft) and no more than 30 degrees offaxis from - Yamaha RX-V1600 | Owner's Manual - Page 119
SBL E-5:NOISY E-6:CHECK SUR. E-7:NO MIC E-8:NO SIGNAL E-9:USER CANCEL E-10:INTERNAL ERROR Cause Remedy Front L/R channel signal(s) is (are) not detected. Select the front speakers with SPEAKER A or B. Check the front L/R speaker connections. A surround channel signal is not detected. Check the - Yamaha RX-V1600 | Owner's Manual - Page 120
a qualified YAMAHA service center. ■ HDMI Error message DEVICE OVER HDCP ERROR Cause Remedy More than 5 HDMI components including Reduce the number of the connected HDMI this unit are connected. components. HDCP testing failed. Check that the connected HDMI components support the HDCP copy - Yamaha RX-V1600 | Owner's Manual - Page 121
theater system so that you can enjoy the depth of sound and natural spatial representation of DTS digital surround in your home. This system produces practically distortion-free 6-channel sound (technically, left, right and center channels, 2 surround channels, plus an LFE 0.1 channel as a subwoofer - Yamaha RX-V1600 | Owner's Manual - Page 122
home theater environment. THX engineers developed patented technologies to accurately translate the sound from the movie theater environment into the home, correcting the tonal and spatial errors one surround channel's time and phase relationship with respect to the other surround channel. This - Yamaha RX-V1600 | Owner's Manual - Page 123
CINEMA DSP uses YAMAHA original sound field technology to combine Dolby Pro Logic, Dolby Digital and DTS systems to provide the visual and audio experience of a movie theater in the listening room of your own home. ■ SILENT CINEMA YAMAHA has developed a natural, realistic sound effect DSP algorithm - Yamaha RX-V1600 | Owner's Manual - Page 124
band is referred to as the Q factor. This parameter is adjustable between the values 0.5 and 10. ■ Gain This parameter is adjustable in increments of 0.5 dB between -20 and +6 dB. YPAO adjusts frequency characteristics to suit your listening requirements using a combination of the above three - Yamaha RX-V1600 | Owner's Manual - Page 125
SPECIFICATIONS SPECIFICATIONS AUDIO SECTION • Minimum RMS Output Power for Front, Center, Surround, Surround back 20 Hz to 20 kHz, 0.04% THD, 8 120 W • Dynamic Power (IHF) 8/6/4/2 155/195/250/330 W • Maximum Power (EIAJ) [Asia, General, China and Korea models] 1 kHz, 10% THD, 6 170 W • Maximum - Yamaha RX-V1600 | Owner's Manual - Page 126
Hz • Power Consumption [U.S.A. and Canada models 500 W/630 VA [Other models 500 W • Standby Power Consumption [U.S.A. and Canada models 0.1 W or less [General model] (AC 240 V, 50 Hz 0.33 W or less [Other models 0.1 W or less • Maximum Power Consumption [General model only] 6ch, 10% THD 1100 - Yamaha RX-V1600 | Owner's Manual - Page 127
LIST OF REMOTE CONTROL CODES CABLE ABC 0030, 0035 AMERICAST 0926 BELL SOUTH 0926 BIRMINGHAM PIONEER 0086 SALORA 0091 SONY 0228 TELEFUNKEN 0086 YAMAHA 2200 MD RECORDER KENWOOD ONKYO SHARP SONY YAMAHA 0708 0895 0888 0517 2500, 2501, 2502 RECEIVER (TUNER) ADC 0558 AIWA 0185, 1116, - Yamaha RX-V1600 | Owner's Manual - Page 128
SAGEM 0847, 1141, 1280 SAMSUNG 1044, 1136, 1303, 1319 SAT CONTROL 1327 SATSTATION 1110 SCHWAIGER 1138 SEEMANN 0423 SIEMENS 0200 SONY 0666, 0874 0056 RCA 0054 REVOX 0056 SANSUI 0056 SONY 0270 THORENS 0056 WARDS 0054 YAMAHA 2700,2701 TV AGB 0543 AOC 0036, 0057, 0087, 0119, - Yamaha RX-V1600 | Owner's Manual - Page 129
CONTEC 0036, 0207 CRAIG 0207 CROSLEY 0081 CROWN 0036, 0064, 0207, 0397, 0445 CURTIS MATHES 0057, 0074, 0081, 0087, 0120, 0172, 0181, 0193, 0478, 0729, 1174, 1374 DAEWOO 0036, 0057, 0064, 0119, 0135, 0181, 0197, 0205, 0207, 0401, 0478, 0650, 0661, 1688 DANSAI 0064 DAYTON 0036 DE - Yamaha RX-V1600 | Owner's Manual - Page 130
0347 VOXSON 0190 WALTHAM 0383 WARDS 0057, 0081, 0205, 0893 WATSON 0064, 0347 WAYCON 0183 WHITE WESTINGHOUSE 0064, 0347, 0490, 0650 YAMAHA 0057, 0677, 0796, 0860, 2900 (projector), 2901 (projector), 2902, 2903 YAPSHE 0277 YOKO 0064, 0291 ZENITH 0044, 0119, 0205, 0490 VCR - Yamaha RX-V1600 | Owner's Manual - Page 131
0072 VIDEOMAGIC 0064 VIDEOSONIC 0267 VILLAIN 0027 WARDS 0027, 0062, 0069, 0074, 0075, 0087, 0099, 0108, 0267 WHITE WESTINGHOUSE 0099 XR-1000 0027, 0062, 0099 YAMAHA 0068 YAMISHI 0099 YOKAN 0099 YOKO 0267 ZENITH 0027, 0060, 0066, 1506 v - Yamaha RX-V1600 | Owner's Manual - Page 132
ELECTRONIQUE FRANCE S.A. RUE AMBROISE CROIZAT BP70 CROISSY-BEAUBOURG 77312 MARNE-LA-VALLEE CEDEX02, FRANCE YAMAHA ELECTRONICS (UK) LTD. YAMAHA HOUSE, 200 RICKMANSWORTH ROAD WATFORD, HERTS WD18 7GQ, ENGLAND YAMAHA SCANDINAVIA A.B. J A WETTERGRENS GATA 1, BOX 30053, 400 43 VÄSTRA FRÖLUNDA, SWEDEN
-
 1
1 -
 2
2 -
 3
3 -
 4
4 -
 5
5 -
 6
6 -
 7
7 -
8
-
9
-
10
-
11
-
12
-
13
-
14
-
15
-
16
-
17
-
18
-
19
-
20
-
21
-
22
-
23
-
24
-
25
-
26
-
27
-
28
-
29
-
30
-
31
-
32
-
33
-
34
-
35
-
36
-
37
-
38
-
39
-
40
-
41
-
42
-
43
-
44
-
45
-
46
-
47
-
48
-
49
-
50
-
51
-
52
-
53
-
54
-
55
-
56
-
57
-
58
-
59
-
60
-
61
-
62
-
63
-
64
-
65
-
66
-
67
-
68
-
69
-
70
-
71
-
72
-
73
-
74
-
75
-
76
-
77
-
78
-
79
-
80
-
81
-
82
-
83
-
84
-
85
-
86
-
87
-
88
-
89
-
90
-
91
-
92
-
93
-
94
-
95
-
96
-
97
-
98
-
99
-
100
-
101
-
102
-
103
-
104
-
105
-
106
-
107
-
108
-
109
-
110
-
111
-
112
-
113
-
114
-
115
-
116
-
117
-
118
-
119
-
120
-
121
-
122
-
123
-
124
-
125
-
126
-
127
-
128
-
129
-
130
-
131
-
132
 |
 |

RX-V1600
RX-V1600
AV Receiver
OWNER’S MANUAL
U