Yamaha RX-V473 Owners Manual - Page 6
Full of useful functions, Useful tips, Audio Return Channel: ARC p.18 - firmware update
 |
View all Yamaha RX-V473 manuals
Add to My Manuals
Save this manual to your list of manuals |
Page 6 highlights
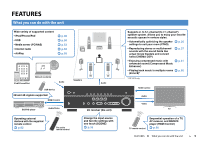
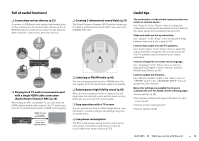
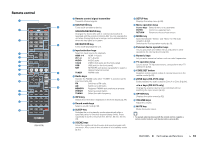
Full of useful functions! ❑ Connecting various devices (p.23) A number of HDMI jacks and various input/output jacks on the unit allow you to connect video devices (such as BD/DVD players), audio devices (such as CD players), game consoles, camcorders, and other devices. Game console BD/DVD player CD player Camcorder TV Set-top box ❑ Playing back TV audio in surround sound with a single HDMI cable connection (Audio Return Channel: ARC) (p.18) When using an ARC -compatible TV, you only need one HDMI cable to enable video output to the TV, audio input from the TV, and the transmission of HDMI Control signals. HDMI Control TV audio Video from external device ❑ Creating 3-dimensional sound fields (p.37) The Virtual Presence Speaker (VPS) function allows you to create a 3-dimensional sound field in your own room (CINEMA DSP 3D). ❑ Listening to FM/AM radio (p.42) The unit is equipped with a built-in FM/AM tuner. You can register up to 40 favorite radio stations as presets. ❑ Enjoying pure high fidelity sound (p.40) When the direct playback mode is enabled, the unit plays back the selected source with the least circuitry, which lets you to enjoy Hi-Fi sound quality. ❑ Easy operation with a TV screen You can operate the iPod or USB storage device, view information, or easily configure the settings using the on-screen menu. ❑ Low power consumption The ECO mode (power saving function) reduces the unit's power consumption and helps to create an eco-friendly home theater system (p.76). Useful tips The combination of video/audio input jacks does not match an external device... Use "Audio In" in the "Option" menu to change the combination of video/audio input jacks so that it matches the output jack(s) of your external device (p.24). Video and audio are not synchronized... Use "Lipsync" in the "Setup" menu to adjust the delay between video and audio output (p.74). I want to hear audio from the TV speakers... Use "Audio Output" in the "Setup" menu to select the output destination of signals input into the unit (p.72). Your TV speakers may be selected as an output destination. I want to change the on-screen menu language... Use "Language" in the "Setup" menu to select a language from English, French, German, Spanish, Russian and Chinese (p.29). I want to update the firmware... Use "Network Update" (p.85) in the "Setup" menu or "UPDATE" (p.81) in the "ADVANCED SETUP" menu to update the unit's firmware. Many other settings are available that let you to customize the unit. For details, see the following pages. • Scene settings (p.35) • Sound/video settings and signal information for each source (p.62) • Various function settings (p.67) • System settings (p.80) FEATURES ➤ What you can do with the unit En 6
-
 1
1 -
 2
2 -
 3
3 -
 4
4 -
 5
5 -
 6
6 -
 7
7 -
 8
8 -
 9
9 -
 10
10 -
 11
11 -
 12
12 -
13
-
14
-
15
-
16
-
17
-
18
-
19
-
20
-
21
-
22
-
23
-
24
-
25
-
26
-
27
-
28
-
29
-
30
-
31
-
32
-
33
-
34
-
35
-
36
-
37
-
38
-
39
-
40
-
41
-
42
-
43
-
44
-
45
-
46
-
47
-
48
-
49
-
50
-
51
-
52
-
53
-
54
-
55
-
56
-
57
-
58
-
59
-
60
-
61
-
62
-
63
-
64
-
65
-
66
-
67
-
68
-
69
-
70
-
71
-
72
-
73
-
74
-
75
-
76
-
77
-
78
-
79
-
80
-
81
-
82
-
83
-
84
-
85
-
86
-
87
-
88
-
89
-
90
-
91
-
92
-
93
-
94
-
95
-
96
-
97
-
98
-
99
-
100
-
101
-
102
-
103
-
104
-
105
-
106
-
107
-
108
-
109
-
110
-
111
-
112
-
113
-
114
-
115
-
116
-
117
-
118
-
119
-
120
-
121
-
122
-
123
-
124
-
125
-
126
-
127
-
128
-
129
-
130
-
131
-
132
-
133
 |
 |
