Yamaha RX-V571 Setup Guide
Yamaha RX-V571 Manual
 |
View all Yamaha RX-V571 manuals
Add to My Manuals
Save this manual to your list of manuals |
Yamaha RX-V571 manual content summary:
- Yamaha RX-V571 | Setup Guide - Page 1
download.yamaha.com/ † Remote control † Batteries (AAA, R03, UM-4) x 2 Insert the batteries into the battery case in correct directions (+ and -). † AM antenna † FM antenna* † VIDEO AUX input † YPAO microphone cover † CD-ROM † Easy Setup Guide † Safety Brochure (Owner's Manual) (this manual - Yamaha RX-V571 | Setup Guide - Page 2
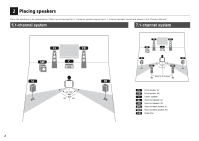
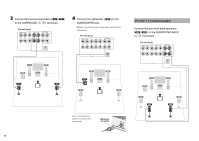
2 Placing speakers Place the speakers in as shown below. Other layouts (except for 5.1-channel speaker layout and 7.1-channel speaker layout) are shown in the "Owner's Manual." 5.1-channel system 7.1-channel system 60° 60° 80° 80° 2 60° 60° 80° 80° 30 cm (1 ft.) or more FL FR C SL SR SBL - Yamaha RX-V571 | Setup Guide - Page 3
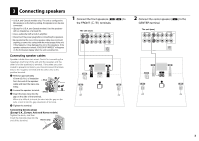
factory setting. 6Ω speakers can be also connected. • (Except for U.S.A. and Canada models) Use the speakers with an impedance of at least 6Ω. • Use a subwoofer with a built-in amplifier. • Disconnect the power R SURROUND L SURROUND BACK/ R BI-AMP L SINGLE SPEAKERS SUBWOOFER 2 Connect the - Yamaha RX-V571 | Setup Guide - Page 4
( SUBWOOFER jack. ) to the Before connecting the subwoofer, turn off the subwoofer. The unit (rear) R FRONT L CENTER R SURROUND L SURROUND BACK/ R BI-AMP L SINGLE SPEAKERS SUBWOOFER SPEAKERS SUBWOOFER For the 7.1-channel system Connect the surround back speakers ( / ) to the - Yamaha RX-V571 | Setup Guide - Page 5
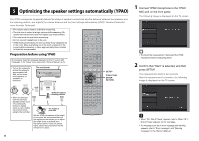
L SPEAKERS The unit (rear) SURROUND BACK/ R BI-AMP L SINGLE SUBWOOFER VOLTAGE SELECTOR SURROUND BACK/ R BI-AMP L SINGLE 110V120V 220V240V SUBWOOFER VOLTAGE SELECTOR Plug into an electric outlet Turn on the unit NATURAL SOUND AV RECEIVER RX-V571 YPAO MIC INFO MEMORY PRESET FM AM - Yamaha RX-V571 | Setup Guide - Page 6
"Language" in the "Setup" menu referring to "Owner's Manual" (p.75). • Turn on the subwoofer and set its volume to approximately half. And, set the crossover frequency (if available) to maximum. The unit (front) CODE SET SOURCE RECEIVER HDMI 1 2 3 4 5 1 5 TUNER AV 2 3 V-AUX 4 6 AUDIO - Yamaha RX-V571 | Setup Guide - Page 7
on the types of speakers or the place where you set them even if they are connected correctly. 4 Confirm Protect the YPAO microphone from high temperatures (such as from AV equipment) and direct sunlight. a Press the cursor key to incorrectly: Turn off the unit and connect the speaker cables again, - Yamaha RX-V571 | Setup Guide - Page 8
player. Signals may be set to normally output on 2 channels (such as PCM). No sound is output from a specific speaker Refer to "Troubleshooting" in the "Owner's Manual." More various features! More various functions are available with the unit. Refer to the "Owner's Manual" for details on effective
-
 1
1 -
 2
2 -
 3
3 -
 4
4 -
 5
5 -
 6
6 -
 7
7 -
8
 |
 |
INFO
MEMORY
PRESET
FM
AM
TUNING
VOLUME
VIDEO
HDMI IN
L
AUDIO
R
STRAIGHT
TONE CONTROL
BD
DVD
TV
CD
RADIO
SILENT CINEMA
SCENE
NATURAL SOUND AV RECEIVER
RX-V571
INFO
MEMORY
PRESET
FM
AM
TUNING
VOLUME
VIDEO
HDMI IN
L
AUDIO
R
STRAIGHT
TONE CONTROL
BD
DVD
TV
CD
RADIO
SILENT CINEMA
iPod/iPhone
SCENE
DIRECT
PHONES
USB
PROGRAM
INPUT
YPAO MIC
VIDEO AUX
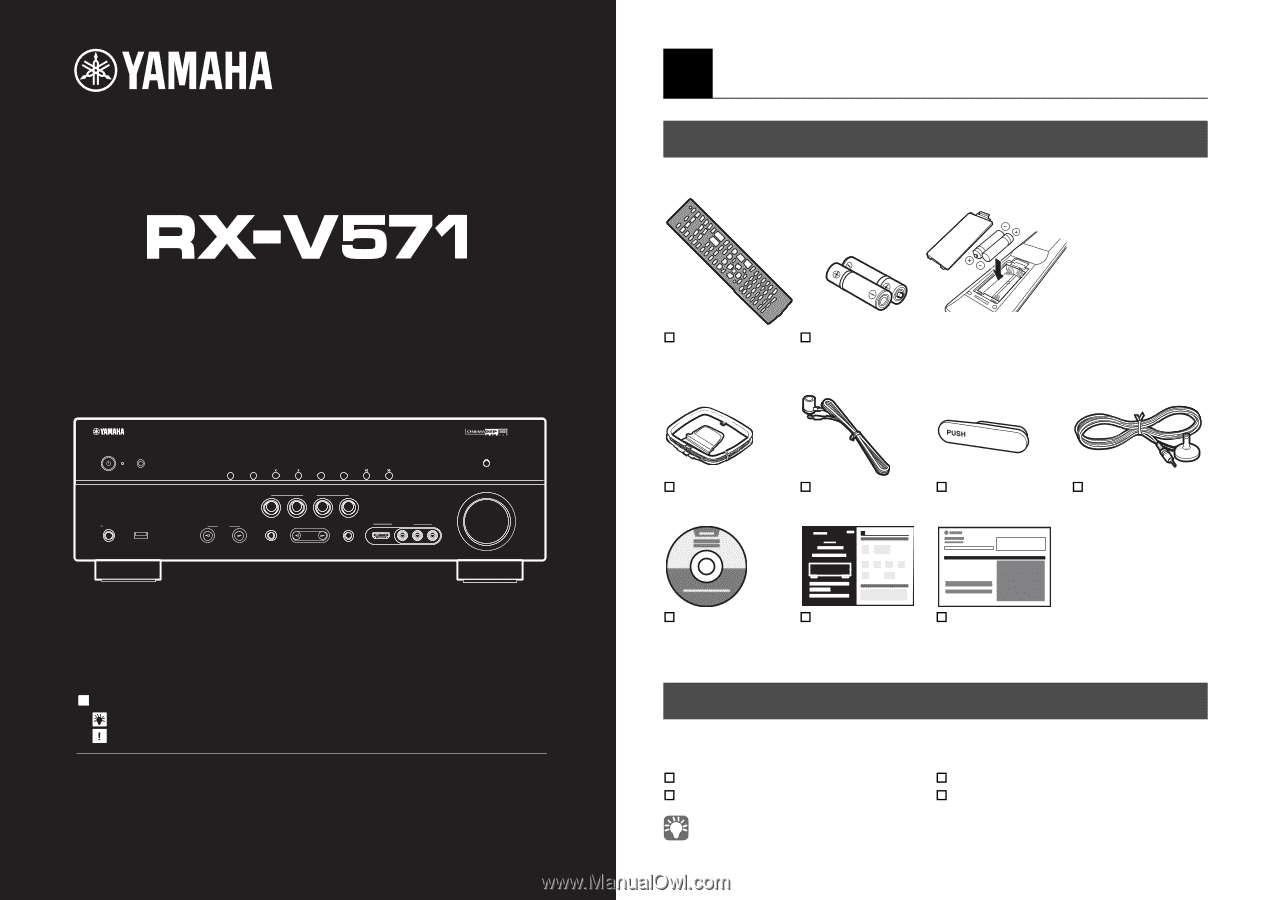
Check that the following accessories are supplied with the unit.
*
The supplied FM antenna will differ depending on your country or region.
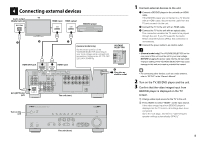
Prepare the following cables (not supplied) for connection according to the instructions
in this guide.
•
A digital optical cable is not required when your TV supports the Audio Return Channel (ARC)
function.
1
Preparation
Accessories
Remote control
Batteries (AAA, R03, UM-4) x 2
Insert the batteries into the battery case in correct directions
(+ and -).
AM antenna
FM antenna*
VIDEO AUX input
cover
YPAO microphone
CD-ROM
(Owner’s Manual)
Easy Setup Guide
(this manual)
Safety Brochure
Preparing cables
Speaker cable (for each speaker)
HDMI cable x 2
Monaural pin cable x 1
Digital optical cable x 1
AV Receiver
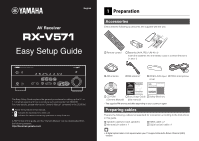
Easy Setup Guide
The Easy Setup Guide explains the general procedures for setting up the 5.1 or
7.1-channel system and how to produce surround sounds from BD/DVD.
For more details, please refer to the “Owner’s Manual” contained in the CD-ROM.
About the symbols in this manual.
•
“
” indicates the explanations for better use.
•
“
” indicates the cautions concerning operations or setup of the unit.
A PDF format of this guide and the “Owner’s Manual” can be downloaded from
the following website.
English