Yamaha RX V659 MCXSP10 Manual - Page 17
Connecting speakers, PREPARATION - wiring
 |
UPC - 027108925295
View all Yamaha RX V659 manuals
Add to My Manuals
Save this manual to your list of manuals |
Page 17 highlights
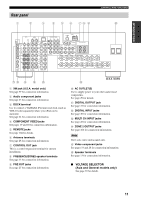
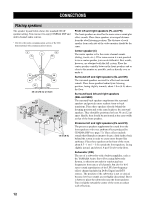
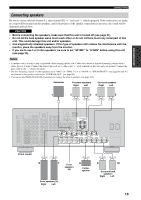
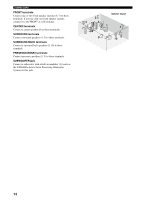
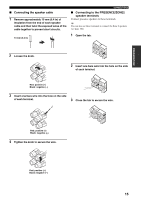
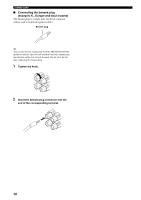
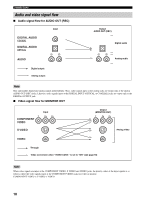
PREPARATION CONNECTIONS Connecting speakers Be sure to connect the left channel (L), right channel (R), "+" (red) and "-" (black) properly. If the connections are faulty, no sound will be heard from the speakers, and if the polarity of the speaker connections is incorrect, the sound will be unnatural and lack bass. CAUTION • Before connecting the speakers, make sure that this unit is turned off (see page 31). • Do not let the bare speaker wires touch each other or do not let them touch any metal part of this unit. This could damage this unit and/or speakers. • Use magnetically shielded speakers. If this type of speakers still creates the interference with the monitor, place the speakers away from the monitor. • If you are to use 4 or 6 ohm speakers, be sure to set "SP IMP." to "6ΩMIN" before using this unit (see page 30). Notes • A speaker cord is actually a pair of insulated cables running side by side. Cables are colored or shaped differently, perhaps with a stripe, groove or ridge. Connect the striped (grooved, etc.) cable to the "+" (red) terminals of this unit and your speaker. Connect the plain cable to the "-" (black) terminals. • The low-frequency signals of other speakers set to "SML" (or "SMALL") or to "NONE" in "SPEAKER SET" (see pages 86 and 87) are directed to the speakers selected in "LFE/BASS OUT" (see page 88). • You can use the PRESENCE/ZONE2 terminals to connect the Zone 2 speakers (see page 105). Subwoofer Presence speakers Right Left Surround speakers Right Left 1 2 34 5 PRE OUT PRESENCE/ZONE2 SUBWOOFER SPEAKERS A SURROUND B FRONT CENTER SURROUND BACK (U.S.A. model) 6 7 Front 8 speakers (B) Center speaker Front speakers (A) Right Left 9 10 Surround back speakers Right Left 13
-
 1
1 -
2
-
3
-
4
-
5
-
6
-
7
-
8
-
9
-
10
-
11
-
 12
12 -
 13
13 -
 14
14 -
 15
15 -
 16
16 -
 17
17 -
 18
18 -
 19
19 -
 20
20 -
 21
21 -
 22
22 -
23
-
24
-
25
-
26
-
27
-
28
-
29
-
30
-
31
-
32
-
33
-
34
-
35
-
36
-
37
-
38
-
39
-
40
-
41
-
42
-
43
-
44
-
45
-
46
-
47
-
48
-
49
-
50
-
51
-
52
-
53
-
54
-
55
-
56
-
57
-
58
-
59
-
60
-
61
-
62
-
63
-
64
-
65
-
66
-
67
-
68
-
69
-
70
-
71
-
72
-
73
-
74
-
75
-
76
-
77
-
78
-
79
-
80
-
81
-
82
-
83
-
84
-
85
-
86
-
87
-
88
-
89
-
90
-
91
-
92
-
93
-
94
-
95
-
96
-
97
-
98
-
99
-
100
-
101
-
102
-
103
-
104
-
105
-
106
-
107
-
108
-
109
-
110
-
111
-
112
-
113
-
114
-
115
-
116
-
117
-
118
-
119
-
120
-
121
-
122
-
123
-
124
-
125
-
126
-
127
-
128
-
129
-
130
-
131
-
132
 |
 |
