Yamaha SPM-K1 Installation Manual
Yamaha SPM-K1 - Mounting Kit For Speaker Manual
 |
UPC - 027108922522
View all Yamaha SPM-K1 manuals
Add to My Manuals
Save this manual to your list of manuals |
Yamaha SPM-K1 manual content summary:
- Yamaha SPM-K1 | Installation Manual - Page 1
.YAMAHA SPM-K1 WALL MOUNT BRACKET SUPPORT MURAL -tt?:/ ~:1DYI?$'-~~i~(j~~ ~ Installation Manual Manuel d'installation Installationsanleitung Instllationsanvisn ingar Manuale d'installazione Manual de instalacion Installatiehandleiding ~f1IDtB~~ - Yamaha SPM-K1 | Installation Manual - Page 2
DIMENSIONS DIMENSIONS ABMESSUNGEN MATTSKISSER DIMENSIONI DIMENSIONES AFMETINGEN §gBO)\t~i 385 355 300 262 ~ .C...D.. en ,N... O.1kg X 2 50 0 ~ 6.1 ------- M6TAP Lu~-J (mm) 1 25 ......1.1..0 ..... C") ,... ~ C") - Yamaha SPM-K1 | Installation Manual - Page 3
WALL MOUNT BRACKET SPM-K1 Installation Manual Thank you very much for purchasing the Wall Mount Bracket SPM-Kl. Be sure to read this manual thoroughly before using this bracket. After you have read this manual, retain it for future reference. When installing the Sound Projector using this bracket, - Yamaha SPM-K1 | Installation Manual - Page 4
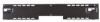
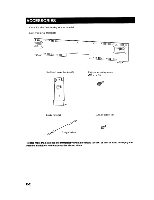
ACCESSORIES Check that all of the following parts are included. Large wall mount bracket (1) o o Small wall mount brackets (2) Projector mounting screws (M6 x 16) (6) Safety wires (2) M4 x 10 Screws (2) Length 300mm Prepare more than six sets of commercially available screws (M5-M6, 25 mm or - Yamaha SPM-K1 | Installation Manual - Page 5
the bracket, make sure of the size (see "DIMENSIONS" on the fITst page of this manual). Installation example 5....6mm Tapping Screw (commercially available) / In order to secure the unit to the wall, attach four (or more) tapping / r... r. screws using the outside of the holes in the wall mount - Yamaha SPM-K1 | Installation Manual - Page 6
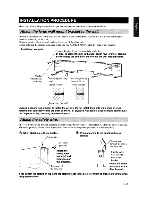
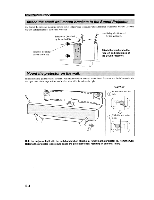
to the rear left and right sides of the Sound Projector. Fit the mounting guide hooks of the small wall mount brackets attached to the Sound Projector into the holes on the left and right sides of the large wall mount bracket, then slide the unit to the right. Rear View CD Fit the hook into - Yamaha SPM-K1 | Installation Manual - Page 7
INSTALLATION PROCEDURE Align the holes on the large wall mount bracket with the holes on the bottom of the small wall mount brackets, and then use two of the projector mounting screws (M6 x 16) provided to secure the unit. Bottom· View Sound lJ....n'1Af"tA.... Projector mounting screws (M6 x 16) - Yamaha SPM-K1 | Installation Manual - Page 8
ELECTRONIQUE FRANCE S.A. RUE AMBROISE CROIZAT BP70 CROISSY-BEAUBOURG 77312 MARNE-LA-VALLEE CEDEX02, FRANCE YAMAHA ELECTRONICS (UK) LTD. YAMAHA HOUSE, 200 RICKMANSWORTH ROAD WATFORD, HERTS WD18 7GQ, ENGLAND YAMAHA SCANDINAVIA A.B. J A WETTERGRENS GATA 1, BOX 30053, 400 43 VASTRA FROLUNDA, SWEDEN
-
 1
1 -
 2
2 -
 3
3 -
 4
4 -
 5
5 -
 6
6 -
 7
7 -
8
 |
 |
.YAMAHA
SPM-K1
WALL
MOUNT
BRACKET
SUPPORT
MURAL
-tt?:/
~:1DYI
?$'-~~i~(j~~
~
Installation Manual
Manuel d'installation
Installationsanleitung
Instllationsanvisningar
Manuale d'installazione
Manual de instalacion
Installatiehandleiding
~f1IDtB~~
.YAMAHA
SPM-K1
WALL
MOUNT
BRACKET
SUPPORT
MURAL
-tt?:/
~:1DYI
?$'-~~i~(j~~
~
Installation Manual
Manuel d'installation
Installationsanleitung
Instllationsanvisningar
Manuale d'installazione
Manual de instalacion
Installatiehandleiding
~f1IDtB~~