Yamaha TP-3126EA Owner's Manual
Yamaha TP-3126EA Manual
 |
View all Yamaha TP-3126EA manuals
Add to My Manuals
Save this manual to your list of manuals |
Yamaha TP-3126EA manual content summary:
- Yamaha TP-3126EA | Owner's Manual - Page 1
(EA) / TP3129(EA) / TP3132(EA) Owner's Manual Thank you for purchasing a Yamaha Timpani. Please read through this manual carefully as it contains important information about your instrument's care. Before using your timpani for the first time be sure to carefully read the instructions on "Initial - Yamaha TP-3126EA | Owner's Manual - Page 2
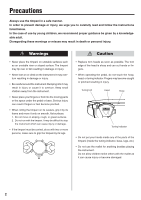
Precautions Always use the timpani in a safe manner. In order to prevent damage or injury, we urge you to carefully read and follow the instructions listed below. In the case of use by young children, we recommend proper guidance be given by a knowledgeable adult. Disregarding these warnings or - Yamaha TP-3126EA | Owner's Manual - Page 3
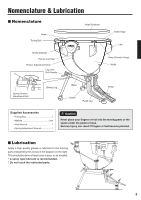
Nomenclature & Lubrication ■ Nomenclature Head Protector Head Tuning Bolt Tuning Indicator Pointer Lock Nut Pointer Adjustment Knob Leg Lock Bolt Handle Kettle Edge Lug Hoop (Counter Hoop) Kettle Spring Tension Adjustment Bolt Sliding Leg Base Caster Pedal Leg Pedal Supplied Accessories - Yamaha TP-3126EA | Owner's Manual - Page 4
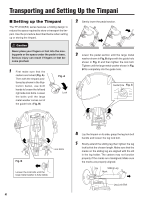
hole shown in Fig. C and then tighten the lock bolt. Tighten until the large metal washer shown in Fig. B fits completely into the guide hole. Guide Hole Fig. C Lock Bolts Fig. B Loosen the lock bolts until the large metal washer is fully visible. 4 4 Lay the timpani on its side, grasp the - Yamaha TP-3126EA | Owner's Manual - Page 5
6 Turn the timpani over and extend and secure the other leg. Make sure that the marks on the sliding leg are aligned with the slit in the leg holder. 7 Return the timpani to an upright position, and then adjust the length of the left and right legs. 8 When it comes time to store or pack up the tim- - Yamaha TP-3126EA | Owner's Manual - Page 6
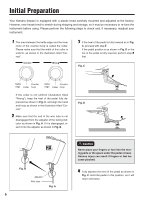
Initial Preparation Your Yamaha timpani is equipped with a plastic head carefully mounted and adjusted at the factory. However, new heads tend to stretch during shipping and storage, so it - Yamaha TP-3126EA | Owner's Manual - Page 7
5 Using the supplied timpani key, tighten the tun- ing bolts by 1/4 of a turn (90°) in the order shown below. It is very important to always turn all tuning bolts by the same amount. Timpani key 29", 32" 23", 26" 6 Take your foot off the pedal. • Heel still moves up → Repeat steps 4 through 6. • - Yamaha TP-3126EA | Owner's Manual - Page 8
timpani for the first time, be sure to set it up according to the instructions of "Initial Preparation" on pages 6 and 7. ■ Head Tuning 1 Tuning is its full tonal range with balanced tension in the paddle. ■ Standard Tonal Ranges for Yamaha Timpani 32" (81cm) 29" (74cm) 26" (66cm) 23" (58cm) Keep - Yamaha TP-3126EA | Owner's Manual - Page 9
than 3 rotations at a time, as the toe of the pedal tends to drop abruptly after a specific point. ● Pedal balance spring mechanism Your Yamaha timpani is equipped with a unique pedal balance spring mechanism (a coil spring counteracting the tension of the head) which allows you to freely change - Yamaha TP-3126EA | Owner's Manual - Page 10
, refer to "Adjusting the Pointer Position". 2 Slide the lowest note of the indicator ("A" in the case of a 26" timpani-see "Standard Tonal Ranges for Yamaha Timpani" on page 8) to the position where its center line coincides with the pointer. 3 Tune the instrument to the next higher pitch (note) by - Yamaha TP-3126EA | Owner's Manual - Page 11
new head with the hoop on the kettle. When using a Yamaha timpani head, make sure its YAMAHA logo is on the side opposite the pedal. The hoop must be . If a head is left on and used more than two years, the following problems may occur: • It may become impossible to tune the head to the proper pitch
-
 1
1 -
 2
2 -
 3
3 -
 4
4 -
 5
5 -
 6
6 -
 7
7 -
8
-
9
-
10
-
11
 |
 |
1
Before using your timpani for the first time be sure to carefully
read the instructions on
“Initial Preparation”
pages 6 and 7.
Thank you for purchasing a Yamaha Timpani.
Please read through this manual carefully as it contains impor-
tant information about your instrument’s care.
Contents
Precautions
.................................................
2
Nomenclature & Lubrication
.....................
3
Transporting and Setting Up the Timpani ... 4
Setting up the Timpani
.......................................
4
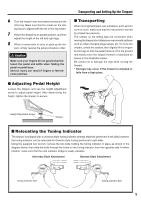
Adjusting Pedal Height
.......................................
5
Transporting
.......................................................
5
Relocating the Tuning Indicator
..........................
5
Initial Preparation
.......................................
6
Adjusting the Pitch
.....................................
8
Head Tuning
.......................................................
8
Pedal Adjustment
...............................................
9
Tuning Indicator Adjustment
............................
10
Replacing the Head
..................................
11
PEDAL TIMPANI
Owner’s Manual
TP3100(EA)
Series
TP3123(EA) / TP3126(EA) / TP3129(EA) / TP3132(EA)
English