Yamaha TSS-10 Owner's Manual - Page 6
Using the remote control, VOLUME, and indicators, Remote control sensor, STANDBY/ON, Standby mode - system
 |
View all Yamaha TSS-10 manuals
Add to My Manuals
Save this manual to your list of manuals |
Page 6 highlights
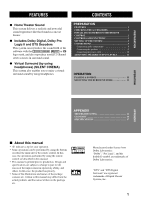
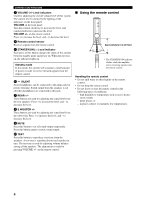
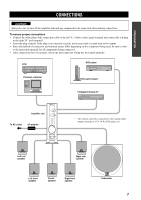
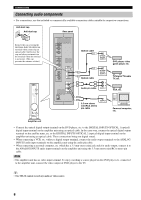
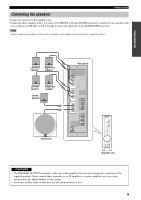
CONTROLS AND FUNCTIONS 3 VOLUME (+/-) and indicators Used for adjusting the overall volume level of this system. The current level is shown by the lighting of the indicators on the front panel. VOLUME on the front panel: Turn this control clockwise to increase the level, and counterclockwise to decrease the level. VOLUME +/- on the remote control: Press + to increase the level, and - to decrease the level. 4 Remote control sensor Receives signals from the remote control. 5 STANDBY/ON ( ) and indicator Each press of this button changes the status of this system between standby mode and power on. When the power is on, the indicator lights up. Standby mode In this mode, this system will consume a small amount of power in order to receive infrared-signals from the remote control. 6 SILENT Stereo headphones can be connected to this mini-jack for private listening. Sound output from the speakers is cut off when headphones are connected to this jack. 7 REAR +/- These buttons are used for adjusting the sound level from the rear speakers. Press + to increase the level, and - to decrease the level. 8 S.WOOFER +/- These buttons are used for adjusting the sound level from the subwoofer. Press + to increase the level, and - to decrease the level. 9 MUTE Press this button to cut off sound output temporarily. Press this button again to restore sound output. 0 TEST Press this button to reproduce a test tone from the speakers. A test tone is reproduced from each speaker in turn. The test tone is used for adjusting volume balance among all the speakers. The adjustment is made by pressing VOLUME +/- on the remote control. I Using the remote control SILENT Approximately 6 m (20 feet) 30° 30° * The STANDBY/ON indicator flashes while the amplifier unit is receiving signals from the remote control. Handling the remote control • Do not spill water or other liquids on the remote control. • Do not drop the remote control. • Do not leave or store the remote control in the following types of conditions: - high humidity or temperature such as near a heater, stove or bath; - dusty places; or - in places subject to extremely low temperatures. 4
-
 1
1 -
 2
2 -
 3
3 -
 4
4 -
 5
5 -
 6
6 -
 7
7 -
 8
8 -
 9
9 -
 10
10 -
 11
11 -
 12
12 -
13
-
14
-
15
-
16
-
17
-
18
-
19
-
20
 |
 |