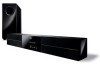
Yamaha YAS-71BL Owner's Manual
Yamaha YAS-71BL Manual
 |
View all Yamaha YAS-71BL manuals
Add to My Manuals
Save this manual to your list of manuals |
Yamaha YAS-71BL manual content summary:
- Yamaha YAS-71BL | Owner's Manual - Page 1
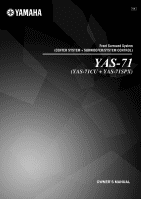
UA Front Surround System (CENTER SYSTEM + SUBWOOFER/SYSTEM CONTROL) YAS-71 (YAS-71CU + YAS-71SPX) OWNER'S MANUAL - Yamaha YAS-71BL | Owner's Manual - Page 2
servicing) instructions in the literature accompanying the appliance. Note to CATV system installer: This reminder is provided to call the CATV system your outlet, consult an electrician for replacement of the obsolete outlet. 10 Protect the power cable from being walked on or pinched particularly - Yamaha YAS-71BL | Owner's Manual - Page 3
the instructions contained in this manual, meets FCC requirements. Modifications not expressly approved by Yamaha " and "ON", please try to eliminate the problem by using one of the following measures: Relocate , change the lead-in to coaxial type cable. If these corrective measures do not produce - Yamaha YAS-71BL | Owner's Manual - Page 4
when the surrounding temperature changes suddenly. Disconnect the power supply cable from the outlet, then leave the unit alone. 21 Secure placement or installation is the owner's responsibility. Yamaha shall not be liable for any accident caused by improper placement or installation of speakers. 22 - Yamaha YAS-71BL | Owner's Manual - Page 5
subwoofer/system control 11 Connecting external components 12 Connecting the Yamaha iPod universal dock 14 Connecting the Yamaha Bluetooth audio receiver ...... 14 Connecting the indoor FM antenna 14 Connecting the power cable 15 BASIC OPERATION BASIC PLAYBACK OPERATION 16 AIR SURROUND XTREME - Yamaha YAS-71BL | Owner's Manual - Page 6
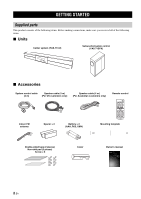
cable (4 m) (For Australian customers only) Remote control Indoor FM antenna Spacer × 2 Battery × 2 (AAA, R03, UM4) Mounting template Double-sided tape (2 pieces) Non-skid pad (2 pieces) Screw × 6 Cover Owner's manual UA Front Surround System (CENTER SYSTEM + SUBWOOFER/SYSTEM CONTROL) YAS-71 - Yamaha YAS-71BL | Owner's Manual - Page 7
turned on. (☞ P. 16) 4 STANDBY/ON Turns on the system, or sets it to standby mode. (☞ P. 16) Note A small amount of electricity is consumed to receive the infrared signal from the remote control even when the system is in standby mode. 5 INPUT Selects an input source you want to listen to. (☞ P. 16 - Yamaha YAS-71BL | Owner's Manual - Page 8
• Lights up when the system is receiving a signal from an iPod stationed in the Yamaha iPod universal dock (such as YDS-10 or YDS-11, sold separately) connected to the DOCK terminal of the subwoofer/system control. (☞ P. 27) • Lights up while the Yamaha Bluetooth audio receiver (such as YBA - Yamaha YAS-71BL | Owner's Manual - Page 9
Control an FM tuner. (☞ P. 22) 5 s/e/p/b/a Control an iPod or a Bluetooth component. (☞ P. 27, 29) 6 BLUETOOTH ON/BLUETOOTH OFF Connects or disconnects a Bluetooth component. (☞ P. 30) 7 STANDBY/ON Turns on the system, or sets it to standby mode. (☞ P. 16) 8 MOVIE/MUSIC/SPORTS/GAME Select surround - Yamaha YAS-71BL | Owner's Manual - Page 10
enhancer mode alternately. (☞ P. 21) E NIGHT Turns night listening mode on or off. (☞ P. 32) F AREA Selects the optimum listening area. (☞ P. 20) G AUDIO DELAY Delays the output sound to synchronize it with the video image. (☞ P. 31) H DISP. MODE Changes the brightness of the - Yamaha YAS-71BL | Owner's Manual - Page 11
remote control within 6 m (20') of the center system and point it toward the remote control sensor. Notes • Be careful not to spill liquid on the remote control. • Be careful not to drop the remote control. • Do not leave the remote control of the remote control decreases considerably, replace the - Yamaha YAS-71BL | Owner's Manual - Page 12
wall. Main roles: Produces front channel (stereo) sounds. Also produces virtual center channel sounds (dialogue, etc.) and virtual surround channel sounds effectively using the Yamaha front surround system. Subwoofer/system control (YAS-71SPX) Place the subwoofer near the center system and turn it - Yamaha YAS-71BL | Owner's Manual - Page 13
, resulting in personal injury. 1 Attach the supplied mounting template on a wall and mark the holes of the mounting template. Tapes or thumbtacks Mark Installing the cables above the center system To pass the cables upward, you need to attach the spacers to make room on the back of the center - Yamaha YAS-71BL | Owner's Manual - Page 14
mm (1/4") YAS-71CU Notes • The center system weighs about 5 kg (11 lbs.). Attach the center system to a bracket, rack or wall. Do not attach the center system to a speaker cable, the center system may fall. • After attaching the center system, check that the center system is fixed securely. Yamaha - Yamaha YAS-71BL | Owner's Manual - Page 15
center system and the subwoofer/system control Follow the procedure below to connect the center system and the subwoofer/system control. Connecting speaker cables Connect the cable plug to the speaker jack of the same color. Connect the cable plug to the speaker jack of the same color. Speaker cable - Yamaha YAS-71BL | Owner's Manual - Page 16
external components The subwoofer/system control has 3 digital input jacks (optical digital × 2, coaxial digital × 1) and 1 analog input jack. Before connecting your external components, check the output jacks of the components and be sure to use correct connection cables. ■ Digital connection Notes - Yamaha YAS-71BL | Owner's Manual - Page 17
[INPUT 3] COAXIAL jack CD player Coaxial digital cable ■ Analog connection [INPUT 4] ANALOG jacks Example1: TV CONNECTION PREPARATION TV Example 2: VCR or video camera VCR or video camera, etc., with no digital output. VCR, etc. Video camera 13 En English - Yamaha YAS-71BL | Owner's Manual - Page 18
you can dock your iPod. Connect the Yamaha iPod universal dock to the DOCK terminal of the subwoofer/system control using its dedicated cable. Refer to "Using iPod™" on page 27 for details. Yamaha iPod universal dock (such as YDS-10 or YDS-11, sold separately) Connecting the Yamaha Bluetooth audio - Yamaha YAS-71BL | Owner's Manual - Page 19
connections, connect the power cable of the subwoofer/system control. CONNECTION To AC wall outlet y You can attach the cover after you have made all connections or detach according to your preference. Attach the cover to the rear panel of the subwoofer/system control using the 6 supplied screws - Yamaha YAS-71BL | Owner's Manual - Page 20
connected to the INPUT 1 jack of the subwoofer/system control, press INPUT 1 to select the DVD player. y You can also switch the input source by pressing INPUT on the center system repeatedly. The input source changes as follows: • To enjoy highly realistic sounds with surround mode ☞ P. 18 • To - Yamaha YAS-71BL | Owner's Manual - Page 21
is AIR SURROUND XTREME ? Ordinarily, two front speakers, a center speaker, two surround speakers, and a subwoofer are necessary for enjoying 5.1 channel surround sound. ■ Virtual 7.1 channel The AIR SURROUND XTREME technology, using only the front left and right speakers of the center system and - Yamaha YAS-71BL | Owner's Manual - Page 22
AIR SURROUND XTREME Listening to surround mode of AIR SURROUND XTREME Surround mode buttons Press one of the surround mode buttons. The names of the selected input source and the selected surround mode appear in the front panel display. Surround mode descriptions Movie This mode is useful when - Yamaha YAS-71BL | Owner's Manual - Page 23
CENTER. • If you press TEST after performing step 1, the system outputs the test tone for a virtual center speaker so you can adjust the position setting. (☞ P. 20) • The setting is set for all the input sources. • This function is available even when surround mode is off. Note If you do not operate - Yamaha YAS-71BL | Owner's Manual - Page 24
AIR SURROUND XTREME Selecting the optimum listening area You can select the optimum listening area from two modes. AREA Press AREA. Each time you press AREA, NORMAL and WIDE modes change alternately. NORMAL Select this to sharpen the sound effect. "AREA NORMAL" appears in the front panel display - Yamaha YAS-71BL | Owner's Manual - Page 25
BASIC OPERATION AIR SURROUND XTREME Using extended stereo mode An extended sound is achieved for a 2 channel source such as a CD player. STEREO Press STEREO to enter extended stereo mode. "EXTENDED" appears in the front panel display. Each time you press STEREO, the function is turned on ( - Yamaha YAS-71BL | Owner's Manual - Page 26
the desired FM station automatically or manually. (See "Basic tuning operation" on page 23.) Preset tuning mode You can preset the desired FM station on page 24.) Controls and functions for the FM tuning A _ E/A ` E Selects the preset group (A to E). FM Sets the input to FM. PRESET/TUNE Switches - Yamaha YAS-71BL | Owner's Manual - Page 27
the desired station. If you tune to a station using the manual tuning feature, the system receives the FM radio signals in monaural reception mode to increase signal quality. 1 Press FM to set the input to FM. "FM" appears in the front panel display. OTHER FUNCTIONS 2 Press AUTO/MAN'L to switch - Yamaha YAS-71BL | Owner's Manual - Page 28
can store up to 40 FM stations (A1 to E8: 8 preset numbers in each of the 5 preset groups). 1 Press FM to set the input to FM. "FM" appears in the front panel display. 2 Press and preset group and number, preset the station manually. Refer to "Manual station preset" on page 25 for details. 24 En - Yamaha YAS-71BL | Owner's Manual - Page 29
Use this feature to preset your desired station manually. LISTENING TO FM BROADCASTS OTHER FUNCTIONS 1 Tune into a station. See "Basic tuning operation" on page 23 for tuning instructions. 2 Press MEMORY. The MEMORY indicator flashes in the front panel display for approximately 30 seconds. Press - Yamaha YAS-71BL | Owner's Manual - Page 30
LISTENING TO FM BROADCASTS ■ Recalling the preset stations 1 Press PRESET/TUNE to select preset tuning mode. 2 Press A_E or A`E repeatedly to select the desired preset group (A to E). 3 Press +/- repeatedly to select the desired preset number (1 to 8). Preset group and number Preset FM station 26 En - Yamaha YAS-71BL | Owner's Manual - Page 31
Yamaha iPod universal dock connected to the DOCK terminal of the subwoofer/system control while this system is turned on. Stationing your iPod in the Yamaha iPod universal dock Once you station your iPod in the Yamaha iPod universal dock, "iPod connected" and the DOCK indicator appear in the front - Yamaha YAS-71BL | Owner's Manual - Page 32
using the supplied remote control in this mode. y Operations can be also done with the controls on your iPod. Refer to the instruction manuals of your iPod for its operations. ■ Controlling your iPod in menu browse mode The song lists or playback information is displayed in the front panel display - Yamaha YAS-71BL | Owner's Manual - Page 33
. 1 Connect the Yamaha Bluetooth audio receiver to the DOCK terminal of the subwoofer/system control. (☞ P. 14) 2 Press DOCK to set the input to DOCK. 3 Turn on the Bluetooth component you want to pair with, and then enter pairing mode. Refer to the instruction manual of your Bluetooth component for - Yamaha YAS-71BL | Owner's Manual - Page 34
details. ■ Disconnecting Press DOCK, and then BLUETOOTH OFF to disconnect the system from the Bluetooth component. "Disconnected" appears in the front panel display. ■ Playing back the Bluetooth component You can play back your Bluetooth component using the supplied remote control. You can also play - Yamaha YAS-71BL | Owner's Manual - Page 35
AUDIO DELAY FPD TV images sometimes lag behind the sound. You can use this function to delay the sound output to synchronize it with the video image. ms and "DELAY OFF" appears in the front panel display. • The system memorizes the settings assigned to each input source. Note If you do not operate - Yamaha YAS-71BL | Owner's Manual - Page 36
the output level of the subwoofer channel. Control range: +6 to -6 CENTER +/- Adjusts the output level of the center virtual speaker channel. Control range: +6 to -6 SUR. +/- Adjusts the output level of the surround/ surround back virtual speaker channels. Control range: +6 to -6 y • You can also - Yamaha YAS-71BL | Owner's Manual - Page 37
. Each time you press DISP. MODE, the brightness of the front panel changes. DISP. MODE Bright Dark * Selecting DISPLAY OFF turns off the front panel display after "DISPLAY OFF" appears in the front panel display. The front panel display lights up momentarily when any operation is performed with - Yamaha YAS-71BL | Owner's Manual - Page 38
Yamaha dealer or Service Center. Problem Cause Solution Power turns on but immediately shuts off. The speakers make no sound. Sound is too low on one side. Speaker channels other than the front ones make no sound. The center speaker channel makes no sound. The surround speaker channels - Yamaha YAS-71BL | Owner's Manual - Page 39
control sensor of this system may be exposed to direct sunlight or lighting. The batteries may be worn out. For information on the remote control operation range, refer to "Using the remote control". Change the lighting. Replace the batteries. See page 7 - 7 ■ Tuner Problem Cause Remedy FM - Yamaha YAS-71BL | Owner's Manual - Page 40
the connection. The pairing is completed. The pairing is canceled. The system cannot find the Bluetooth component while performing the pairing or trying to connect to the Bluetooth component. The connection between the Yamaha Bluetooth audio receiver (such as YBA10, sold separately) and the - Yamaha YAS-71BL | Owner's Manual - Page 41
ADDITIONAL INFORMATION Glossary ■ AIR SURROUND XTREME New surround technology developed by Yamaha enables surround sound with fewer speakers. In comparison to traditional front surround technology, the AIR SURROUND XTREME provides a natural surround sound field. ■ Channel (ch) A channel is an audio - Yamaha YAS-71BL | Owner's Manual - Page 42
change without notice. This system employs new technologies and algorithms that make it possible to achieve 7-channel surround sound with only two front speakers, and without using wall reflections. "DTS" and "DTS Digital Surround" are registered trademarks of DTS, Inc. Manufactured under license - Yamaha YAS-71BL | Owner's Manual - Page 43
- Yamaha YAS-71BL | Owner's Manual - Page 44
Printed in China WP54420-1
-
 1
1 -
 2
2 -
 3
3 -
 4
4 -
 5
5 -
 6
6 -
 7
7 -
8
-
9
-
10
-
11
-
12
-
13
-
14
-
15
-
16
-
17
-
18
-
19
-
20
-
21
-
22
-
23
-
24
-
25
-
26
-
27
-
28
-
29
-
30
-
31
-
32
-
33
-
34
-
35
-
36
-
37
-
38
-
39
-
40
-
41
-
42
-
43
-
44
 |
 |

Front Surround System
(CENTER SYSTEM + SUBWOOFER/SYSTEM CONTROL)
YAS-71
(YAS-71CU + YAS-71SPX)
OWNER’S MANUAL
UA