Zenith SL-4127-BK User Guide
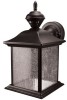
Zenith SL-4127-BK - Heath - City Carriage Style 150-Degree Motion Sensing Decorative Security Light Manual
 |
UPC - 016963412712
View all Zenith SL-4127-BK manuals
Add to My Manuals
Save this manual to your list of manuals |
Zenith SL-4127-BK manual content summary:
- Zenith SL-4127-BK | User Guide - Page 1
Set ON-TIME switch to 1, 5, or 10 minutes. TEST 1 5 10 MIN MANUAL MODE Manual mode only works at night because daylight returns the sensor to AUTO. Flip the light switch off for one second then back on to toggle between AUTO and MANUAL MODE. Manual mode works only with the ON-TIME switch in the - Zenith SL-4127-BK | User Guide - Page 2
ON-TIME Switch at 1, 5, or 10 minutes AUTO MANUAL MODE Flip light switch off for one second then back on* SENS MIN MAX 4. Set sensitivity control on back of fixture to mid-position. Wire Path * If you get confused while switching modes, turn the power off for one minute, then back on. After - Zenith SL-4127-BK | User Guide - Page 3
box as shown. Wire Path Ground Screw Wire Path Fixture Screws As Shipped Flipped and Rotated White Black Green or Bare Light Fixture Light Fixture Two Motion Lights ❒ Twist the junction box wires and the fixture wires together as shown below. Secure with wire connectors. If you have - Zenith SL-4127-BK | User Guide - Page 4
so that either fixture will turn on both lights at the same time (dual master system). It is recommended that only people with plenty of electrical experience attempt this configuration. Please call our customer service number (1-800-8588501 - English speaking only) before attempting this wiring - Zenith SL-4127-BK | User Guide - Page 5
fixture mounting surface with silicone weather sealant. You may want to wait until you have completed the tests and adjustments on page 6. ❒ Install light bulb. See fixture markings for proper bulb type and wattage. ❒ If so equipped, install the fixture top.Secure with decorative screws. ❒ If you - Zenith SL-4127-BK | User Guide - Page 6
the sensitivity, temporarily remove the fixture and make the adjustment.Too much sensitivity may increase false triggering. ❒ Set the amount of TIME you want the light to stay on after motion is detected. (1, 5, or 10 minutes). ❒ Set the amount of time after dusk you want the - Zenith SL-4127-BK | User Guide - Page 7
. Upto360Watts(3.0A.) Maximum Tungsten Incandescent Power Requirements 120 VAC, 60 Hz Operating Modes. . . . TEST, AUTO, and MANUAL MODE Time Delay 1, 5, 10 minutes in products previously sold. TROUBLESHOOTING GUIDE SYMPTOM POSSIBLE CAUSE Light will not come on. 1. Light switch is turned off. - Zenith SL-4127-BK | User Guide - Page 8
Service Please call 1-800-858-8501 (English speaking only) for assistance before returning product to store. If you experience a problem, follow this guide. You may also want to visit our Web site at: www.hzsupport.com. If the problem OF ALL OTHER WARRANTIES, EXPRESS OR IMPLIED, INCLUDING ANY - Zenith SL-4127-BK | User Guide - Page 9
® TEST 1 5 10 a apagado (OFF). AUTOMATICO Ponga el interruptor de tiempo (ON-TIME) en la posición de 1, 5 ó 10 minutos. TEST 1 5 10 MODO MANUAL El modo manual funciona sólo por la noche porque la luz del día pone al detector en modo AUTOMATICO. Apague el interruptor por un segundo y vuélvalo - Zenith SL-4127-BK | User Guide - Page 10
., hasta el amanecer). Si escoge OFF (APAGADO) deshabilita esta función. Las funciones que detectan movimiento continuarán funcionando como se describen en este manual. Si detecta movimiento, la luz se prende con todo su resplandor por el tiempo de duración o de ON-TIME (1, 5 ó 10 minutos) y luego - Zenith SL-4127-BK | User Guide - Page 11
4. Voltee la placa de montaje de modo que el agujero de paso del alambre esté en la parte derecha superior. Nota: El agujero de paso del alambre en la placa de montaje debe estar ubicado como se muestra abajo para que los alambres de la parte de atrás del aparato puedan pasar. 5. Reinstale los - Zenith SL-4127-BK | User Guide - Page 12
CONEXION ALTERNA Este aparato viene con un detector con una potencia de 360 Vatios. Puesto que el aparato tiene sólo una potencia de 100 Vatios (60 vatios para el modelo 4131 y 180 vatios candelabro), la carga adicional de 260 Vatios (300 vatios para el modelo 4131 y 180 vatios candelabro) puede ser - Zenith SL-4127-BK | User Guide - Page 13
COMPLETE LA INSTALACION ❒ Meta los cables en la caja de empalme. Asegúrese que los cables del aparato pasen por el paso para los cables y que no estén pinchados. Ensamble superior del modelo 4182 La pieza más grande debe estar arriba Deslice al apartato sobre los tornillos de montaje y ajuste - Zenith SL-4127-BK | User Guide - Page 14
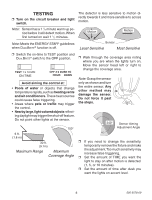
PRUEBA ❒ Prenda el cortacircuitos y el interruptor de luz. Nota: El detector tiene un período de cerca de 1 1/2 minutos de calentamiento antes de detectar movimiento. Cuando lo prenda por primera vez, espere 1 1/2 minutos. Nota: Cumple con las normas ENERGY STAR® cuando la función DualBrite® está - Zenith SL-4127-BK | User Guide - Page 15
, de secadora o hacia una superficie con pintura brillante y que refleja el calor. (Reposicione el detector). 2. El control de luz está en fase Manual (Cámbiela a Auto). 3. El control de luz está en fase DualBrite®. 4. La Sensibilidad es demasiado alta. (Reduzca la sensibilidad). 1. El calor que se - Zenith SL-4127-BK | User Guide - Page 16
tiene algún problema, siga esta guía. Usted puede también visitar nuestro sitio Web: www.hzsupport.com. Si el problema continúa, llame al 1-800-858-8501 HeathCo LLC P.O. Box 90004, Bowling Green, KY 42102-9004 ATTN: Technical Service (Servicio Técnic) * Si se llama al Servicio Técnico, por favor - Zenith SL-4127-BK | User Guide - Page 17
Lanterne de voiture DualBriteMD à détecteur de mouvement Conforme aux exigences ENERGY STARMD lorsque la fonction DualBriteMD est désactivée. Caractéristiques • Allume l'éclairage lorsqu'un mouvement est détecté. • Éteint automatiquement l'éclairage. • Éclairage d'accentuation de crépuscule. • - Zenith SL-4127-BK | User Guide - Page 18
détection de mouvement continuera toutefois de fonctionner tel que décrit dans ce guide. Si un mouvement est détecté, la lumière s'allume à pleine de jonction Ce luminaire vous est fourni avec un support universel; déjà fixé au luminaire, ce support convient à la majorité des boîtes de raccordement - Zenith SL-4127-BK | User Guide - Page 19
5. Remettez en place les vis de fixation au luminaire et la vis de mise à la terre, puis fixez la plaque de montage à la boîte de raccordement, comme illustré. Blanc Luminaire Luminaire Passage des fils Passage des fils Vis de mise à la terre Noir Vert ou dénudé Deux lanternes à détecteur de - Zenith SL-4127-BK | User Guide - Page 20
tre contrôlé par ce capteur. Lorsque vous déterminez l'intensité que peut supporter un luminaire, ne vous contentez pas de simplement lire l'intensité indiquée sur type de câblage, veuillez communiquer avec notre Service à la clientèle au 1 800 858-8501 (service en anglais seulement). Si le câblage - Zenith SL-4127-BK | User Guide - Page 21
COMPLÉTEZ L'INSTALLATION ❒ S'assurer que les fils du luminaire suivent le passage des fils et qu'aucun d'eux ne soit pincé. Ensemble supérieur 4182 Plus grande pièce sur le dessus Glissez le luminaire sur les vis de montage et resserrez les vis. Boîte de jonction Ensemble facultatif ❒ S'il y a - Zenith SL-4127-BK | User Guide - Page 22
ESSAIS ❒ Mettre en circuit le disjoncteur et l'interrupteur d'éclairage. Note : Le capteur doit se réchauffer 1 1/2 minute avant de pouvoir détecter le mouvement. Lorsque l'appareil est mis en circuit, attendre 1 1/2 minute. Note : Conforme aux exigences ENERGY STARMD lorsque la fonction DualBriteMD - Zenith SL-4127-BK | User Guide - Page 23
, en tout temps et sans contracter quelque obligation que ce soit quant à l'incorporation de nouvelles caractéristiques aux produits déjà vendus. GUIDE DE DÉPANNAGE SYMPTÔME CAUSE POSSIBLE La lampe ne s'allume pas. 1. L'interrupteur d'éclairage est en position hors circuit. 2. L'ampoule au - Zenith SL-4127-BK | User Guide - Page 24
me, suivez ce guide. Vous pouvez aussi visiter notre site Web à www. hzsupport.com. Si le problème persiste, composez* le 1 800 858-8501 (service en anglais seulement), utiliser conjointement avec nos produits. CETTE GARANTIE TIENT EXPRESSÉMENT LIEU DE TOUTES AUTRES GARANTIES, EXPLICITES OU
-
 1
1 -
 2
2 -
 3
3 -
 4
4 -
 5
5 -
 6
6 -
 7
7 -
8
-
9
-
10
-
11
-
12
-
13
-
14
-
15
-
16
-
17
-
18
-
19
-
20
-
21
-
22
-
23
-
24
 |
 |

This package includes:
• Lantern
• Easy to use Universal Mounting Bracket
• Mounting Hardware
• Wire Connectors
• Some Models Include an Optional Decora-
tive Tail Assembly
Requirements
• The light control requires 120 volts AC.
•
If you want to use Manual Mode, the control
must be wired through a switch.
•
Some codes require installation by a
qualified electrician.
Features
• Light comes on when motion is detected.
• Automatically turns light off.
• Dusk Accent lighting.
• Photocell keeps the light off during daylight
hours.
© 2007 HeathCo LLC
595-5578-09
MANUAL MODE
... back on.
1 Second
OFF
then...
OPERATION
TEST
TEST
1 5 10 MIN
AUTO
TEST
1 5 10 MIN
D
UAL
B
RITE
®
Motion Sensing
Coach Light
Set the ON-TIME switch on
the bottom of the cover plate
to TEST and the
D
UAL
B
RITE
®
switch OFF.
Set ON-TIME switch to
1, 5, or 10 minutes.
Manual mode only works at
night because daylight re-
turns the sensor to AUTO.
Flip the light switch off for
one second then back on to
toggle between AUTO and
MANUAL MODE.
Manual mode works only
with the ON-TIME switch in
the 1, 5, or 10 position.
* resets to Auto Mode at dawn.
Note:
When first turned on wait about 1
1
/
2
minutes for the circuitry to calibrate.
Mode:
On-Time
Works: Day Night
Test
5 Seconds
x
x
Auto
1, 5, or 10 Min
x
Manual
To Dawn*
x
Accent
3, 6 Hr, to Dawn
x
Meets the ENERGY STAR
®
guidelines when
D
UAL
B
RITE
®
function is off.