Zenith SL-6107-WH User Guide
Zenith SL-6107-WH - Heath - Motion Activated Wall Switch Manual
 |
UPC - 169636107122
View all Zenith SL-6107-WH manuals
Add to My Manuals
Save this manual to your list of manuals |
Zenith SL-6107-WH manual content summary:
- Zenith SL-6107-WH | User Guide - Page 1
stays on is adjustable. The Heath®/Zenith SL-6107 Motion Sensing 3-Way Wall Switch replaces any "3-way" switch. Perfect for rooms or hallways where two wall switches control a single light. This package includes: • light control • wire connectors • wire jumper • decorative cover plate • mounting - Zenith SL-6107-WH | User Guide - Page 2
place that can detect motion in the desired area. ✓ For easier re-wiring later, mark the house wiring with tape indicating where the wire had been connected. In the following section you will install a jumper wire at one 3-way switch and replace the other switch with the SL-6107. *Note: The existing - Zenith SL-6107-WH | User Guide - Page 3
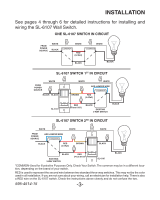
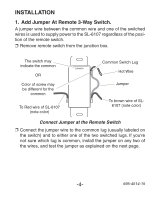
instructions for installing and wiring the SL-6107 Wall Switch. ONE SL-6107 SWITCH IN CIRCUIT FROM POWER SOURCE WHITE WHITE WHITE BLACK *COMMON RED (In Wall) *COMMON BLACK BLACK SL-6107 SWITCH 1ST IN CIRCUIT FROM POWER SOURCE WHITE BLACK BLACK WHITE WHITE BROWN ADD JUMPER WIRE - Zenith SL-6107-WH | User Guide - Page 4
of screw may be different for the common To Red wire of SL-6107 (note color) COMMON Common Switch Lug Hot Wire Jumper To brown wire of SL6107 (note color) Connect Jumper at the Remote Switch ❐ Connect the jumper wire to the common lug (usually labeled on the switch) and to either one of the two - Zenith SL-6107-WH | User Guide - Page 5
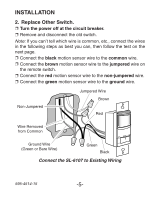
wire on the remote switch. ❐ Connect the red motion sensor wire to the non-jumpered wire. ❐ Connect the green motion sensor wire to the ground wire. Non-Jumpered Jumpered Wire Brown Red Wire Removed from Common OFF AUTO ON Ground Wire (Green or Bare Wire) Green Black Connect the SL-6107 - Zenith SL-6107-WH | User Guide - Page 6
to the previously unconnected terminal. Jumper is correct. Go to next page. Flip the switch with the jumper wire to the other position. Remove the jumpered switch from the junction box. Flip the unjumpered switch on and off. Turn the power off at the circuit breaker. No Lights turn on Yes - Zenith SL-6107-WH | User Guide - Page 7
Adjustment fully clockwise. Cover the lens with masking tape. ❐ With the motion sensor in the "ON" position, turn the remote switch on and off several times. Go to step 1, 2, or 3, depending on results. Troubleshooting Wiring Connections * Turn power off before rewiring! 1. If light does not turn - Zenith SL-6107-WH | User Guide - Page 8
SPECIAL INSTALLATIONS For single switch installations, connect the wall switch as shown here. SINGLE SWITCH INSTALLATION BLACK BLACK FROM POWER SOURCE OFF AUTO ON BROWN RED SL-6107 WHITE BLACK WHITE If you want to have motion sensors at both 3-way switches, connect them as shown below. The - Zenith SL-6107-WH | User Guide - Page 9
light level using this diagram as a guide. In the fully clockwise position, the sensor turns on lights even in full daylight. In the fully counter-clockwise position, the sensor only turns on lights when the surrounding light level is very low. ❐ With the switch in the AUTO position and the light - Zenith SL-6107-WH | User Guide - Page 10
ADJUSTMENT Time Control + 5 10 There are 6 preset selections for the amount of time the lights stay on: Test (5 seconds), 1, 5, 10, 15, and 20 minutes. Use a small, phillips screw driver to adjust the TIME control (see Figure 4). Turn the TIME control until it "snaps" into the desired time - Zenith SL-6107-WH | User Guide - Page 11
the three-position switch on the SL-6107: Off: When you want the light off all the time. The light will not be switched on by either switch. Put the control in this position when changing light bulbs. Auto: When you want the light to come on and turn off automatically with motion or turn on - Zenith SL-6107-WH | User Guide - Page 12
. • Control may be wired incorrectly. See Troubleshooting Wiring Con- nections, page 7. Remote switch does not work: • The remote switch only works to turn the light on in the Auto mode. Put sensor in the Auto mode. • Control may be wired incorrectly. See Troubleshooting Wiring Con- nections, page - Zenith SL-6107-WH | User Guide - Page 13
TROUBLESHOOTING In the Auto mode, light does not stay on: • Motion is needed to keep the light on. • Time DARK position. Technical Service Please call 1-800-858-8501 (English speaking only) for assistance before returning product to store. If you experience a problem, follow this guide. You may also - Zenith SL-6107-WH | User Guide - Page 14
From full daylight to less than 1 FC. Coverage up to 15 ft. (4.6 m) at 150°, up to 30 ft. (9.1 m) in front of the sensor Specification subject to change without notice. *Designed for use with standard 3 ft./30 watt and 4 ft./40 watt rapid-start fluorescent tubes. Not designed for - Zenith SL-6107-WH | User Guide - Page 15
adjustment and calibration due to misuse, abuse or negligence, light bulbs, batteries, and other expendable items are not covered by this warranty. Unauthorized service or modification of the product or of any furnished component will void this warranty in its entirety.This warranty does not include - Zenith SL-6107-WH | User Guide - Page 16
El período de tiempo que la luz se queda prendida es ajustable. El Interruptor Tridireccional de pared y Dectector de Movimiento SL-6107 reemplaza a cualquier interruptor tridireccional.Perfecto para cuartos o pasillos donde dos interruptores de pared controlan una sola luz. Este paquete tiene: • el - Zenith SL-6107-WH | User Guide - Page 17
cada uno. En la siguiente sección usted instalará un puente de alambre en el un interruptor de 3-vías y reemplazará el otro interruptor con el SL-6107. *Nota: Al interruptor existente de 3 direcciones se le llamará "interruptor remoto" durante el resto del manual de instalación. 595-4514-15 -17- - Zenith SL-6107-WH | User Guide - Page 18
DE LA LÁMPARA EXISTENTE DE LA FUENTE DE ALIMENTACIÓN BLANCO NEGRO BLANCO *COMÚN ROJO (en la pared) *COMÚN NEGRO BLANCO NEGRO INTERRUPTOR SL-6107 1ro EN EL CIRCUITO BLANCO DE LA FUENTE DE ALIMENTACIÓN BLANCO BLANCO AÑADA EL CONDUCTOR PUENTE *COMÚN NEGRO NEGRO MARRÓN OFF AUTO ON - Zenith SL-6107-WH | User Guide - Page 19
a control remoto. Se usa un cable de conexión entre el alambre común y uno de los alambres con interruptor para suplir energía al SL-6107 cualquiera sea la posición del interruptor a control remoto. ❐ Quite el interruptor a control remoto de la caja de empalme. El interruptor puede indicar - Zenith SL-6107-WH | User Guide - Page 20
Marrón Que va sin el puente Rojo Conductor retirado del común OFF AUTO ON Alambre de conexión a tierra (Verde o conductor desnudo) Verde Negro Conecte el SL-6107 a la conexión existente -20- 595-4514-15 - Zenith SL-6107-WH | User Guide - Page 21
INSTALACION Prueba para la conexión correcta de un cable común Reinstale el interruptor. Prenda de nuevo el cortacircuitos. Dejando el cable con puente en una posición, prenda y apague el otro interruptor tridireccional. La luz se prende y Sí se apaga. No Mueva un extremo del cable de puente al - Zenith SL-6107-WH | User Guide - Page 22
INSTALACION ❐ Monte el SL-6107 dentro de la caja de empalme con los tornillos para la caja de empalme. ❐ Instale de nuevo el interruptor. ❐ Prefije los controles:Tiempo Mínutos, Ajuste - Zenith SL-6107-WH | User Guide - Page 23
fluorescente y a 50 vatios para la incandescente. MARRÓN NEGRO MARRÓN NEGRO ROJO (Desde el SL-6107) OFF AUTO NEGRO ON SL-6107 ROJO (Desde el SL-6107) ROJO (en la pared) OFF AUTO ON SL-6107 NEGRO *COMÚN- Usado sólo por razones ilustrativas. Revise su interruptor. El común puede estar - Zenith SL-6107-WH | User Guide - Page 24
AJUSTE Sensibilidad de Foto ON AUTO OFF 5 Segundos Presione con un destornillador. Gire la tapa para quitarla. Cualquier nivel de luz + 5 10 Obscuro 1 15 Test 20 TIME LIGHT 20 Minutos El detector puede prevenir que se prenda la luz cuando existe ya suficiente luz en el cuarto. Use un - Zenith SL-6107-WH | User Guide - Page 25
Control del Tiempo AJUSTE + 5 10 Hay 6 ajustes precalibrados para el lapso de tiempo que las luces permanecen encendidas: Prueba 1 15 (5 segundos), 1, 5, 10, 15 y 20 mi- nutos.Use un destornillador Phillips pequeño para regular el control de TIEMPO (Vea la Figura 4). Gire el Test 20 - Zenith SL-6107-WH | User Guide - Page 26
FUNCIONAMIENTO Cómo usar el Control de Luz Se pueden escoger tres posiciones cuando se usa el interruptor de tres posiciones del SL-6107: Off: Cuando quiere que la luz esté siempre apagada. La luz no se prenderá con ninguno de los dos interruptores. Coloque el control en esta - Zenith SL-6107-WH | User Guide - Page 27
INVESTIGACION DE AVERIAS La luz no se prende: • El cortacircuitos está apagado. Préndalo de nuevo. • La bombilla está quemada. Cambie la bombilla. • La sensibilidad de foto está fijada en DARK (OBSCURO). Gire el ajuste hacia la derecha hacia la posición de LIGHT (CLARO). • El control está en la - Zenith SL-6107-WH | User Guide - Page 28
inglés), de 7:30 AM a 4:30 PM CST (L-V). Usted puede también escribir a: HeathCo LLC P.O. Box 90004, Bowling Green, KY 42102-9004 ATTN: Technical Service (Servicio Técnic) * Si se llama al Servicio Técnico, por favor tener lista la siguiente información: Número de Modelo, Fecha de compra y Lugar de - Zenith SL-6107-WH | User Guide - Page 29
ESPECIFICACIONES Este producto debe ser instalado sólo dentro de casa. Entrada eléctrica 120V, 60 Hz. Carga Fluorescente 2) 30 Vatios Mín. y Hasta 400 Vatios Máximo Estabilizador de arranque rápido Carga del motor Hasta 1/8 HP Máximo Incandescente Hasta 500 Vatios Máximo Duración ........ - Zenith SL-6107-WH | User Guide - Page 30
GARANTÍA LIMITADA A 5 AÑOS Esta es una "Garantía Limitada" que le da a Ud. derechos legales específicos. Usted puede también tener otros derechos que varían de estado a estado o de provincia a provincia. Por un período de 5 años desde la fecha de compra, cualquier mal funcionamiento ocasionado por - Zenith SL-6107-WH | User Guide - Page 31
Notes / Notas 595-4514-15 -31- - Zenith SL-6107-WH | User Guide - Page 32
Purchase Information Información de la compra Model Nº de modelo Date of Purchase Fecha de compra Staple Purchase Receipt Here Engrape aquí el recibo de compra Please keep your dated sales receipt, it
-
 1
1 -
 2
2 -
 3
3 -
 4
4 -
 5
5 -
 6
6 -
 7
7 -
8
-
9
-
10
-
11
-
12
-
13
-
14
-
15
-
16
-
17
-
18
-
19
-
20
-
21
-
22
-
23
-
24
-
25
-
26
-
27
-
28
-
29
-
30
-
31
-
32
 |
 |
SL-6107
© 2007 HeathCo LLC
595-4514-15
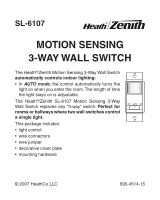
The Heath
®
/Zenith Motion Sensing 3-Way Wall Switch
automatically controls indoor lighting:
• In
AUTO mode,
the control automatically turns the
light on when you enter the room. The length of time
the light stays on is adjustable.
The Heath
®
/Zenith SL-6107 Motion Sensing 3-Way
Wall Switch replaces any “3-way” switch.
Perfect for
rooms or hallways where two wall switches control
a single light.
This package includes:
• light control
• wire connectors
• wire jumper
• decorative cover plate
• mounting hardware
MOTION SENSING
3-WAY WALL SWITCH
AUTO
OFF
ON