Zenith Z37LZ5D Operating Guide
Zenith Z37LZ5D - LCD HDTV Manual
 |
UPC - 044642702229
View all Zenith Z37LZ5D manuals
Add to My Manuals
Save this manual to your list of manuals |
Zenith Z37LZ5D manual content summary:
- Zenith Z37LZ5D | Operating Guide - Page 1
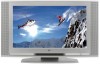
Installation and Operating Guide | Warranty Model Numbers | Z37LZ5D | LCD TV © Copyright 2005, LG Electronics USA, Inc. - Zenith Z37LZ5D | Operating Guide - Page 2
USER SERVICEABLE PARTS INSIDE. REFER TO QUALIFIED SERVICE user to the presence of important operating and maintenance (servicing) instructions Part instructions user TV technician user user's authority to operate this product. COMPLIANCE: The responsible party for this device compliance is: Zenith www.zenith.com - Zenith Z37LZ5D | Operating Guide - Page 3
instructions in an instruction instruction list. At the manufacturer's option, a picture or drawing that illustrates the intent of a specific safety instruction may be placed immediately adjacent to that safety instruction : 1. Read these instructions. 2. Keep these instructions instructions , stand, - Zenith Z37LZ5D | Operating Guide - Page 4
the specification page of this owner's manual to be certain. Do not overload wall outlets. Overloaded wall outlets, loose or damaged wall outlets appliance, and have the cord replaced with an exact replacement part by an authorized servicer. Protect the power cord from physical or mechanical abuse, - Zenith Z37LZ5D | Operating Guide - Page 5
35 EPG (Electronic Program Guide 36 Brief Info 37 Mute 38 Freeze 38 Screen Setup for PC mode 39 External Control Device Setup 40~45 IR Codes 46~47 Programming the Remote 48 Programming Codes 49~50 Troubleshooting Checklist 51 Maintenance 52 Product Specifications 53 Warranty 56 Setup - Zenith Z37LZ5D | Operating Guide - Page 6
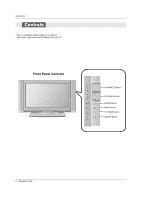
Introduction Controls - This is a simplified representation of front panel. Here shown may be somewhat different from your TV. Front Panel Controls CH VOL ENTER MENU TV VIDEO CHANNEL Buttons VOLUME Buttons ENTER Button MENU Button TV/VIDEO Button ON/OFF Button 6 Operating Guide - Zenith Z37LZ5D | Operating Guide - Page 7
on an AC power. The voltage is indicated on the Specifications page. Never attempt to operate the TV on DC power. HDMI/DVI RS-232C INPUT (VIDEO)INPUT (CONTROL/SER connect a VICE) PORT DVI(Video) sig- Connect to the nal to HDMI/DVI. RS-232C port on a PC. Antenna Input Connect over-theair - Zenith Z37LZ5D | Operating Guide - Page 8
VIDEO MODE DAY - GUIDE DAY + EXIT TIMER CC TV/VIDEO External input modes rotate in regular sequence: Antenna, Cable, Video, Front Video, Component 1-2, RGB-DTV (or RGB-PC) and HDMI/DVI input sources. (Video, Front Video, Component 1-2 input sources are linked automatically, only if these are - Zenith Z37LZ5D | Operating Guide - Page 9
Remote Control Key Functions Introduction POWER Turns your TV or any other programmed equipment on or off, depending on mode. TV INPUT TV/VIDEO , size, and phase in PC mode. DAY - GUIDE DAY + EXIT TIMER CC GUIDE Shows program schedule. CHANNEL UP/DOWN Selects available channels found - Zenith Z37LZ5D | Operating Guide - Page 10
you purchased the product. Owner's Manual 1.5V 1.5V Batteries Power Cord 75Ω Round Cable TV INPUT TV/VIDEO MODE DAY - GUIDE DAY + EXIT TIMER CC FLASHBK Remote Control 4-Wall brackets 2-bolts Tie Band Arrange the wires with the tie band. Installation Instructions How to join the - Zenith Z37LZ5D | Operating Guide - Page 11
Wall Mounting Bracket Installation. 4 inches 2 inches 4 inches 4 inches 4 inches For proper ventilation, allow a clearance of 4" on each side and the top, 2.36" on the bottom, and 2" from the wall. Detailed installation instructions are included in the optional Desktop Stand Installation - Zenith Z37LZ5D | Operating Guide - Page 12
and Digital TV signals provided on antenna - Wall Antenna Socket or Multi-family Dwellings/Apartments (Connect to wall antenna socket) Wall Antenna Socket Bronze Wire RF Coaxial Outdoor Antenna Single-family Dwellings /Houses (Connect to wall jack for outdoor antenna) Bronze Wire Be careful not - Zenith Z37LZ5D | Operating Guide - Page 13
manual.) 3. Select the input source with using the TV/VIDEO button on the remote control. Note that this TV DVI sources are connected. Do not connect to both Video and S-Video at the same time. 1 2 ANT OUT ANT IN S-VIDEO OUT OUTPUT (R) AUDIO (L) SWITCH 3 4 IN VIDEO VCR Rear Operating Guide - Zenith Z37LZ5D | Operating Guide - Page 14
DVD player, insert a DVD. 2. Use the TV/VIDEO button on the remote control to select Component 1 or Component 2. (If connected to S-VIDEO, select the Video or Front Video external input source.) 3. Refer to the DVD player's manual for operating instructions. • Component Input ports To get better - Zenith Z37LZ5D | Operating Guide - Page 15
as shown below. - This TV supports HDCP (High-bandwidth Digital Contents Protection connect Use the TV's COMPONENT (Y, PB, PR) INPUT, RGB or HDMI/DVI jack for video manual for the digital set-top box.) 2. Use TV/VIDEO on the remote control to select Component 1, Component 2, RGB-DTV, or HDMI/DVI - Zenith Z37LZ5D | Operating Guide - Page 16
with a HDMI to DVI cable> How to connect 1. Connect the PC to HDMI/DVI port of this TV with an HDMI-to-DVI cable(not sup- plied card or consult the manufacturer of the PC graphic card. Monitor Display Specifications (RGB-PC ) Resolution Horizontal Vertical Frequency(KHz) Frequency(Hz Guide - Zenith Z37LZ5D | Operating Guide - Page 17
. Connect the second TV or monitor to the TV's MONITOR OUTPUT. See the Operating Manual of the second TV or monitor for further details regarding that device's input settings. Notes: • Component, RGB-PC/RGB-DTV, HDMI/DVI, DTV input sources cannot be used for Monitor out. • When connecting with - Zenith Z37LZ5D | Operating Guide - Page 18
source device does not support Auto HDMI/DVI, you need to supports HDMI> How To Connect 1. Connect the source device to HDMI/DVI port of this TV supports DVI> How To Connect 1. Connect the source device to HDMI/DVI port of this TV with a HDMI-to-DVI source device does not support Auto DVI, you need to - Zenith Z37LZ5D | Operating Guide - Page 19
Reference Cable sample Installation HDMI Cable (not supplied with the product) HDMI to DVI Cable (not supplied with the product) Fiber Optic Digital Audio Cable (not supplied with the product) Analog Audio Cable(RCA type) (not supplied with the - Zenith Z37LZ5D | Operating Guide - Page 20
Source Devices, "INVALID FORMAT" OSD display. Refer to the Manual of HDMI/DVI Source Devices or contact your service center. POSITION G SIZE PHASE RESET Adjust Close D F G E PC mode In This Mode, the Supported TV SET Resolution Specification - 1920 x 1080 I @ 59.94Hz / 60Hz, 16:9 - 1280 x 720 - Zenith Z37LZ5D | Operating Guide - Page 21
which power state it was last set to, even if the power cord is out. 3. When finished using the TV, press the POWER button on the remote control. The TV reverts to standby mode. TV Setup On-screen Menus Language Selection - The menus can be shown on the screen in the selected language. First - Zenith Z37LZ5D | Operating Guide - Page 22
on the channel list. - Run EZ button to select Manual Scan. 3. Press the G button and then use D / E button to select TV, DTV, CATV, TV: analog antenna(over-the-air) TV signal DTV: digital antenna(over-the-air) TV signal CATV: analog cable TV signal CADTV: digital cable TV signal 22 Operating Guide - Zenith Z37LZ5D | Operating Guide - Page 23
List. Use the FAV button on the remote control when a channel is highlighted and then you can add or delete the channel to/from the Favorite List. SETUP VIDEO AUDIO TIME OPTION EZ Scan Manual monitor to see the quality of the signal being received. 4. Press EXIT button to return to TV viewing - Zenith Z37LZ5D | Operating Guide - Page 24
TV viewing mode, you will see the channel banner. • TV, cable TV, VCR, DVD, or any other devices that are connected to your TV DVI. 4. Press EXIT button to return to TV press TV/VIDEO DVI. 4. Press the F / G button to select the label. 5. Press EXIT button to return to TV DVI SETUP EZ Scan Manual - Zenith Z37LZ5D | Operating Guide - Page 25
EZ Picture. 2. Press the EXIT button to save and return to TV viewing or press MENU button to return to the previous menu. Manual Picture Control (Custom option) - Adjust the picture appearance to suit your Previous Selection ( G or ) resets to the factory settings(default) Operating Guide 25 - Zenith Z37LZ5D | Operating Guide - Page 26
TV TV TV to TV viewing TV Speaker TV sets the appropriate sound options based on the program content. - When adjusting sound options (treble, bass, and front surround) manually TV viewing or press MENU button to return to the previous menu. Manual TV viewing or press MENU button to return to the - Zenith Z37LZ5D | Operating Guide - Page 27
TV Speaker BBE TV viewing or press MENU button to return to the previous menu. TV Speakers On/Off Setup - Turn TV speakers off if using external audio equipment. Feature turns the TV TV Speaker. 3. Press the G button and then use D / E button to select On or Off. 4. Press EXIT button to return to TV - Zenith Z37LZ5D | Operating Guide - Page 28
original one. - When having selected Stereo or SAP button on the remote control, this TV can only receive the signal when the TV station transmits the proper signals. - Mono sound is automatically received if the SAP button. 2. Press EXIT button to save and return to TV viewing. 28 Operating Guide - Zenith Z37LZ5D | Operating Guide - Page 29
manually Manual TV viewing or press MENU button to return to the previous menu. SETUP VIDEO AUDIO TIME Auto Clock Manual Manual TV must be in standby TV turns on with the On Timer function, the TV TV viewing or press MENU button to return to the previous menu. SETUP VIDEO AUDIO TIME Auto Clock Manual - Zenith Z37LZ5D | Operating Guide - Page 30
TV before the TV turns off, input signal, the TV turns off automatically after TV viewing or press MENU button to return to the previous menu. SETUP VIDEO AUDIO TIME Auto Clock Manual Clock Off Timer On Timer Sleep Timer Auto Off OPTION If set to On and there is no input signal, the TV - Zenith Z37LZ5D | Operating Guide - Page 31
TV, you need to specify how the picture is to be displayed. - If you are viewing a picture with a 16:9 aspect ratio, you can't use the Horizon aspect ratio option. - Horizon aspect ratio is not available for Component 1-2(480p/720p/1080i)/RGB-DTV (480p/720p/1080i)/HDMI/DVI to return to TV viewing or - Zenith Z37LZ5D | Operating Guide - Page 32
Press EXIT button to return to TV viewing or press MENU button to a data service. - Caption - This TV is programmed to EXIT button to save and return to TV viewing. • You can also use the across the bottom of the TV screen; usual- ly the to TV viewing or button to return to TV viewing or press MENU - Zenith Z37LZ5D | Operating Guide - Page 33
Select an edge type. • Edge Color: Select a color for the edges. 5. Press EXIT button to return to TV viewing or press MENU button to return to the previous menu. SETUP VIDEO AUDIO TIME OPTION LOCK Aspect Ratio Cinema Custom A Standard Font 0 White Solid Black Solid None Black Operating Guide 33 - Zenith Z37LZ5D | Operating Guide - Page 34
to block specific channels, TV-G, TV-PG, TV-14, TV-MA) (applies to TV-PG, TV-14) (applies to TV-PG, TV-14, TV-MA) (applies to TV-PG, TV-14, TV-MA) (applies to TV-PG, TV-14, TV-MA) Input Block • Video, Front Video • Component 1, 2 • RGB, HDMI/DVI (On, Off) (On, Off) (On, Off) 34 Operating Guide - Zenith Z37LZ5D | Operating Guide - Page 35
specific channels, ratings, and external viewing sources. - A password is required to gain access to this menu. 1. Press the MENU button and then use D / E button to select the LOCK menu. Then, press the G button • The TV 3. Press EXIT button to return to TV viewing or press MENU button to return - Zenith Z37LZ5D | Operating Guide - Page 36
Operation Remote Control EPG (Electronic Program Guide) (In DTV mode) - This system has an Electronic Program Guide (EPG) to help your navigate through all the possible viewing options. - The EPG supplies information such as program listings, start and end times for all available services. - This - Zenith Z37LZ5D | Operating Guide - Page 37
DVI modes. - Press the INFO button or EXIT button to exit. Operation: • Watching TV/DTV/CATV/CADTV • Watching Video, Front Video • In Component1, Component2, RGB, HDMI/DVI audio services. Press the SAP => The program contains one or more caption services. Press the CC button to select wanted - Zenith Z37LZ5D | Operating Guide - Page 38
the currently-viewed picture. 1. Press the FREEZE button to freeze the screen section. 2. To return to normal viewing, press the FREEZE button again. 38 Operating Guide - Zenith Z37LZ5D | Operating Guide - Page 39
this function is used. • When HDMI/DVI connect to PC input and select HDMI/DVI input, this function is used. • Size, Phase, Reset •After connecting RGB-PC or HDMI/DVI to PC input and checking the screen quality. - of Pixel clock. In HDMI/DVI-PC mode, PHASE is not available. - Reset - Zenith Z37LZ5D | Operating Guide - Page 40
RS-232C jack on the Monitor back panel. - RS-232C connection cables are not supplied with the Monitor. RS-232C Setup PC RTS 7 CTS 8 3 TXD 2 RXD 5 GND 6 DSR 4 DTR 8 CTS 7 RTS D-Sub 9 40 Operating Guide D-Sub 9 1 5 9 6 3-Wire Configurations (Not standard) PC PDP RXD 2 TXD 3 GND 5 DTR 4 DSR - Zenith Z37LZ5D | Operating Guide - Page 41
Error Acknowledgement [Command2][ ][Set ID][ ][NG][Data][x] * The Monitor transmits ACK (acknowledgement) based on this format when receiving abnormal data from non-viable functions or communication errors. Data 1: Illegal Code 2: Not supported function 3: Wait more time COM- COMMAND 1 MAND 2 DATA - Zenith Z37LZ5D | Operating Guide - Page 42
select input source for the Monitor. Transmission [k][b][ ][Set ID][ -DTV 7: RGB-PC 8: HDMI/DVI Acknowledgement [b][ ][Set ID][ ][OK screen format using the RATIO button on remote control or in the Option menu. Transmission ID][ ][OK][Data][x] 42 Operating Guide 05. Volume Mute (Command2:e) G - Zenith Z37LZ5D | Operating Guide - Page 43
[l][ ][Set ID][ ][OK][Data][x] External Control Device Setup 13. Remote Control Lock Mode (Command2:m) G To lock the remote control and the front panel controls on the set. Transmission [k][m][ ][ Real data mapping'. See page 42. Acknowledgement [t][ ][Set ID][ ][OK][Data][x] Operating Guide 43 - Zenith Z37LZ5D | Operating Guide - Page 44
code part)/ Channel Number (One part) Data1: High byte Data2: Low byte Two part channel number: Major number-Minor number One part 6 Part Channel code *Two/One part 23 xx xx xx xx 01 attribute(0x01): main picture, two part part part remote key code Transmission [m][c][ ][Set ID][ ][Data][Cr] Data Key code - Zenith Z37LZ5D | Operating Guide - Page 45
(Command: x b) (Main Picture Input) G To select input source for TV. Transmission [x][b][][Set ID][][Data][Cr] Data Structure DATA(Hex) INPUT 00 DTV Component 2 50 RGB DTV 60 RGB PC 90 HDMI/DVI Acknowledgement [b][ ][Set ID][ ][OK/NG][Data][x] External Control Device Setup Operating - Zenith Z37LZ5D | Operating Guide - Page 46
on the TV. Remote Control IR Codes G Output waveform Single pulse, modulated with 37.917KHz signal at 455KHz TC Carrier frequency FCAR = 1/TC = fOSC/12 T1 Duty ratio = T1/TC = 1/3 G Configuration of frame • 1st frame Lead code Low custom code High custom code Data code Data code C0 C1 - Zenith Z37LZ5D | Operating Guide - Page 47
Selection) Discrete IR Code (RGB-PC Input Selection) Discrete IR Code (RGB-DTV Input Selection) Discrete IR Code (HDMI/DVI Input Selection) Discrete IR Code (Only 4:3 Mode) Discrete IR Code (Only 16:9 Mode) Discrete IR Code (Only Zoom1 Mode) Discrete IR Code (Multmedia Selection) Operating Guide 47 - Zenith Z37LZ5D | Operating Guide - Page 48
Programming the Remote Programming the Remote G The remote is a multi-brand or a universal remote. It can be programmed to operate most remote-controllable devices of other manufacturers. Note that the remote may not control all models of other brands. Programming a code into a remote mode 1. To - Zenith Z37LZ5D | Operating Guide - Page 49
JCPENNY JENSEN JVC Codes 034 016 PHILIPS PILOT PIONEER Codes 014 034 039 SYMPHONIC TANDY Codes 108 072 VIDEOSONIC WARDS YAMAHA ZENITH Codes 039 043 GEMINI GI Codes 003 004 PANASONIC PARAGON PHILIPS Codes 030 049 050 SL MARX Codes 065 085 CABLE UNIVERSAL VIEWSTAR ZENITH Codes 047 078 - Zenith Z37LZ5D | Operating Guide - Page 50
PROSAT 072 RCA 066 106 REALISTIC 043 074 SAMSUNG 123 SATELLITE SERVICE CO 028 035 047 057 085 SCIENTIFIC ATLANTA 032 138 SONY 103 STARCAST 041 SUPER GUIDE 020 124 125 TEECOM 023 026 075 087 Brand TOSHIBA UNIDEN VIEWSTAR WINEGARD ZENITH Codes 088 090 107 130 137 002 127 016 025 042 - Zenith Z37LZ5D | Operating Guide - Page 51
Troubleshooting Checklist No picture & No sound • Check whether the TV is turned on. • Is the power cord inserted into wall power outlet? • Test the wall power outlet, plug another product's power cord into the outlet where the TV's power cord was plugged in. Picture OK & No sound The remote - Zenith Z37LZ5D | Operating Guide - Page 52
the amount of time you will have your new TV. Be sure to turn the power off and and then let it air-dry before you turn on your TV. Cleaning the Cabinet To remove dirt or dust, wipe the use a wet cloth. Extended Absence If you expect to leave your TV dormant for a long time (such as a vacation), it's - Zenith Z37LZ5D | Operating Guide - Page 53
Product Specifications Specification MODELS Z37LZ5D Power requirement Power Consumption Television System Program ~ 135, CADTV 1 ~ 135, DTV 2 ~ 69 75 Ω 32 ~ 104°F (0 ~ 40°C) Less than 80% • The specifications shown above may be changed without prior notice for quality improvement. Operating - Zenith Z37LZ5D | Operating Guide - Page 54
Notes 54 Operating Guide - Zenith Z37LZ5D | Operating Guide - Page 55
Notes Operating Guide 55 - Zenith Z37LZ5D | Operating Guide - Page 56
ELECTRONICS CORPORATION LCD-TV LIMITED WARRANTY - USA Zenith will repair or replace your product, at Zenith's option, if it proves to be defective in material or workmanship under normal use, during the warranty period ("Warranty Period") listed below, effective from the date ("Date of Purchase
-
 1
1 -
 2
2 -
 3
3 -
 4
4 -
 5
5 -
 6
6 -
 7
7 -
8
-
9
-
10
-
11
-
12
-
13
-
14
-
15
-
16
-
17
-
18
-
19
-
20
-
21
-
22
-
23
-
24
-
25
-
26
-
27
-
28
-
29
-
30
-
31
-
32
-
33
-
34
-
35
-
36
-
37
-
38
-
39
-
40
-
41
-
42
-
43
-
44
-
45
-
46
-
47
-
48
-
49
-
50
-
51
-
52
-
53
-
54
-
55
-
56
 |
 |

©
Copyright 2005, LG
Electronics USA, Inc.
Installation and Operating Guide | Warranty
Model Numbers
|
Z37LZ5D
|
LCD TV