ZyXEL GS1100-16 User Guide
ZyXEL GS1100-16 Manual
 |
View all ZyXEL GS1100-16 manuals
Add to My Manuals
Save this manual to your list of manuals |
ZyXEL GS1100-16 manual content summary:
- ZyXEL GS1100-16 | User Guide - Page 1
GS1100 Series Unmanaged Gigabit Ethernet Switch Version 1.00 Edition 4, 02/2013 Quick Start Guide User's Guide www.zyxel.com Copyright © 2013 ZyXEL Communications Corporation - ZyXEL GS1100-16 | User Guide - Page 2
GUIDE FOR FUTURE REFERENCE. Screenshots and graphics in this book may differ slightly from your product due to differences in your product firmware or your computer operating system. Every effort has been made to ensure that the information in this manual is accurate. 2 GS1100 Series User's Guide - ZyXEL GS1100-16 | User Guide - Page 3
Front Panel LEDs ...12 2.3 Hardware Installation ...14 2.3.1 Wall Mounting ...14 2.3.2 Rack Mounting ...15 2.3.3 Mounting the Switch on a Rack 16 Chapter 3 Troubleshooting...19 3.1 Improper Network Cabling and Topology 20 Appendix A Legal Information...21 Index ...23 GS1100 Series User's Guide 3 - ZyXEL GS1100-16 | User Guide - Page 4
Table of Contents 4 GS1100 Series User's Guide - ZyXEL GS1100-16 | User Guide - Page 5
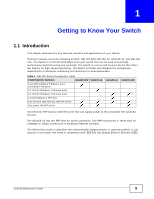
, benefits and applications of your Switch. This User's Guide covers the following models: GS1100-8HP, GS1100-16, GS1100-24, and GS110024E. The Switch is a 10/100/1000 Mbps multi-port switch that can be used to build highperformance switched workgroup networks. The Switch is a store-and-forward - ZyXEL GS1100-16 | User Guide - Page 6
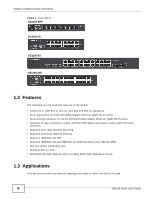
802.3at PoE standards (only GS1100-8HP) • Full wire speed forwarding rate. • Supports 802.1p CoS. • Embedded 8K MAC address table providing 8000 MAC addresses entries. 1.3 Applications This section provides two network topology examples in which the Switch is used. 6 GS1100 Series User's Guide - ZyXEL GS1100-16 | User Guide - Page 7
environment. The two networks (RD and Sales), the standalone server and the computers can all communicate with each other and share all network resources. Figure 3 Bridging Example 1.4 Power Over Ethernet (PoE) The PoE function is available for GS1100-8HP only. GS1100 Series User's Guide 7 - ZyXEL GS1100-16 | User Guide - Page 8
port. In the figure below, the IP camera and IP phone get their power directly from the Switch. Aside from minimizing the need for cables and wires, PoE removes the hassle of trying to find a nearby electric outlet to power up devices. Figure 4 Powered Device Examples 8 GS1100 Series User's Guide - ZyXEL GS1100-16 | User Guide - Page 9
power source. For the GS1100-8HP, GS1100-16 and GS1100-24E, use the POWER ON/OFF switch to have the Switch power on or off. 2.2 Front Panel The front panel of the Switch includes the auto-negotiating 10 Base-T/100 Base-TX/1000 Base-T RJ-45 ports and the LEDs. GS1100 Series User's Guide 9 - ZyXEL GS1100-16 | User Guide - Page 10
the EEE feature. Disable it if you don't want the network performance to be impacted due to the latency from the additional time required for the sleep and wake transition or if the remote side doesn't support it. 2.2.3 SFP Slots (GS1100-24 Only) These are slots for Small Form-factor Pluggable (SFP - ZyXEL GS1100-16 | User Guide - Page 11
and Connection 2 Press the transceiver firmly until it clicks into place. 3 The Switch automatically detects the installed transceiver. Check the LEDs to verify that it is functioning Removing the Fiber Optic Cables Figure 9 Opening the Transceiver's Latch Example GS1100 Series User's Guide 11 - ZyXEL GS1100-16 | User Guide - Page 12
1000 Mbps Category 5e, 6 UTP/STP You can use either crossover or straight-through cables for all the ports. 2.2.5 Front Panel LEDs The LED Indicators give real-time information about the status of the Switch. The following table provides descriptions of the LEDs. 12 GS1100 Series User's Guide - ZyXEL GS1100-16 | User Guide - Page 13
-16 GS1100-24 GS1100-24E Chapter 2 Hardware Description and Connection The following table describes the LEDs. Table 3 The Front Panel LED Descriptions: GS1100-8HP LED COLOR STATUS DESCRIPTION PWR Green On The Switch is on and receiving power. Off The Switch is not receiving power. PoE - ZyXEL GS1100-16 | User Guide - Page 14
the Switch to the rack/wall. For GS1100-8HP, GS1100-16 and GS110-24E, you can place the Switch directly on top of your desk or have it wall-mounted. For GS1100-16, GS1100-24 and GS110-24E, the size is suitable for rackmounting and you can refer to Section 2.3.2 on page 15 for instruction. Take - ZyXEL GS1100-16 | User Guide - Page 15
between the centers of the holes for wall mounting MODEL GS1100-8HP GS1100-16 DISTANCE 120 mm 148 mm GS1100-24E 207 mm 1 Screw the two screws provided with your Switch into the wall (see the figure in step 2). Use screws with 6 mm ~ 8 mm (0.24" ~ 0.31") wide heads. Do not screw the screws - ZyXEL GS1100-16 | User Guide - Page 16
on a rack. Proceed to the next section. 2.3.3 Mounting the Switch on a Rack 1 Position a mounting bracket (that is already attached to the Switch) on one side of the rack, lining up the two screw holes on the bracket with the screw holes on the side of the rack. 16 GS1100 Series User's Guide - ZyXEL GS1100-16 | User Guide - Page 17
-24E) Figure 15 Mounting the Switch on a Rack (GS1100-24) 2 Using a #2 Philips screwdriver, install the M5 flat head screws through the mounting bracket holes into the rack. 3 Repeat steps 1 and 2 to attach the second mounting bracket on the other side of the rack. GS1100 Series User's Guide - ZyXEL GS1100-16 | User Guide - Page 18
Chapter 2 Hardware Description and Connection 18 GS1100 Series User's Guide - ZyXEL GS1100-16 | User Guide - Page 19
-8HP and an appropriate power source. Make sure the power source is on and functioning properly. • Check that the Ethernet cables are connected properly and that you are using the correct type of Ethernet cable. Contact your local distributor if the problem persists. GS1100 Series User's Guide - ZyXEL GS1100-16 | User Guide - Page 20
cause of poor network performance or even network failure. Figure 16 Troubleshooting Improper Network Cabling and Topology PROBLEM Faulty cables Non-standard that will severely affect your network performance. Make sure there are no loops in your network topology. 20 GS1100 Series User's Guide - ZyXEL GS1100-16 | User Guide - Page 21
has been tested and found to comply with the limits for a Class A digital switch, pursuant to Part 15 of ZyXEL. This warranty shall not apply if the product has been modified, misused, tampered with, damaged by an act of God, or subjected to abnormal working conditions. GS1100 Series User's Guide - ZyXEL GS1100-16 | User Guide - Page 22
ZyXEL shall in no event be held liable for indirect or consequential damages of any kind to the purchaser. To obtain the services fuse only with a fuse of the same type and rating. • The PoE (Power over Ethernet) devices that supply or receive power and their connected GS1100 Series User's Guide - ZyXEL GS1100-16 | User Guide - Page 23
Ethernet 10 F Faulty cables 20 FCC interference statement 21 Front Panel 9 GS1100 Series User's Guide Index Index Front Panel Connections 12 H High Power over Ethernet 8 I IEEE 802.3at 8 IEEE 802.3az 10 installation precautions 16 transceivers 10 L LED Descriptions LK/ACT 14 PWR 13, 14 Low Power - ZyXEL GS1100-16 | User Guide - Page 24
Index P PD 8 PoE 8 power supplying 8 Power over Ethernet 8 power saving 10 powered device 8 product registration 22 R rack mounting 15 Rear Panel 9 installation 10 removal 11 Troubleshooting Improper Network Cabling and Topology 20 W wall mounting 14 warranty 21 note 22 24 GS1100 Series User's Guide
-
 1
1 -
 2
2 -
 3
3 -
 4
4 -
 5
5 -
 6
6 -
 7
7 -
8
-
9
-
10
-
11
-
12
-
13
-
14
-
15
-
16
-
17
-
18
-
19
-
20
-
21
-
22
-
23
-
24
 |
 |

Quick Start Guide
www.zyxel.com
GS1100 Series
Unmanaged Gigabit Ethernet Switch
Version 1.00
Edition 4, 02/2013
Copyright © 2013 ZyXEL Communications Corporation
User’s Guide