ZyXEL NBG-418N User Guide - Page 68
What You Can
 |
View all ZyXEL NBG-418N manuals
Add to My Manuals
Save this manual to your list of manuals |
Page 68 highlights
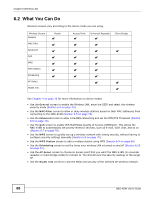
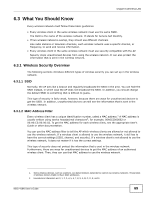
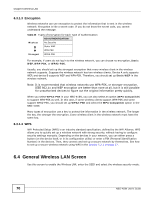
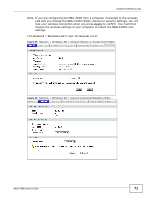
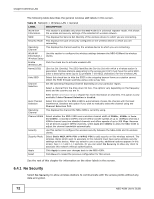
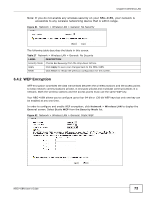
Chapter 6 Wireless LAN 6.2 What You Can Do Wireless screens vary according to the device mode you are using. Wireless Screen General MAC Filter Advanced QoS WPS WPS Station Scheduling AP Select WLAN Info Router Access Point Universal Repeater Client Bridge See Chapter 4 on page 35 for more information on device modes. • Use the General screen to enable the Wireless LAN, enter the SSID and select the wireless security mode (Section 6.4 on page 70). • Use the MAC Filter screen to allow or deny wireless stations based on their MAC addresses from connecting to the NBG-418N (Section 6.5 on page 75). • Use the Advanced screen to allow intra-BSS networking and set the RTS/CTS Threshold (Section 6.6 on page 76). • Use the QoS screen to enable Wifi MultiMedia Quality of Service (WMMQoS). This allows the NBG-418N to automatically set priority levels to services, such as e-mail, VoIP, chat, and so on (Section 6.7 on page 78). • Use the WPS screen to quickly set up a wireless network with strong security, without having to configure security settings manually (Section 6.8 on page 79). • Use the WPS Station screen to add a wireless station using WPS (Section 6.9 on page 80). • Use the Scheduling screen to set the times your wireless LAN is turned on and off (Section 6.10 on page 81). • Use the AP Select screen to choose an access point that you want the NBG-418N (in universal repeater or client bridge mode) to connect to. You should know the security settings of the target AP. • Use the WLAN Info screen to view the SSID and security of the selected AP wireless network. 68 NBG-418N User's Guide
-
 1
1 -
2
-
3
-
4
-
5
-
6
-
7
-
8
-
9
-
10
-
11
-
12
-
13
-
14
-
15
-
16
-
17
-
18
-
19
-
20
-
21
-
22
-
23
-
24
-
25
-
26
-
27
-
28
-
29
-
30
-
31
-
32
-
33
-
34
-
35
-
36
-
37
-
38
-
39
-
40
-
41
-
42
-
43
-
44
-
45
-
46
-
47
-
48
-
49
-
50
-
51
-
52
-
53
-
54
-
55
-
56
-
57
-
58
-
59
-
60
-
61
-
62
-
 63
63 -
 64
64 -
 65
65 -
 66
66 -
 67
67 -
 68
68 -
 69
69 -
 70
70 -
 71
71 -
 72
72 -
 73
73 -
74
-
75
-
76
-
77
-
78
-
79
-
80
-
81
-
82
-
83
-
84
-
85
-
86
-
87
-
88
-
89
-
90
-
91
-
92
-
93
-
94
-
95
-
96
-
97
-
98
-
99
-
100
-
101
-
102
-
103
-
104
-
105
-
106
-
107
-
108
-
109
-
110
-
111
-
112
-
113
-
114
-
115
-
116
-
117
-
118
-
119
-
120
-
121
-
122
-
123
-
124
-
125
-
126
-
127
-
128
-
129
-
130
-
131
-
132
-
133
-
134
-
135
-
136
-
137
-
138
-
139
-
140
-
141
-
142
-
143
-
144
-
145
-
146
-
147
-
148
-
149
-
150
-
151
-
152
-
153
-
154
-
155
-
156
-
157
-
158
-
159
-
160
-
161
-
162
-
163
-
164
-
165
-
166
-
167
-
168
-
169
-
170
-
171
-
172
-
173
-
174
-
175
-
176
-
177
-
178
-
179
-
180
-
181
-
182
-
183
-
184
-
185
-
186
-
187
-
188
-
189
-
190
-
191
-
192
-
193
-
194
-
195
-
196
-
197
-
198
-
199
-
200
-
201
-
202
-
203
-
204
-
205
-
206
-
207
-
208
-
209
-
210
-
211
-
212
-
213
-
214
-
215
-
216
-
217
-
218
-
219
-
220
-
221
-
222
-
223
-
224
 |
 |